SolarVenti Standard (SV) Wall Installation Manual
|
|
|
- Ingelise Holst
- 8 år siden
- Visninger:
Transkript

1 SolarVenti Standard (SV) Wall Installation Manual Wand Installationsanleitung Wall Manuel d installation Wall Manual de instalación Zed - Montážní instrukce Væg Installationsvejledning Wall Monteringsanvisning Wall Installationsinstruktioner Seinäsarjan asennusohje tv. 3.58

2

3 General information General information (*) Check reference on page 18 Weitere Erläuterungen siehe Seite 19 Se noter på side 23 Reportez vous à la page 20 Se merknader på side 24 Comprobar referencias en el pagina 21 Se anmärkningarna på sidan 25 Další informace naleznete na straně 22 Katso ohjeet sivulta 26 SolarVenti EMA 2014

4 I. Collector Assembly... 1 I.I SV3 & SV7 I.II SV14, SV20 & SV30 Zusammenbau des Kollektors Collecteur Montage Montage del colector Montáž kolektoru Samling af luftsolfangerpanel Samling av luftsolfangerpanelet Samling av luftsolfångare panel Keräimen asennus II. Wall Mounting Kit... 3 Wandmontage Set French title Spanish title Montážní sada na zed Vægsæt Norwegan title swedish title Seinäkiinnityssarja III. Angle Wall Mounting Kit... 7 Winkelset Winkelset Kit angular Sada se zaúhlením Vinkelmontagesæt til væg norwegan title swedish title Kulma-asennus seinään III.I Stand Assembly. 9 Zusammenbau der Winkel Samling af vinkelstativer French title Norwegan title Spanish title Swedish title Skládání stojanu na zed Telineen asennus IV. Ventilation Kit Belüftungsset Belüftungsset Kit de ventilación Ventilační sada Ventilationssæt norwegan title swedish title Ilmanvaihdon asennussarja SolarVenti EMA 2014

5 V. Switch Ein-/Ausschalter French title Spanish title Vypínač Afbryder/Kontakt Norwegan title swedish title Katkaisin VI. Regulator Komfortregler Komfortregler Regulador Regulátor Regulator norwegan title swedish title Säädin VII. Additional installation tips...18 Weitere Montage-Tipps...19 Komfortregler...20 Más consejos para la instalación...21 Další instalační tipy...22 Yderligere tips til installationen...23 Norwegan title...24 Swedish title...25 Lisää vinkkejä asennukseen...26 (*) SolarVenti EMA 2014

6 I. Collector Assembly I. Collector Assembly SV3 & SV7 PV-cell [mm] SV3 SV7 I II III IV V PV Cell 303x180 6 W 350x W SolarVenti 1

7 I. Collector Assembly I. Collector Assembly SV14, SV20 & SV30 SV14 SV20 SV30 I II III IV V [mm] PVcell 350x W 350x W 555x W SolarVenti 2

8 II. Wall Mounting Kit II. Wall Mounting Kit SolarVenti 3

9 II. Wall Mounting Kit 1 [mm] I II III IV SV SV SV SV SV SolarVenti 4

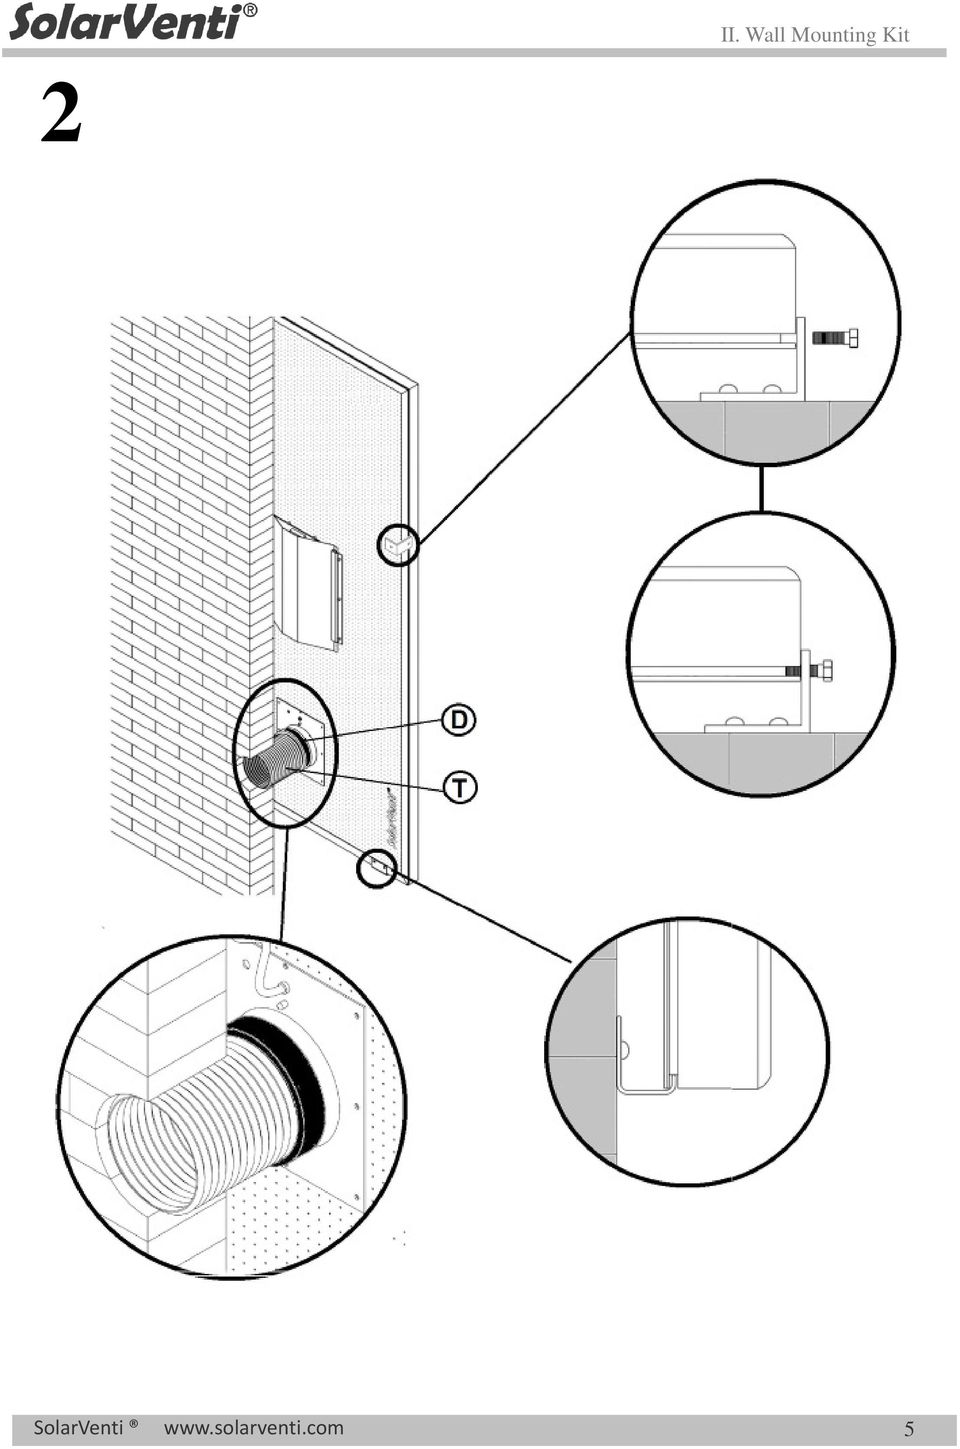
10 II. Wall Mounting Kit 2 SolarVenti 5
11 II. Wall Mounting Kit 3 (*) SolarVenti 6

12 III. Angle Wall Mounting Kit III. Angle Wall Mounting Kit SolarVenti 7

13 III. Angle Wall Mounting Kit SolarVenti 8

14 III.I Stand Assembly III.I Stand Assembly SolarVenti 9

15 III.I Stand Assembly SV7-14 SV20-30 y Option 1 Option 2 (*) SolarVenti 10

16 III.I Stand Assembly 1 [mm] I SV3 600 SV7 SV14 SV20 SV SolarVenti 11

17 III.I Stand Assembly 2 SolarVenti 12

18 III.I Stand Assembly (*) SolarVenti 13

19 III.I Stand Assembly 3 (*) SolarVenti 14

20 IV. Ventilation Kit IV. Ventilation Kit COOLING EXTRACTION (*) SolarVenti 15

21 V. Switch V. Switch SolarVenti 16
22 VI. Regulator VI. Regulator SolarVenti 17
23 Installation manual for mounting SV standard to the wall Additional installation tips VII. Further installation tips INTRO Optimal airflow: In a leaky building there is no need for an exhaust/pressure valve. However, a valve for air outlet should be installed in a very tight building. As far as possible inject the air into the driest room and extract from the most humid room to eliminate the risk of leading the moisture through the rest of the building. TOOLS The hole: Drilling through a wall can be challenging and the tools needed to make the hole will depend on the material of the wall. Contact your local SolarVenti installer for further advice regarding the drilling and the installation. Take care not to drill into cables, power sockets, etc. The optimal diameter of the hole is Ø133 mm on the inside and Ø140 mm on the outside. However, it is possible to use a diameter of Ø135 mm both inside and outside. p. 6, 14, 15 Cable: The cable of the Solar Air Collector may either go through the hole of the air inlet as shown above or a separate 6-8 mm hole may be drilled in the position desired. p. 10 Stands: Drill two holes in each rack and mount them to the wall with suitable screws. p. 11 The plastic strips (Jv) are to be tightened around the flexible hose (Iv) approximately in the middle of the armaflex fitting (Dv). p. 15 COOLING is used to blow external non-preheated air into the building and EXTRACTION helps the airflow of the SV-system. SolarVenti 18
24 Installationsanleitung für SolarVenti Standard Modell Weitere Montage-Tipps VII. Further installation tips ALLGEMEINES Optimale Luftverteilung: Bei einem undichten Gebäude ist ein Absaugset/ Druckventil nicht nötig. In einem dichten Gebäude muss jedoch eine Entlüftung (Absaugset/Druckventil) installiert werden. Der Lufteinlass muss möglichst immer in dem trockensten Raum platziert werden und die Entlüftung immer im feuchtesten Raum. WERKZEUG Das Loch: Welche Werkzeuge für die Bohrung durch eine Wand benötigt werden, hängt von der Beschaffenheit ab. Die Bohrung kann sich als schwierig erweisen. Sind Sie unsicher bezüglich der Bohrung oder Installation eines SolarVentis, ist die Installation durch einen SolarVenti Fachbetrieb durchzuführen. Stellen Sie sicher, dass Sie nicht in Kabel u.ä. bohren. Der optimale Durchmesser des Loches im Innenraum beträgt Ø133 mm und an der Außenwand Ø140 mm. Haben Sie nur einen Bohraufsatz, können Sie stattdessen Ø135 mm sowohl für den Innenund Außenbereich benutzen. S. 6, 14, 15 Kabelführung: Das Kabel des Warmluftkollektors kann entweder durch das Loch der Zuluft geführt werden oder durch ein separates Loch Ø 6-8 mm. S. 10 Wandgestelle: Bohren Sie zwei Löcher in die jeweiligen Wandgestelle und befestigen Sie die Gestelle mit passenden Schrauben. S. 13 Befestigen Sie Die Kabelbinder (JV) um den Luftschlauch (Iv) mittig auf dem Armaflex-Streifen (DV). S. 17 COOLING (Die Kühlfunktion) kann ab einer gewissen Raumtemperatur unerwärmte Außenluft in das Gebäude einblasen. EXTRACTION (Die Absaugfunktion) hilft die optimale Luftverteilung im Gebäude zu schaffen. SolarVenti 19
25 VII. Further installation tips Basement Installation manual Further Installation Tips INTRO Blow into dry room: As far as possible the air inlet must always be installed in the most dry room and the outlet in the room containing most humidity. In this way you don t risk the humid air to spread through the entire basement. K vs. Standard: All measurements in this manual are fitting to the SolarVenti (K) models. The measurements DO NOT fit to the standard SolarVenti air collectors (SV14, SV20, SV30). TOOLS The wall of the basement: It can be challenging to drill through the wall of a basement. Furthermore the tools, which are needed, depend on the consistency of the wall. E.g. you can risk loose insulation in the cavity dam, which you have to secure before drilling. Contact your local SolarVenti installer for further advices regarding the drilling and installation of a SolarVenti. The hole: Make sure that you don t drill into cables etc. The centre of the air inlet must be minimum 100 mm below the ceiling. The optimal diameter of the indoor hole is Ø133 mm and Ø140 mm for the outdoor hole. If you only have one drilling bit, you can use Ø140 mm for both the indoor and outdoor hole. Screws: We don t provide screws for mounting the air collector to the wall. p. 6, 12, 18, 20 Cable: The cable of the Solar Air Collector can either go through the hole of the air inlet as shown above or can be drilled as a separate 6-8 mm hole, which can be placed wherever you like. p. 8 Insulation: Insulation of the pipe is needed. Get the insulation in a building supply store or buy an insulation matt and aluminium cover from SolarVenti. p. 8, 14 Stands: Drill two holes in every stand and mount them to the wall with screws fitting to the construction of the wall. p. 10 Angle: Find the referencepoint which indicates the place of the fan on the Solar Air Collector. Mark the triangle on the wall. The gray triangle is the possible area, where the air inlet hole will be placed. The drilling can be made within this area. (If an Extra Extension Kit is used as an add on the max. length of the triangle will be 2010 mm instead of 1010 mm) If you use the whole length of the pipe G, you need to drill the hole on the bottom line. Whereas you drill a hole inside the grey field, you need to cut the pipe. SolarVenti 20
26 VII. Further installation tips SV-Standar Manual de instalación Más consejos para la instalación INTRO TOOLS Entrada de aire: En la medida de lo posible, la entrada de aire siempre debe estar instalada en el cuarto más seco y la salida en la sala que contiene más humedad. Taladrar en la pared o tejado puede ser un reto. Las herramientas necesarias dependen de la consistencia de la pared/tejado. Póngase en contacto con su instalador SolarVenti local para obtener más consejos en cuanto a la perforación Perforación: Asegúrese de que NO HAY cables ni tuberias en la zona a perforar. El diámetro óptimo para el agujero es; interior Ø133 mm y exterior Ø140 mm. Si sólo tiene un kit de perforación, puede utilizar Ø135 mm para el interiory exterior. Tornillos: Los tornillos solo se proporcionanpara el montaje de collector en un tejado. Con estructura de madera. p. 6, 12, 18 p. 9, 14 p. 15 Cable: El cable del colector puede o bien ir por el orificio de entrada de aire o puede ser perforado en el lugar mas conveniente, como un agujero de 6.8 mm. Soportes: perforar dos agujeros para cada soporte y montar con tornillos y tacos adecuados para la pared/tejado. Tejado ondulado: Use las almohadillas de presión (X2). Evite goteras: la entrada de aire (W) debe estar perfectamente acoplado al tejado y sin burbujas. Su parte superior debe ir cubierta por la teja de arriva. Los bordes laterales deben terminar en una ola subducente. Puede que haya que cortar (W) para que sus bordes laterales coincidan con una ola subducente. Tejados sin ondulacion: Use las almohadillas de presion (X1). Evite goteras: Antes de fijar la entrada de aire (W) al tejado, poner pegamento en su parte trasera (en el marco de la cinta blanca). La entrada de aire (W) debe estar fijada al tejado en no mas de 2-5 min. sin burbujas. Una vez (W) ha sido fijada en la posicion correcta, poner pegamento alrededor de todo el borde para sellarlo aun mejor. p. 17 p. 11, 17 p. 19 Cableado impermeabilizado: Pasar el cable entre el aislamiento flexible (Iv) y el aluflex (T) e introducirlo a través de un pequeño agujero hecho en la entrada de aire (W). Este agujero debe quedar cubierto por Iv al final de la instalación. Deje una parte del cable (5-10 cm) salir de la manguera flexible cerca del colector de aire, para que el agua pueda drenar desde el cable. Por ultimo ponga pegamento alrededor del cableado en la entrada de aire (W), para impermiavilizar el pequeño agujero. Coloque el accesorio Armaflex (Dv) alrededor de la tubería Aluflex y el cable recuerde que el aislamiento flexible debe cubrir el cableado y agujeroen (W). Las bridas (Jv) son para ser apretado alrededor del aislamiento flexible (Iv) aproximadamente en el centro del accesorio Armaflex (Dv). COOLING Introduce aire fresco exterior en el recinto EXTRACTION Extrae el aire del recinto (ayudando a la entrada de aire caliente)- SolarVenti 21
27 VII. Further installation tips Standardní montážní instrukce Další montážní tipy INTRO Optimální objemový průtok vzduchu. U budov, které nejsou zcela hermeticky uzavřené není potřeba další odtah. Nainstalujte však odtah u velmi utěsněných budov. Talířový ventil, přes který se vzduch vhání dovnitř by měl být umístěn v nejsušší místnosti a ventil na odtah naopak v nejvlhčí místnosti jinak by docházelo k rozhánění vlhkosti do zbytku budovy. NÁŘADÍ Otvor do zdi: Nářadí k tomuto účelu je speciální dle materiálu a složení zdi. Zeptejte se svého prodejce či technika, pokud si přejete rady s vrtání otvoru. Zajistěte, aby v místě prostupu nevedly žádné kabely či zásuvky. Lze využít korunkový vrták s průměrem Ø mm. s. 6, 14, 15 Kabel: Kabel z panelu je možné protáhnout přímo skrz prostupové potrubí, anebo pro něj vyvrtat zvláštní díru 6-8 mm dle Vašich potřeb. s. 10 Stativy: Postupujte dle instrukcí na str. 11. Vyvrtejte dvě dírky v každém z dlouhých hliníkových stativů (Ev3) a upevněte je vhodnými šrouby do zdi. Pak teprve složte stativy, už přímo na zdi. s. 13 Stahovací pásky (Jv) je třeba utáhnout kolem flexihadice(lv) zhruba uprostřed (Dv). s. 17 COOLING (chladící systém) může vhánět neohřátý venkovní vzduch do budovy a EXTRACTION (odtah) pomáhá s optimálním prouděním/nasměrováním vzduchu. SolarVenti 22
28 VII. Further installation tips Installationsvejledning til vægmontage Yderligere tips til installationen INTRO Optimal luftflow. Ved en utæt bygning er der ikke behov for en udsugning/ trykventil. Installer dog en ventil til luftudstrømning i en meget tæt bygning. Indblæsningen skal så vidt muligt ske i bygningens tørreste rum og udsugningen fra det fugtigste rum ellers risikerer man at presse fugten ud i resten af bygningen. VÆRKTØJ Hullet: At bore et hul gennem væggen kan være vanskeligt. Dertil kommer, at værktøjet, der skal bruges til at lave hullet, afhænger af murens beskaffenhed. Få råd og vejledning hos din lokale SolarVenti installatør, hvis du er i tvivl om installationen. Sørg for, at der ikke er nogen ledninger, stikkontakter e.l., hvor boringen skal foretages. Den optimale diameter af hullet er Ø133 mm på indersiden og Ø140 mm på ydersiden. I tilfælde af, at du kun har en borekrone, kan du dog bruge Ø135 mm til både det indvendige og udvendige hul. s. 6, 14, 15 Kabel: Luftsolfangerens kabel kan enten føres igennem indblæsningshullet eller der kan bores et separat 6-8 mm hul, som placeres efter ønske. s. 10 Stativer: Følg først instruktioner på s. 11. Bor så to huller i hver af de lange aluminiumsstænger (Ev3) og fastgør dem med passende skruer på væggen. Saml først herefter stativerne færdig på væggen. s. 13 Plaststripsene (Jv) skal strammes rundt om flexslangen (Iv) ca. midt på (Dv). s. 17 COOLING (køling-systemet) kan blæse uopvarmet udendørsluft ind i bygningen og EXTRACTION (udsugningen) hjælper med at skabe den optimale luftflow. SolarVenti 23
29 VII. Further installation tips Kælder Installationsvejledning Yderligere tips til installationen INTRO Blæs ind i det tørre rum. Indblæsningen skal så vidt muligt ske i det tørreste rum og udsugning fra det fugtigste rum i kælderen ellers risikerer man at presse fugten ud i kældervæggene. K vs. Standard: Alle mål angivet i denne montagevejledning gælder for SolarVenti (K) kældermodeller. Målene dækker IKKE vores standard SolarVenti luftsolfangere (SV14, SV20, SV30). TOOLS Kældervægge kan være vanskelige at bore i og værktøjet, der skal bruges til at foretage boringen afhænger af murens beskaffenhed. Du kan bl.a. risikere, at der er løs isolering i hulmuren, som du skal sikre yderligere. Få råd og vejledning hos din lokale SolarVenti installatør, hvis du er i tvivl om installationen. Hullet: Sørg for, at der ikke er nogen ledninger, stikkontakter e.l., hvor boringen skal foretages. Indblæsningshullets centrum skal være mindst 100 mm under kælderens loftshøjde. Den optimale diameter af hullet er Ø133 mm på indersiden og Ø140 mm på ydersiden. I tilfælde af, at du kun har en borekrone, kan du dog bruge Ø140 mm til både det indvendige og udvendige hul. Skruer: Skruer til fastgørelse i væggen følger ikke med. p. 6, 12, 18, 20 Kabel: Luftsolfangerens kabel kan enten føres igennem indblæsningshullet, som vist ovenfor, eller der kan bores et separat 6-8 mm hul, som placeres efter ønske. p. 8 Isolering: Isolering af røret er nødvendig. Tilkøb af isoleringsmåtte og aluinddækning muligt. p. 8, 14 Stativer: Bor to huller i hvert stativ og fastgør med passende skruer. p. 10 Vinkel: Find punktet som svarer til luftsolfangerens studs. Tegn trianglen op på væggen. Den grå markerede triangel er det mulige område for indblæsningshullets placering. Boringen kan foretages indenfor dette område. (Er der tilkøbt et kælderforlængersæt, bliver max længden 2010 mm i stedet for 1010 mm) Bruger du hele længden af røret G skal du bore hullet et sted på den nederste linje. Borer du et hul indenfor det grå markerede felt, vil du blive nød til at skære røret til. SolarVenti 24

30 VII. Further installation tips Basement Installation manual Further Installation Tips INTRO Blow into dry room: As far as possible the air inlet must always be installed in the most dry room and the outlet in the room containing most humidity. In this way you don t risk the humid air to spread through the entire basement. K vs. Standard: All measurements in this manual are fitting to the SolarVenti (K) models. The measurements DO NOT fit to the standard SolarVenti air collectors (SV14, SV20, SV30). TOOLS The wall of the basement: It can be challenging to drill through the wall of a basement. Furthermore the tools, which are needed, depend on the consistency of the wall. E.g. you can risk loose insulation in the cavity dam, which you have to secure before drilling. Contact your local SolarVenti installer for further advices regarding the drilling and installation of a SolarVenti. The hole: Make sure that you don t drill into cables etc. The centre of the air inlet must be minimum 100 mm below the ceiling. The optimal diameter of the indoor hole is Ø133 mm and Ø140 mm for the outdoor hole. If you only have one drilling bit, you can use Ø140 mm for both the indoor and outdoor hole. Screws: We don t provide screws for mounting the air collector to the wall. p. 6, 12, 18, 20 Cable: The cable of the Solar Air Collector can either go through the hole of the air inlet as shown above or can be drilled as a separate 6-8 mm hole, which can be placed wherever you like. p. 8 Insulation: Insulation of the pipe is needed. Get the insulation in a building supply store or buy an insulation matt and aluminium cover from SolarVenti. p. 8, 14 Stands: Drill two holes in every stand and mount them to the wall with screws fitting to the construction of the wall. p. 10 Angle: Find the reference point which indicates the place of the fan on the Solar Air Collector. Mark the triangle on the wall. The gray triangle is the possible area, where the air inlet hole will be placed. The drilling can be made within this area. (If an Extra Extension Kit is used as an add on the max. length of the triangle will be 2010 mm instead of 1010 mm) If you use the whole length of the pipe G, you need to drill the hole on the bottom line. Whereas you drill a hole inside the grey field, you need to cut the pipe. SolarVenti 25
31 VII. Further installation tips Seinäsarjan asennusohje Lisää vinkkejä asennukseen ESITTELY Ihanteellinen ilmavirta: Mikäli rakennuksessa vetää, tarvetta pako- / paineventtiilille ei ole. Venttiili tulee asentaa mikäli rakennus on tiivis. Mikäli mahdollista, ohjaa ilma kuivimpaan huoneeseen ja poista se kosteimman huoneen kautta. Näin vältetään kosteuden leviäminen rakennukseen. TYÖKALUT Reiät: Seinän läpi poraaminen saattaa olla haasteellista ja tarvittavat työkalut riippuvat seinän materiaalista. Ota tarvittaessa yhteyttä paikalliseen SolarVentin asentajaan saadaksesi tarkempaa tietoa asennuksesta. Varo poraamasta sähköjohtoihin, pistorasioihin jne. Reiän halkaisijan optimaalinen koko on Ø133 mm sisällä ja Ø140 mm ulkona. Ø135 mm halkaisijaa voidaan käyttää sekä sisällä että ulkona. s. 6, 14, 15 Johto: Aurinkokeräimen johto voidaan viedä tuloaukon kautta kuten yläpuolellatai sille voidaan porata erillinen 6-8 mm reikä haluttuun kohtaan. s. 10 Tuet: Poraa kaksi reikää jokaiseen telineeseen ja kiinnitä ne seinään sopivilla ruuveilla. s. 13 Nippusiteet: Kiristä kurttuputki (lv) nippusiteiden (Jv) avulla suunnilleen Armaflextiivisteiden (Dv) puoleenväliin. s. 17 VIILENNYS käytetään puhaltamaan lämmittämätöntä ilmaa rakennukseen ja POISTO tehostaa SV-järjestelmän ilmavirtausta. SolarVenti 26
32 SolarVenti provides a healthy indoor climate in your basement Avoid humidity Avoid stale smell Avoid mould and fungus Local dealer / installer: Produced in Denmark SolarVenti A/S Fabriksvej 8 DK Thorsø Tlf /
SolarVenti Standard (SV) Roof Installation Manual
 Roof Installation Manual") SolarVenti Standard (SV) Roof Installation Manual Dach Installationsanleitung Roof Manuel d installation Roof Manual de instalación Roof Instalační manuál Tag Installationsvejledning Roof Monteringsanvisning
SolarVenti Standard (SV) Roof Installation Manual Dach Installationsanleitung Roof Manuel d installation Roof Manual de instalación Roof Instalační manuál Tag Installationsvejledning Roof Monteringsanvisning
SolarVenti Standard (SV) Wall Installation Manual
 Wall Installation Manual") SolarVenti Standard (SV) Wall Installation Manual Wand Installationsanleitung Wall Manuel d installation Wall Manual de instalación Wall Instalační manuál Væg Installationsvejledning Wall Monteringsanvisning
SolarVenti Standard (SV) Wall Installation Manual Wand Installationsanleitung Wall Manuel d installation Wall Manual de instalación Wall Instalační manuál Væg Installationsvejledning Wall Monteringsanvisning
Basement Installation manual
 Basement Installation manual Keller Installationsanleitung Sous sol Manuel d installation Sótano Manual de instalación Suterén instalační manuál Kælder Installationsvejledning Kjeller Monteringsanvisning
SolarVenti Standard (SV) Roof Installation Manual
 Roof Installation Manual") SolarVenti Standard (SV) Roof Installation Manual Dach Installationsanleitung Roof Manuel d installation Roof Manual de instalación Střecha - Montážní instrukce Tag Installationsvejledning Roof Monteringsanvisning
SolarVenti Standard (SV) Roof Installation Manual Dach Installationsanleitung Roof Manuel d installation Roof Manual de instalación Střecha - Montážní instrukce Tag Installationsvejledning Roof Monteringsanvisning
frame bracket Ford & Dodge
 , Rev 3 02/19 frame bracket 8552005 Ford & Dodge ITEM PART # QTY DESCRIPTION 1 00083 8 NUT,.50NC HEX 2 00084 8 WASHER,.50 LOCK 3 14189-76 2 FRAME BRACKET 4 14194-76 1 411AL FRAME BRACKET PASSENGER SIDE
Podia samlevejledning
 Montering af Podia. Assembly of Podia. 1 af 12 Stykliste. Podia er bygget op omkring en Multireol (9 rums) og en Amfi trappe. Dertil består den af en bundplade, to balustre, to afskærmninger, tre madrasser
DIVAR VIGTIGT! / IMPORTANT! MÅL / DIMENSIONS. The DIVAR wall lamp comes standard. with 2.4 m braided cord and a plug in power supply (EU or UK).
.") DIVAR VIGTIGT! / IMPORTANT! VIGTIGT læs vores anvisninger før du bruger produktet. Har du problemer med den elektriske installation, skal du kontakte en elektriker. Sørg for at altid slukke for strømmen
DIVAR VIGTIGT! / IMPORTANT! VIGTIGT læs vores anvisninger før du bruger produktet. Har du problemer med den elektriske installation, skal du kontakte en elektriker. Sørg for at altid slukke for strømmen
Sikkerhedsvejledning
 11-01-2018 2 Sikkerhedsvejledning VIGTIGT! Venligst læs disse instruktioner inden sengen samles og tages i brug Tjek at alle dele og komponenter er til stede som angivet i vejledningen Fjern alle beslagsdele
Læs vejledningen godt igennem, før du begynder at samle vuggen. Please read the instruction carefully before you start.
 00 Samlevejledning på Vugge ssembly instruction for the cradle Læs vejledningen godt igennem, før du begynder at samle vuggen. Please read the instruction carefully before you start. www.oliverfurniture.dk
SAMLEVEJLEDNINGER / COLLECTION GUIDES
 SAMLEVEJLEDNINGER / COLLECTION GUIDES INDHOLDSFORTEGNELSE GENERELT 1 MONTERINGSHULLER 3 ANGLE BORDBEN 5 PIN BORDBEN 9 LINK U - BEN 11 CROSS BUKKE 13 INDEX GENERAL 2 MOUNTING SPOTS 4 ANGLE TABLE LEGS 6
Power Supply 24V 2.1A
 Power Supply 24V 2.1A Strømforsyning 24 V 2,1 A Power Supply 24V 2.1A Stromversorgung 24 V 2,1 A Teknisk brugervejledning Technical User Guide Technische Bedienungsanleitung 2015.04.21 604159 Technical
Brugsanvisning. Installation Manual
 Manual size: 148 x 210 mm 175g copper paper(铜版纸印刷) UNIVERSAL BIL TAGBAGAGEBÆRER Brugsanvisning UNIVERSAL CAR ROOF RACK Installation Manual Model no. 10889 Tak fordi du valgte dette produkt, som vi håber
DIVAR VIGTIGT! / IMPORTANT! MÅL / DIMENSIONS
 DIVAR VIGTIGT! / IMPORTANT! VIGTIGT læs vores anvisninger før du bruger produktet. Har du problemer med den elektriske installation, skal du kontakte en elektriker. Sørg for at altid slukke for strømmen
DANSK INSTALLATIONSVEJLEDNING VLMT500 ADVARSEL!
 DANSK INSTALLATIONSVEJLEDNING VLMT500 Udpakningsinstruktioner Åben indpakningen forsigtigt og læg indholdet på et stykke pap eller en anden beskyttende overflade for at undgå beskadigelse. Kontroller at
highline med ramme with frame mit rahmen
 highline med ramme with frame mit rahmen Hvad er HighLine med ramme? HighLine med ramme er en produktserie bygget omkring det velkendte unidrain system. Udløbshuset og afløbsarmaturet er de samme produkter:
Montage bjælkeklipper BM 5001R Art. No. 112870. Assembly scythe mower BM 5001R Art. No. 112870
 Montage bjælkeklipper BM 5001R Art. No. 112870 Assembly scythe mower BM 5001R Art. No. 112870 Løsdele pose pakket, afdækninger, skaftkonsol, skaft højre og venstre. Lose parts plastic bag, covers, handle
INSTALLATION INSTRUCTIONS STILLEN FRONT BRAKE COOLING DUCTS NISSAN 370Z P/N /308960!
 Materials supplied: 1. (10) Zip Ties 2. (4) Hose Clamps 3. (2) Brake Duct Hose 4. (2) Brake Shields 5. (2) Front Brake Ducts ( Stock Fascia Only ) 6. (2) Washers 1 OD ( Stock Fascia Only ) 7. (8) Shims
FlexiManual Corner. Montagevejledning, Mounting Instructions, Montageanleitung, Tillæg til FlexiManual Manual. Supplement to FlexiManual User Manual
 FlexiManual Corner Montagevejledning, Mounting Instructions, Montageanleitung, Tillæg til FlexiManual Manual Supplement to FlexiManual User Manual Nachtrag zum FlexiManual Benutzerhandbuch PDF 5999 / 01.07.2019
Montage bjælkeklipper BM 870 III Art. No / BM 875 III Art. No
 Montage bjælkeklipper BM 870 III Art. No. 112871 / BM 875 III Art. No. 112872 Assembly scythe mower BM 870 III Art. No. 112871 / BM 875 III Art. No. 112872 Motor og driv enhed. Engine and drive unit. Løsdele
Samlevejledning til tremmeseng 70 x 140 Assembly instruction for cot 70 x 140
 Samlevejledning til tremmeseng 70 x 140 Assembly instruction for cot 70 x 140 Læs vejledningen godt igennem før du begynder. Read the assembly instruction carefully before you start. OLIVER FURNITURE /
Ventilation. Du skal selv være med til at holde din lejlighed sund You are responsible too: keep your apartment healthy
 Ventilation Du skal selv være med til at holde din lejlighed sund You are responsible too: keep your apartment healthy Ventilation Ventilation Din lejlighed er renoveret, for at du skal have et sundt indeklima.
Læg lågen med fronten nedad på et blødt materiale for at beskytte lakken.
 Dansk Deutsch Francais - English Varenr. 51075 Udskiftning af pakning ved glas: Pakken indeholder: 1 stk. Pakning Vejledning: Aduro 4 Er pakningerne blevet hårde og utætte kan de skiftes på følgende måde:
Montageanvisning Assembly instructions. MultiDicer KMD 12, 18
 Montageanvisning instructions MultiDicer KMD 12, 18 2 DK Kongskilde MultiDicer KMD 12 og KMD 18 samles som vist på efterfølgende tegninger. 1. Tegning 121117963 Kongskilde MultiDicer leveres fra fabrikken
Brug sømbrættet til at lave sjove figurer. Lav fx: Få de andre til at gætte, hvad du har lavet. Use the nail board to make funny shapes.
 Brug sømbrættet til at lave sjove figurer. Lav f: Et dannebrogsflag Et hus med tag, vinduer og dør En fugl En bil En blomst Få de andre til at gætte, hvad du har lavet. Use the nail board to make funn
SkyVision Linear Installation manual, comfort _0216, Comfort, Item no Version 02/16
 SkyVision Linear Installation manual, comfort 5.6.07_06, Comfort, Item no. 0606 Version 0/6 Installation Manual VITRAL SkyVision Linear Comfort Trækarme skal altid opbevares tørt/ Wooden upstands must
Assembly Guide Monteringsvejledning. 60/30 - wood end panels
 Assembly Guide Monteringsvejledning 60/30 - wood end panels Wood end panels 1. When installing wood end panels, insert the top fittings into the upper crossbar slots and place the Z brackets over the foot
MAKING MODERN LIVING POSSIBLE. Danfoss Air PC Tool. Installation guide. Danfoss Heating Solutions
 MAKING MODERN LIVING POSSIBLE Danfoss Air Tool Installation guide Danfoss Heating Solutions 1. How to connect your to the Installer: Connection by USB cable (standard mini USB cable) USB cable End user:
SkyVision Comfort Installation manual _0517, Comfort, Item no Version 05/17
 SkyVision Comfort Installation manual 5.6.02_0517, Comfort, Item no. 2022 Version 05/17 Installation Manual VITRAL SkyVision Comfort Trækarme skal altid opbevares tørt/ Wooden upstands must always be kept
Håndbog til kælderen. Privat. Vælg den passende SolarVenti kælderløsning
 Privat Vælg den passende SolarVenti kælderløsning Vers. 12/06/2014 Indhold: Generel information om SolarVenti kælderaffugtning Affugtning af kælderen.3 SolarVenti kældermodellerne..3 SolarVenti kældersæt...3
Fuego. Biopejs / Bio firelight / Bio Feuerstelle. Instruktion / Instructions / Instruktionen
 Fuego Biopejs / Bio firelight / Bio Feuerstelle Instruktion / Instructions / Instruktionen Må kun fyldes hertil / Fill up to here only / Nur hier befüllen DK DK Læs hele instruktionen igennem inden brug
Brugervejledning / User manual
 Brugervejledning / User manual No. 8700032 Airtracks til hjemmetræning og sport AirTracks for home and sport 2 Indholdsfortegnelse / Index Anbefalinger til brug af airtracks... 4 Sådan pumpes airtracken
Monteringsvejledning (DK) Montering af centralbremse på Panther. Mounting instruction (GB) Mounting central braking system on the Panther
 Montering af centralbremse på Panther. Mounting instruction (GB) Mounting central braking system on the Panther") Monteringsvejledning (K) Montering af centralbremse på Panther Mounting instruction (G) Mounting central braking system on the Panther Montageanleitung () Montage der Zentralbremsessystem für den Panther
Monteringsvejledning (K) Montering af centralbremse på Panther Mounting instruction (G) Mounting central braking system on the Panther Montageanleitung () Montage der Zentralbremsessystem für den Panther
Assembly Instructions. ROLZ-2 Portable AV/Conference Center
 1 Assembly Instructions ROLZ-2 Portable AV/Conference Center Rolz-2 Portable AV/Conference Center Part Drawing Description Qty Part Drawing Description Qty Hardware List A 1 ½ Flat Head Screw 2 EA P-1
Vores mange brugere på musskema.dk er rigtig gode til at komme med kvalificerede ønsker og behov.
 På dansk/in Danish: Aarhus d. 10. januar 2013/ the 10 th of January 2013 Kære alle Chefer i MUS-regi! Vores mange brugere på musskema.dk er rigtig gode til at komme med kvalificerede ønsker og behov. Og
DANSK / ENGLISH DS PRO PROJEKTORBESLAG 180 CM MANUAL DS PRO PROJECTOR BRACKET 180 CM OWNERS MANUAL
 DANSK / ENGLISH DANSK SIDE 1 DS Pro PRO projektorbeslag PROJEKTORBESLAG 180 cm 180 CM Tillykke med dit nye DS Pro projektorbeslag 180 cm. For at opnå det bedste resultat bedes du læse denne manual og udelukkende
Hjælpeværktøj for reparation af 300, 500 og 700 blæserne samt celleføderne CA 30 og 40
 Auxiliary tools Hjælpeværktøj for reparation af 300, 500 og 700 blæserne samt celleføderne CA 30 og 40 Auxiliary tools for repair of the 300, 500 and 700 blowers as well as the rotary valves CA 30 and
ALLROUND 360 ONE 360 ONE SOFT SQUARY BLOCKY OWI TUBO EASY B75 EASY B100
 ALLROUND 360 ONE 360 ONE SOFT SQUARY BLOCKY OWI TUBO EASY B75 EASY B100 Since the dawn of time, man has depended on the existence of light. The sun forced darkness to retreat into the shadows and made
The art of heating. Hudevad Plan XV. Installation guide Monteringsvejledning Montageanleitung. EN ini.3s /0
 The art of heating Hudevad Plan XV Installation guide Monteringsvejledning Montageanleitung 1 Languages Sprog Sprache EN... 4 DK... 6 DE... 8 Tools Værktøj Werkzeug Tools needed for installation Nødvendigt
- The knowledge to make a difference
 - The knowledge to make a difference TILLYKKE MED DIT NYE AKVARIUM Denne vejledning vil hjælpe dig let gennem opstilling og samling af dit nye MOVE akvarium. Vi anbefaler du læser vejledningen grundigt
DK - Vejledning ENG - Instruction manual x 532 mm 758 x 532 mm
 DK - Vejledning ENG - Instruction manual 1158 x 532 mm 758 x 532 mm DK - Læs monteringsanvisningen nøje igennem før montage/anvendelse. Kontrollere at alle dele er i pakken før montering. Kontakt forhandler
Slot diffusers. Slot diffusers LD-17, LD-18
 LD-17, LD-18 Application LD-17 and LD-18 are designed for supply of cold or warm air in rooms with a height between. m and 4 m. They allow easy setting of air deflectors for different modes of operation
E-PAD Bluetooth hængelås E-PAD Bluetooth padlock E-PAD Bluetooth Vorhängeschloss
 E-PAD Bluetooth hængelås E-PAD Bluetooth padlock E-PAD Bluetooth Vorhängeschloss Brugervejledning (side 2-6) Userguide (page 7-11) Bedienungsanleitung 1 - Hvordan forbinder du din E-PAD hængelås med din
DK - Quick Text Translation. HEYYER Net Promoter System Magento extension
 DK - Quick Text Translation HEYYER Net Promoter System Magento extension Version 1.0 15-11-2013 HEYYER / Email Templates Invitation Email Template Invitation Email English Dansk Title Invitation Email
FUTURA. H x 6. Minst två personer krävs för att sätta upp det här staketet. Det skal være minst to personer ved montering av dette gjerdet.
 FUTURA Der skal være min. 2 personer til opstilling af dette hegn. Minimum two people are needed to set up this fence. Es werden mindestens 2 Personen für das Aufstellen dieses Zauns benötigt. Compter
VEDLIGEHOLDELSE AF SENGE
 DK VEDLIGEHOLDELSE AF SENGE VEDLIGEHOLDELSE AF SENGE Sengen er typisk det møbel i hjemmet som bruges i flest timer gennem døgnet. Det betyder at sengen udsættes for et stort slid, og det er derfor vigtigt
Varenr.: 553925 90 højre 553926 90 venstre 554027 90º højre med coating 554028 90º venstre med coating
 DK GH Skiftespor Varenr.: 55395 90 højre 55396 90 venstre 55407 90º højre med coating 55408 90º venstre med coating 553991 60º højre 553995 60º venstre 551058 60º højre med coating 551059 60º venstre med
TM4 Central Station. User Manual / brugervejledning K2070-EU. Tel Fax
 TM4 Central Station User Manual / brugervejledning K2070-EU STT Condigi A/S Niels Bohrs Vej 42, Stilling 8660 Skanderborg Denmark Tel. +45 87 93 50 00 Fax. +45 87 93 50 10 info@sttcondigi.com www.sttcondigi.com
Montering af læsseudstyr Mounting of Loading Equipment. SupraVac 2000
 Montering af læsseudstyr Mounting of Loading Equipment SupraVac 2000 DK Montering af læsseudstyr på SupraVac 2000 Det er vigtigt, at læsseudstyret monteres og justeres som angivet nedenfor. Forkert justering
Monteringsvejledning (DK) Montering af bord, armlæn til bord og legetøjsbøjle. Monteringsanvisning (SV) Montering av bord
 Montering af bord, armlæn til bord og legetøjsbøjle. Monteringsanvisning (SV) Montering av bord") Monteringsvejledning (K) Montering af bord, armlæn til bord og legetøjsbøjle Monteringsanvisning (SV) Montering av bord Monteringsveiledning (N) Montering av bord, armlener til bord og leketøysbøyle Mounting
Monteringsvejledning (K) Montering af bord, armlæn til bord og legetøjsbøjle Monteringsanvisning (SV) Montering av bord Monteringsveiledning (N) Montering av bord, armlener til bord og leketøysbøyle Mounting
how to save excel as pdf
 1 how to save excel as pdf This guide will show you how to save your Excel workbook as PDF files. Before you do so, you may want to copy several sheets from several documents into one document. To do so,
MS-H280-Pro Magnetic Stirrer
 MS-H280-Pro Magnetic Stirrer www..com Copyright: No part of this manual may be reproduced or transmitted without prior written permission of. VERSION201407 CONTENTS Chapter 1: Working Principle... 3 1
Trin 1 Opstart af montage. Udsparingsmål kontrolleres. Mål på udsparinger udføres iht. nedenstående tabel.
 FutureVent Mounting instruction Ventilation row (WFV), Insolation box (WFB), Regenerator (WFR), Control unit (WFC), Drip edge (WFD), Outdoor screen (WFS), Mounting frame (WFF) & Indoor grill (WFG) DK Montagevejledning
DOL 15 SENSOR. DA Teknisk brugervejledning. EN Technical user s guide. DE Technisches Bedienungsanleitung.
 DOL 15 SENSOR DA Teknisk brugervejledning EN Technical user s guide DE Technisches Bedienungsanleitung www.dol-sensors.com DA TEKNISK BRUGERVEJLEDNING 1 Produktbeskrivelse DOL 15 er en universel fuldelektronisk
Mandara. PebbleCreek. Tradition Series. 1,884 sq. ft robson.com. Exterior Design A. Exterior Design B.
 Mandara 1,884 sq. ft. Tradition Series Exterior Design A Exterior Design B Exterior Design C Exterior Design D 623.935.6700 robson.com Tradition Series Exterior Design A w/opt. Golf Cart Garage Exterior
Bjælkesko Type U. Beam shoes Type U. Balkenschuhe Typ U DK UK D
 DK UK D Anvendelse: Bjælkesko anvendes til samling af bjælker og bjælkelag i samme plan, såvel træ mod træ, som træ mod beton eller murværk. Beslagene: Er udført i 2 mm varmforzinket stålplade og forsynet
DET KONGELIGE BIBLIOTEK NATIONALBIBLIOTEK OG KØBENHAVNS UNIVERSITETS- BIBLIOTEK. Index
 DET KONGELIGE Index Download driver... 2 Find the Windows 7 version.... 2 Download the Windows Vista driver.... 4 Extract driver... 5 Windows Vista installation of a printer.... 7 Side 1 af 12 DET KONGELIGE
Mandara. PebbleCreek. Tradition Series. 1,884 sq. ft robson.com. Exterior Design A. Exterior Design B.
 Mandara 1,884 sq. ft. Tradition Series Exterior Design A Exterior Design B Exterior Design C Exterior Design D 623.935.6700 robson.com Tradition OPTIONS Series Exterior Design A w/opt. Golf Cart Garage
frame bracket Dodge Ram x2 & 4x4 (Includes Mega Cab) (6-1/2 & 8 Boxes)
 (6-1/2 & 8 Boxes)") , Rev 4 03/19 frame bracket 8551006 Dodge Ram 3500 4x2 & 4x4 (Includes Mega Cab) (6-1/2 & 8 Boxes) ITEM PART # QTY DESCRIPTION 1 00248 4 WASHER,.625 SPRING LOCK 2 00291 4 NUT,.625NC HEX 3 00477 4 WASHER,.625
, Rev 4 03/19 frame bracket 8551006 Dodge Ram 3500 4x2 & 4x4 (Includes Mega Cab) (6-1/2 & 8 Boxes) ITEM PART # QTY DESCRIPTION 1 00248 4 WASHER,.625 SPRING LOCK 2 00291 4 NUT,.625NC HEX 3 00477 4 WASHER,.625
Boligsøgning / Search for accommodation!
 Boligsøgning / Search for accommodation! For at guide dig frem til den rigtige vejledning, skal du lige svare på et par spørgsmål: To make sure you are using the correct guide for applying you must answer
Bredgaard Bådeværft ApS
 Bredgaard Bådeværft ApS Velkommen til BREDGAARD BÅDEVÆRFT APS - et af Danmarks førende bådværfter indenfor glasfiberfartøjer. Vi tilbyder et bredt sortiment af glasfiberbåde - lige fra erhvervsfiskefartøjer
External Communication Box
 External Communication Box Manual 12 Kamstrup A/S Industrivej 28, Stilling DK-8660 Skanderborg TEL: +45 89 93 10 00 FAX: +45 89 93 10 01 E-MAIL: info@kamstrup.com WEB: www.kamstrup.com 2 Contents Introduction
Manual Transmission Remove and Install (2,0 DOHC 8V Engine) ( ) Remove
 ( ) Remove") Manual Transmission Remove and Install (,0 DOHC 8V Engine) (6 4 0) Workshop Equipment Transmission jack Materials Brake fluid (Super Dot 4) ESD-M6C57-A Remove. Standard preparatory measures: Make a note
Manual Transmission Remove and Install (,0 DOHC 8V Engine) (6 4 0) Workshop Equipment Transmission jack Materials Brake fluid (Super Dot 4) ESD-M6C57-A Remove. Standard preparatory measures: Make a note
ROTERENDE TABURET 360 GRADER MED HYL Brugsanvisning. ROTATING SHOWER STOOL WITH TRAY Installation Manual. Size: 148 x 210 mm 105g copper paper
 Size: 148 x 210 mm 105g copper paper ROTERENDE TABURET 360 GRADER MED HYL Brugsanvisning ROTATING SHOWER STOOL WITH TRAY Installation Manual Model. 10853 1. Fjern emballagen. 2. Taburettens ben samles
Diamond Core Drilling
 Diamond Core Drill ZIZ-250Pro Product Description Diamond core drill is a tool used for drilling holes on reinforced concrete, rocks and fire-proof materials. It features in high-efficiency, smooth and
Project Step 7. Behavioral modeling of a dual ported register set. 1/8/ L11 Project Step 5 Copyright Joanne DeGroat, ECE, OSU 1
 Project Step 7 Behavioral modeling of a dual ported register set. Copyright 2006 - Joanne DeGroat, ECE, OSU 1 The register set Register set specifications 16 dual ported registers each with 16- bit words
Frame System Part Numbers
 52 FRAMES Frame System Part Numbers Square Corner Part Numbers Round Corner Part Numbers White Black Almond Gray Brown Navy Taupe Black Almond Gray Brown Sizes Insert (not included) 2 x 4 1 59 / 64 x 3
flowiq & MULTICAL 21 External antenna
 Installation and User Guide flowiq & MULTICAL 21 External antenna English - Deutsch - Dansk Kamstrup A/S Industrivej 28, Stilling DK-8660 Skanderborg T: +45 89 93 10 00 info@kamstrup.com kamstrup.com Contents
F x 4 D x 2. M x 4 4,8 x 16. A x 14 5 x 35. Revideret juli 2017 AKKU. xxv
 19630-1 A x 14 M x 4 4,8 x 16 F x 4 D x 2 Revideret juli 2017 1 Vedligeholdelse: Plankerne leveres ubehandlet. Vi anbefaler at give plankerne en sæbebehandling eller træolie. Med træplejemidler sikrer
DK Tillykke med deres nye høj glans møbel. Det møbel som De netop har købt, er et møbel hvor overfladen er høj glans. Alt som placeres på dette møbel
 DK Tillykke med deres nye høj glans møbel. Det møbel som De netop har købt, er et møbel hvor overfladen er høj glans. Alt som placeres på dette møbel skal være beskyttet under bunden med filt eller lign.
FlexiElectric Corner. Montagevejledning, Mounting Instructions, Montageanleitung, Tillæg til FlexiElectric Manual
 FlexiElectric Corner Montagevejledning, Mounting Instructions, Montageanleitung, Tillæg til FlexiElectric Manual Supplement to FlexiElectric User Manual Nachtrag zum FlexiElectric Benutzerhandbuch PDF
PARALLELIZATION OF ATTILA SIMULATOR WITH OPENMP MIGUEL ÁNGEL MARTÍNEZ DEL AMOR MINIPROJECT OF TDT24 NTNU
 PARALLELIZATION OF ATTILA SIMULATOR WITH OPENMP MIGUEL ÁNGEL MARTÍNEZ DEL AMOR MINIPROJECT OF TDT24 NTNU OUTLINE INEFFICIENCY OF ATTILA WAYS TO PARALLELIZE LOW COMPATIBILITY IN THE COMPILATION A SOLUTION
TGP 15 H. Betjeningsvejledning. Texas Power Line Pumper 2003 / 2
 2003 / 2 Betjeningsvejledning Texas Power Line Pumper TGP 15 H Texas Andreas Petersen A/S Knullen 2 DK-5260 Odense S Tlf. 6395 5555 Fax 6395 5558 post@texas.dk - www.texas.dk ADVARSEL - Læs altid betjeningsvejledningen
IBM Network Station Manager. esuite 1.5 / NSM Integration. IBM Network Computer Division. tdc - 02/08/99 lotusnsm.prz Page 1
 IBM Network Station Manager esuite 1.5 / NSM Integration IBM Network Computer Division tdc - 02/08/99 lotusnsm.prz Page 1 New esuite Settings in NSM The Lotus esuite Workplace administration option is
WIO200A INSTALLATIONS MANUAL Rev Dato:
 WIO200A INSTALLATIONS MANUAL 111686-903 Rev. 1.01 Dato: 10.01.2013 Side 1 af 14 Contents Contents... 2 Introduction... 3 Pin assignment of the terminal box connector for customer... 4 Pin assignment of
Thermex Scandinavia A/S CKB 800-1200-2000. Thermex Scandinavia A/S
 Thermex Scandinavia A/S CKB 800-1200-2000 Thermex Scandinavia A/S 1 2 Såfremt Såfremt kondens/lyd kondens/lyd isoleringsboks isoleringsboks anvendes: anvendes: 3 VENTILATOR CKB 800-1200 - 2000 TIL MONTERING
SYSTEM CADO Design by Poul Cadovius, 1960
 SYSTEM CADO Design by Poul Cadovius, 1960 Montagevejledning (DK) ASSEMBLY INSTRUCTION (ENG) Montagevejledning SYSTEM CADO (DK) SYSTEM CADO kan monteres på mange forskellige vægoverflader. Hvis reolen skal
Mit den Steinen vorsichtig umgehen, da vor allem die Ecken und Kanten der Specksteine sehr spröde sind.
 15.09.2011 Montageanleitung zum Einbau der Speck und Speichersteine in Scan-line 820, 830 und 80. Heta empfiehlt, die Montage des Ofens von zwei Personen vorzunehmen. Mit den Steinen vorsichtig umgehen,
Shooting tethered med Canon EOS-D i Capture One Pro. Shooting tethered i Capture One Pro 6.4 & 7.0 på MAC OS-X 10.7.5 & 10.8
 Shooting tethered med Canon EOS-D i Capture One Pro Shooting tethered i Capture One Pro 6.4 & 7.0 på MAC OS-X 10.7.5 & 10.8 For Canon EOS-D ejere der fotograferer Shooting tethered med EOS-Utility eller
LJM s cylinder program kan også fås med enten indbyggede pilotstyrede kontraventiler eller overcentreventiler.
 Indbyggede ventiler LJM s cylinder program kan også fås med enten indbyggede pilotstyrede kontraventiler eller overcentreventiler. Pilotstyret kontraventil Overcentreventil eller lastholdeventil. * Enkelt-
Hudevad P200. Technical datasheet
 Technical datasheet Key benefits Low, streamlined design Ideal in front of glazing to prevent cold draughts Available in two depths For high flexibility in usage Historical Kundenedfald Grøn energi Flat
Læs venligst Beboer information om projekt vandskade - sikring i 2015/2016
 Læs venligst Beboer information om projekt vandskade - sikring i 2015/2016 Vi er nødsaget til at få adgang til din lejlighed!! Hvis Kridahl (VVS firma) har bedt om adgang til din/jeres lejlighed og nøgler,
Portal Registration. Check Junk Mail for activation . 1 Click the hyperlink to take you back to the portal to confirm your registration
 Portal Registration Step 1 Provide the necessary information to create your user. Note: First Name, Last Name and Email have to match exactly to your profile in the Membership system. Step 2 Click on the
See for further information and advice on the maintenance of materials.
 19638-1 x 2 A x 12 5 x 35 B x 8 5 x 40 J x 32 4 x 18 C C G G I x 7 K x 4 L x 1 Plastik Kunststoff Plastic Plastique E x 4 F x 4 D x 2 Revideret juli 2017 1 w w w. p l u s. d k Vedligeholdelse: Plankerne
Page 2: Danish. Page 4: English
 Identifikationsdokumenter når du har adresse i udlandet / Identification documents when you live abroad Guide til dokumentation/ Documentation Guidelines Page 2: Danish Page 4: English 1 Adresse i udlandet
Aktivering af Survey funktionalitet
 Surveys i REDCap REDCap gør det muligt at eksponere ét eller flere instrumenter som et survey (spørgeskema) som derefter kan udfyldes direkte af patienten eller forsøgspersonen over internettet. Dette
Timetable will be aviable after sep. 5. when the sing up ends. Provicius timetable on the next sites.
 English Information about the race. Practise Friday oct. 9 from 12.00 to 23.00 Saturday oct. 10. door open at 8.00 to breakfast/coffee Both days it will be possible to buy food and drinks in the racecenter.
VFL OPTIMA Flange. 1/9. Montagevejledning Montageanleitung Mounting instructions Instrucciones de montaje Instructions de montage
 VFL OPTIMA Flange DE EN ES Montagevejledning Montageanleitung Mounting instructions Instrucciones de montaje Instructions de montage Produktbe skrive lse: VFL OPTIMA Flange kombinerer en stilbar dynamisk
H07RN-F CPR BESKRIVELSE STANDARDER. Kontakter Installation Tlf.: Support:
 Industrial flexible rubber cable range with an insulation and sheath in elastomers. Cables for heavy duty uses, Oil resistant and Flame retardancy according to IEC/EN 60332-1-2 standard. BESKRIVELSE Application
TELT. Oversigt over dele. Følg opstillingsanvisningerne for at opnå det bedste resultat.
 TELT Følg opstillingsanvisningerne for at opnå det bedste resultat. Opstillingstid: ca. 25 min. Krævet antal personer til opstilling: 2 Oversigt over dele Kabine Pløkker (18 stk.) Yderdug Bæretaske Ekstra
l i n d a b presentation CMD 07 Business area Ventilation
 l i n d a b presentation CMD 07 Business area Ventilation 1 Ventilation Sales LTM June 4 097 MSEK EBIT LTM June 449 MSEK 11,0% Two Divisions ADS 85% Comfort 15% YTD June 07 % Sales +31 Nordic countries
storage with plenty of scope 79400/06 Reolsystem/Wall system/regalsystem
 create and combine 79400/06 Reolsystem/Wall system/regalsystem Med Bocca har formålet været at skabe en fleksibel opbevaringsserie. Bocca er møbler i et moderne design med metalgreb og mulighed for flotte
Daglig huskeliste Daily checklist
 Daglig huskeliste Daily checklist Quick release er spændt Nakkestøtte korrekt højde Fodskåle korrekt højde Fodremme spændt Tjek jævnligt bolte og skruer for efterspænding Quick release locked Headrest
Strategic Capital ApS has requested Danionics A/S to make the following announcement prior to the annual general meeting on 23 April 2013:
 Copenhagen, 23 April 2013 Announcement No. 9/2013 Danionics A/S Dr. Tværgade 9, 1. DK 1302 Copenhagen K, Denmark Tel: +45 88 91 98 70 Fax: +45 88 91 98 01 E-mail: investor@danionics.dk Website: www.danionics.dk
Trolling Master Bornholm 2016 Nyhedsbrev nr. 6
 Trolling Master Bornholm 2016 Nyhedsbrev nr. 6 English version further down Johnny Nielsen med 8,6 kg laks Laksen blev fanget seks sømil ud for Tejn. Det var faktisk dobbelthug, så et kig ned i køletasken
Daglig huskeliste Daily checklist
 Daglig huskeliste Daily checklist Quick release er spændt Nakkestøtte korrekt højde Selen er spændt og justeret korrekt Fodskåle korrekt højde Fodremme spændt Tjek jævnligt bolte og skruer for efterspænding
To the reader: Information regarding this document
 To the reader: Information regarding this document All text to be shown to respondents in this study is going to be in Danish. The Danish version of the text (the one, respondents are going to see) appears
 Instructions for use www.nilfisk-advance.com 1 2 3 PRECAUTIONARY MEASURES If the opening that sucks in the air, thesuction pipe orthe telescopic wand on pipe are blocked, you should switch off the vacuum
Appendix 1: Interview guide Maria og Kristian Lundgaard-Karlshøj, Ausumgaard
 Appendix 1: Interview guide Maria og Kristian Lundgaard-Karlshøj, Ausumgaard Fortæl om Ausumgaard s historie Der er hele tiden snak om værdier, men hvad er det for nogle værdier? uddyb forklar definer
Generalized Probit Model in Design of Dose Finding Experiments. Yuehui Wu Valerii V. Fedorov RSU, GlaxoSmithKline, US
 Generalized Probit Model in Design of Dose Finding Experiments Yuehui Wu Valerii V. Fedorov RSU, GlaxoSmithKline, US Outline Motivation Generalized probit model Utility function Locally optimal designs
User Manual for LTC IGNOU
 User Manual for LTC IGNOU 1 LTC (Leave Travel Concession) Navigation: Portal Launch HCM Application Self Service LTC Self Service 1. LTC Advance/Intimation Navigation: Launch HCM Application Self Service