Important Notice 6. Safety Instructions... 6 Children and Persons with Disabilities... 8 Charger and Rechargeable Battery Cables...
|
|
|
- Magdalene Mogensen
- 8 år siden
- Visninger:
Transkript
1

2
3 SCAZ 5.00 A1 Table of Contents Table of Contents Important Notice 6 Safety Instructions... 6 Children and Persons with Disabilities... 8 Charger and Rechargeable Battery... 8 Cables... 9 Repair and Maintenance Intended Use Conformity Notice Disposal of Old Devices Introduction 12 Package Contents Controls and buttons Front Rear Panel...13 Left Panel...14 Right Panel...14 Top Bottom Opening the Display Getting Started Charging the Battery by Using the Charger English - 1

4 Table of Contents SCAZ 5.00 A1 Charging the Battery while Inserted in the Camcorder Inserting the Battery Inserting the SD Card Write-Protecting the Memory Card Switching the Camcorder On and Off Switching the Operating Mode The Touch-Sensitive Display Setting the Menu Language Setting Date and Time Recording 27 Recording Videos The Video Mode Display Macro Mode Manual Focus Locking the Auto Focus Capturing Pictures The Photo Mode Display Video Lamp Playback 35 Playing Back Video Clips Playing Back Photos The Menus 40 The Main Menu English

5 SCAZ 5.00 A1 Table of Contents Main Menu Icons Date/Time Beep Auto PowerOff TV standard Format Default Language Frequency Video Menu White Balance Resolution Effect Night Mode Quality Video Playback Menu...50 Video Playback Menu Icons...51 Deleting A Video Recording Deleting all video recordings Protect Autoplay Photo Menu Photo Menu Icons White Balance Resolution Effect English - 3

6 Table of Contents SCAZ 5.00 A1 Night Mode Selftimer Quality Photo Playback Menu Delete one picture Delete all pictures Protect Autoplay Connectors and Sockets 59 Viewing Recordings on a Television Screen Connecting via the HDMI Cable Connecting via the USB/AV Cable Transferring Recordings to the Computer Using the USB port Using a Card Reader Software 63 System Requirements Installing the Software Uninstalling the Software The Main Dialog Select language Editing Recordings Viewing Recordings Importing Recordings English

7 SCAZ 5.00 A1 Table of Contents Selecting the Navigation View Preview Window Toolbar Import Merge videos...69 Creating an AVCHD Disk Cutting Video Clips Upload to YouTube Upload to Facebook Photo Album Album page Appendix 73 Technical Specifications...73 Warranty Information Declaration of Conformity English - 5

8 Important Notice Important Notice SCAZ 5.00 A1 This icon denotes important information for the safe operation of the product and the user s safety. This icon denotes further information on the topic. Safety Instructions Before you use this device for the first time, please read the following notes in this manual and heed all warnings, even if you are familiar with handling electronic devices. Always check that the product works correctly. Keep this manual with the instructions in a safe place for future reference. If you sell the device or pass it on, it is essential that you also hand over this manual. Do not try to open the housing or reassemble the product. You are at risk of receiving an electric shock. Maintenance and repairs should only be carried out by qualified technicians. Do not look at the sun or other sources of intense light. Doing so may damage your eyesight. Keep the device away from water and other liquids. Do not operate the device with wet hands and do not use it in rain or snow. Dampness can cause danger through fire or electric shock. Keep the device out of the reach of children and animals to avoid accidents or damage. 6 -English

9 SCAZ 5.00 A1 Important Notice Switch the device off immediately if you notice it emitting smoke or strange noises. Contact customer service. Never try to repair the device yourself. Only use the supplied charger cradle Scope DJ04V20500A or the USB interface cable to recharge the product battery. Only use this device with the supplied rechargeable battery (NP120) in order to avoid overheating, deformation of the cover, fire, electric shocks, explosion and other dangers. Unplug the power cord from the mains outlet before you remove the rechargeable battery from the charger or separate the charger from the power cord. In the event of a defect in the product or its accessories, unplug the power cord from the mains immediately. Also, when there is the possibility of thunderstorms, unplug the power cord from the wall outlet. Never try to heat, disassemble or short-circuit the rechargeable battery. Do not throw the rechargeable battery into fire. Warning: Notice concerning separation from the mains The supplied charger consumes electrical energy even if there is no battery inserted. You should therefore disconnect the charger from the wall outlet when not using it. In order to completely disconnect the charger from the mains, unplug the power cord from the wall outlet. The wall outlet where the device is connected must be easy to access so that the power cord can be pulled out quickly in case of emergency. Unplug the power cord from the mains when you will not be using it for a long while (e.g. when going on holiday) in order to avoid the danger of fire. Do not hold the power cord with wet hands. The device is not for use in rooms with a high temperature or humidity and must be kept free of dust. Position the device on a stable, flat surface and do not place any objects on the device. English - 7

10 Important Notice Always make sure that: SCAZ 5.00 A1 no direct heat sources (e.g. heating) affect the device; no direct sunlight or bright artificial light reaches the device; contact with spray and dripping water and abrasive liquids must be avoided and the device should never be operated near water, and it must especially never be immersed (do not place any objects filled with liquids such as vases or drinks near the device); do not place any fire sources (e.g. burning candles) on or near the device; no foreign bodies enter the device; the device must not be subject to any great temperature changes as this may cause moisture through condensation; the device should not be subject to excessive shock and vibrations. Children and Persons with Disabilities Do not allow children or persons with disabilities to use electrical devices when not under supervision. They may not comprehend the presence of potential risks. Rechargeable batteries and small parts represent potential choking hazards. Keep batteries out of reach of children. If a rechargeable battery is swallowed, seek medical help immediately. Keep all packaging away from children as this may cause suffocation. 8 -English Charger and Rechargeable Battery Insert the rechargeable battery with the correct polarity. Never throw a rechargeable battery into fire. Remove the rechargeable battery when the device is not to be used for a long time. Danger of Explosion! Improper use may cause explosions and danger to life. Only replace the rechargeable battery with an equivalent or a type recommended by the
 on or near the device; no foreign bodies enter the device; the device must not be subject to any great temperature changes as this may cause moisture through condensation; the device")
11 SCAZ 5.00 A1 Important Notice manufacturer. Never replace any batteries in an explosion-sensitive environment. While inserting or removing the batteries a spark may be produced causing an explosion. Explosion-sensitive areas will normally (but not always) be labelled. These include fuel storage areas such as below deck on a boat, fuel line or tank areas, environments where the air contains inflammable substances (e.g. cereals, dust or metal powder, etc.) and any areas where you should normally switch off your car engine. Respect the environment. Old rechargeable batteries do not belong in with domestic waste. They must be handed in to a collection point for waste batteries. Cables Always hold cables by the plug and never pull on the cable itself. Never hold the power cord with wet hands as this may cause a short circuit or electric shock. Never place the device, heavy objects or furniture on the cable and take care that the cord does not become trapped, especially at the plug and sockets. Never tie knots in the cable and do not tie it together with other cables. All cables should be positioned so that nobody can trip over them or be obstructed by them. A damaged power cord can cause a fire or an electric shock. Inspect the power cord from time to time. Do not use an adapter plug or extension cable that does not meet the required safety standards. English - 9
 and any areas where you should normally switch off your car engine. Respect the environment. Old rechargeable batteries do not belong in with domestic waste.")
12 Important Notice Repair and Maintenance SCAZ 5.00 A1 Repairs are required when this device has been damaged in any way: for example, when the charger or the housing of the SCAZ 5.00 A1 is damaged, when liquid or objects have entered the device, when the product has been exposed to rain or moisture, when the product does not work normally or if the product has been dropped. If you notice any smoke, unusual noise or strange smells, switch off the device immediately and unplug the power cord from the power supply. If this occurs the device should no longer be used and should be inspected by authorized service personnel. Please contact qualified personnel when servicing is needed. Intended Use Your camcorder is a Consumer Electronics device and is designed for recording and playing back videos and pictures only. Any use other than that mentioned above does not correspond to the intended use. The device may only be used for private use, not industrial or commercial use. In its default configuration, this product has not been designed for medical, lifesaving, rescue or life-maintaining purposes. This device fulfils all that relates to CE Conformity, relevant standards and Directives. Any changes to the equipment other than those recommended by the manufacturer may lead to these directives no longer being met. Only use the accessories recommended by the manufacturer. If you are not using the device within the Republic of Germany, you must observe the regulations and laws in the country of use. 10 -English

13 SCAZ 5.00 A1 Conformity Notice Important Notice This device and its supplied accessories have been tested and approved for compliance with the basic and other relevant requirements of the EMC Directive 2004/108/EC, as well as the Low-voltage Directive 2006/95/EC. The corresponding Declaration of Conformity can be found at the end of this User's Manual. Disposal of Old Devices Devices marked with this symbol are subject to the European Directive 2002/96/EC. All electric and electronic devices must be disposed of separately from household waste at official disposal centres. Avoid hazards to the environment and dangers to your personal health by disposing of the device properly. For further information about proper disposal, contact your local government, disposal bodies or the shop where you bought the device. Recycle the packaging material properly too. Cardboard packaging can be taken to paper recycling containers or public collection points for recycling. Any film or plastic contained in the packaging should be taken to your public collection points for disposal. Respect the environment. Old batteries do not belong in with domestic waste. They must be handed in to a collection point for waste batteries. English - 11

14 Introduction Introduction SCAZ 5.00 A1 Package Contents Camcorder SCAZ 5.00 A1 2 rechargeable batteries Roofer Technology Co., Ltd. NP120 Charger Scope DJ04V20500A Power Cable USB/AV cable HDMI cable SD memory card, 4GB (not illustrated) CD-ROM (not shown) Bag (not illustrated) User's manual (not shown) 12 -English
 CD-ROM (not shown) Bag (not illustrated) User's")
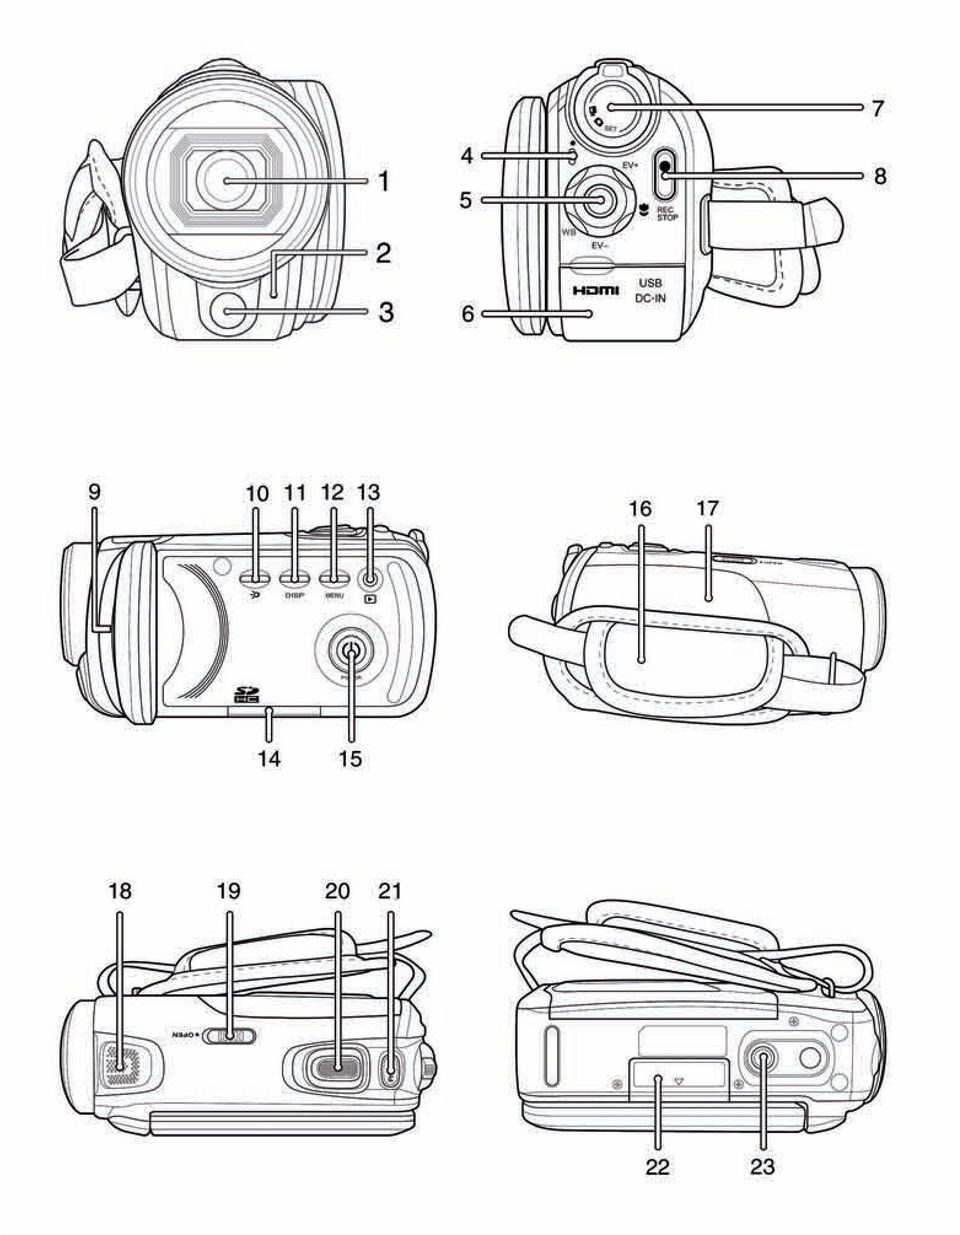
15 SCAZ 5.00 A1 Controls and buttons Introduction Front 1 Lens 2 Self-timer indicator 3 Video lamp Rear Panel 4 Power indicator 5 Navigation button 6 HDMI input, USB and AV port, charger DC in 7 Mode selection switch 8 RECORD button English - 13

16 Introduction Left Panel SCAZ 5.00 A1 9 Microphone 10 Video lamp button 11 Display button 12 Menu button 13 PLAY button 14 Memory card compartment 15 On/Off button Right Panel 16 Hand strap 17 Battery compartment 14 -English

17 SCAZ 5.00 A1 Top Introduction 18 Speakers 19 Battery compartment lock 20 Zoom swivel button 21 Picture (photo) shutter button Bottom 22 Memory card compartment 23 Tripod mount English - 15
 shutter button Bottom 22")
18 Introduction Opening the Display SCAZ 5.00 A1 Open the display and then rotate it according to your needs. You can also rotate the display so it faces the front. In this case, the picture orientation will be adjusted automatically. The rotated display can be folded completely until it touches the camera housing. 16 -English

19 SCAZ 5.00 A1 Getting Started Introduction The camcorder is powered by a rechargeable Lithium-Ion (NP120) battery. On delivery, the battery is not charged. Please charge the battery before first use of the device. To operate the camera, use only the rechargeable Lithium-Ion battery NP120. Charging the Battery by Using the Charger Insert the rechargeable battery in the charger cradle Scope DJ04V20500A so that the contacts [+] and [-] correspond to the rechargeable battery and charging tray markings. English - 17

20 Introduction SCAZ 5.00 A1 Make sure that the battery clicks into place on the charger. Next connect the power cord to the charger and plug the power cord to a wall outlet. Remove the rechargeable battery from the camera when the device is not to be used for a long time. During charging, the rechargeable battery and charging device will become warm. This is not a malfunction. The status indicator of the charging cradle will light orange whilst the battery is charging. When the charging process is completed, the status indicator will light green. You can then insert the rechargeable battery into the camcorder. Depending on the charge level, the charging cycle can take up to 3 hours. If, after inserting the rechargeable battery, the indicator remains green, this means the rechargeable battery is already charged or it is not correctly inserted. In this case, check the polarity. 18 -English

21 SCAZ 5.00 A1 Charging the Battery while Inserted in the Camcorder Introduction It is also possible to recharge the camcorder battery via the USB power of a computer. To do this, you ll need the supplied USB/AV cable. Insert the rechargeable battery into the camcorder (see page 20). Use the supplied USB/AV cable to connect the camcorder to an available USB port on a computer. Please make sure that your camcorder is powered off. If the device is powered on, its battery will not recharge. If necessary, press the On/Off button (15) to power the camcorder off. The power indicator (4) will light red during charging. When the charging process is completed, the power indicator will stop lighting. Some computers do not supply USB power while they are turned off. If the camcorder power indicator does not light, make sure to power on your computer. English - 19
22 Introduction Inserting the Battery SCAZ 5.00 A1 When the battery is fully charged, insert it into the camcorder. Proceed as follows: Open the battery compartment (17) by gently sliding the battery cover lock (19) to the front. The battery compartment will open so you can insert the rechargeable battery. Make sure that the contacts [+] and [-] correspond to the rechargeable battery and charging tray markings. 20 -English
23 SCAZ 5.00 A1 Close the battery compartment. Introduction Insert the rechargeable battery as indicated in the figures. Positioning the battery the wrong way round may damage the device. Inserting the SD Card By using the supplied SD memory card you can increase the camcorder storage capacity for saving your videos and photos. When a memory card is inserted, all the recorded contents will be saved onto it. If there is no memory card inserted, your photos and videos will be saved to the internal memory of the camera. Power the device off before you insert or remove the memory card. English - 21
24 Introduction SCAZ 5.00 A1 Open the display and press the On/Off button (15) to power the camcorder off. Open the memory card compartment (21) by sliding the cover in the direction of the small arrow. Then insert the memory card with the metal contacts facing forwards into the card slot. The label must face downwards. Slide the card fully into the slot opening until the card clicks into place. 22 -English
25 SCAZ 5.00 A1 Introduction Close the memory card compartment by sliding the cover in the opposite direction. To remove the memory card, open the memory card compartment and gently press on the inserted card. This will protrude a little so that you can get a hold of it and remove it. If the memory card or the internal memory is full, the message Memory full will appear on the display. English - 23
26 Introduction Write-Protecting the Memory Card SCAZ 5.00 A1 The memory card features a write-protection tab. When write-protection is enabled (see the figure below right) you can only view existing videos and pictures, not delete or edit them. Also, it will not be possible to record any new videos or pictures onto the memory card. Write-protection disabled Write-protection enabled When inserting a write-protected memory card, the warning icon will appear in the lower-right corner of the display. If you attempt to record a video or take a picture while write-protection is enabled, an acoustic signal will be heard when pressing the shutter button. 24 -English
27 SCAZ 5.00 A1 Switching the Camcorder On and Off Introduction Press the On/Off button (15) to power the camcorder on. While initialising, the power indicator (4) will light red for a few seconds then change to green. Press the On/Off button (15) to power the camcorder off. The power indicator (4) then goes out. When opening the display, the camcorder will power on automatically. As soon as you close the cover, it will power off. Switching the Operating Mode Rotate the mode selector switch (7) to toggle between the modes Movie, Photo and Set. To do this, rotate the corresponding icon to the yellow dot marking on the bottom left. Video recordings Photography Settings The Touch-Sensitive Display The device display is touch-sensitive. The displayed icons can be selected and activated either by tapping on them with the finger or by using the navigation button (5). This User s Manual describes operating the device by using the navigation button. English - 25
28 Introduction Setting the Menu Language SCAZ 5.00 A1 Open the camcorder display. The device powers on automatically. Rotate the mode selector switch (7) to the SET position Use the navigation button (5) to move the highlight to the Language option. Press the navigation button. Use the navigation button to select the desired menu language. Confirm the selection by pressing the navigation button Setting Date and Time Open the camcorder display. The device powers on automatically. Rotate the mode selector switch (7) to the SET position Use the navigation button (5) to move the highlight to the Date/Time option. Press the navigation button. Move the navigation button to the left or right to toggle between the year, month, day, hours and minutes fields. Move the navigation button up or down to select a different value for the current setting. Repeat these steps until you have finished setting the date and time. Confirm your selection by pressing the navigation button. 26 -English
29 SCAZ 5.00 A1 Recording Recording Recording Videos Open the display and then rotate it according to your needs. The device powers on automatically. If the current mode is not set to video recording, select it by using the mode selector (7). Move the navigation button (5) up or down to adjust exposure compensation in four steps to a positive or negative value. The set value is indicated on the display. Move the navigation button (5) multiple times to the left to select a White Balance preset. The corresponding icon will show on the display. No icon will be shown for automatic White Balance. Move the navigation button (5) to the right to toggle between Manual focus and Macro mode. Pressing the navigation button (5) will lock the currently set focus. Press the record button (8) to start recording. During recording the power indicator (4) will blink red. If necessary, use the zoom swivel button (20) to select a larger to smaller scene area. Move the swivel button to the right to zoom in or move the swivel button to the left to zoom out. Press the record button (8) to stop recording. The power indicator (4) then goes out. During recording, different icons may appear on the display informing you about the current settings. English - 27
30 Recording The Video Mode Display SCAZ 5.00 A1 You can press the display button (11) to turn the icons display on or off. 28 -English
31 SCAZ 5.00 A1 Recording 1 Manual focus Macro mode Auto focus lock 2 Movie mode 3 Use the zoom swivel button to focus (only available for Manual focus mode) 4 White Balance 5 Zoom indicator 6 Night mode 7 Effect mode 8 Battery level 9 Resolution 10 Recorded time 11 Exposure Compensation 12 Remaining memory card or internal memory storage capacity 13 Indicates whether recording takes place on the memory card (left icon) or the internal memory (right icon) English - 29
32 Recording Macro Mode SCAZ 5.00 A1 This device features a macro function allowing you to focus on very close subjects. This allows you to position the lens as close as 10 cm (4 inches) from the subject. Use the navigation button to enable Macro mode. To do this, move the navigation button multiple times to the right until Macro mode is enabled. The Macro mode is indicated by the Manual Focus display icon. With this function you can focus the scene yourself. Use the navigation button to enable Manual focus. To do this, move the navigation button multiple times to the right until Manual focus is enabled. Manual focus is indicated by the display icon. While Manual focus is enabled, the icon will appear on the display. You can then use the zoom swivel button (20) to focus the scene. Tap on the icon to toggle the zoom swivel button back to zoom adjustment mode. The icon will appear on the display. Each tap on these icons will toggle the operating mode allowing easy selection. Locking the Auto Focus While your camcorder is focussing automatically, you can lock the current focus setting by pressing the navigation button (5). This focus setting will be kept even if you aim the device at a different subject. The lock will be disabled when you press the navigation button again. 30 -English
33 SCAZ 5.00 A1 Capturing Pictures Recording Open the display and then rotate it according to your needs. The device powers on automatically. If the current mode is not set to photo capturing, select it by using the mode selector (7). Move the navigation button (5) up or down to adjust exposure compensation in four steps to a positive or negative value. The set value is indicated on the display. Move the navigation button (5) multiple times to the left to select a White Balance preset. The corresponding icon will show on the display. No icon will be shown for automatic White Balance. Move the navigation button (5) to the right to toggle between Manual focus and Macro mode. If necessary, use the zoom swivel button (20) to select a larger to smaller scene area. Move the swivel button to the right to zoom in or move the swivel button to the left to zoom out. Press the shutter button (21) to capture a picture. During saving the power indicator (4) will light red. The photo taken will be shown on the display for a few seconds. After this, the device will return to photo capture mode. In photo mode, different icons may appear on the display informing you about the current settings. English - 31
34 Recording The Photo Mode Display SCAZ 5.00 A1 32 -English
35 SCAZ 5.00 A1 Recording 1 Manual focus Macro mode Auto focus lock 2 Photo mode 3 Use the zoom swivel button to focus (only available for Manual focus mode) 4 White Balance 5 Zoom indicator 6 Night mode 7 Effect mode 8 Remaining number of shots 9 Self-timer 10 Battery level 11 Resolution 12 Exposure Compensation 13 Indicates whether recording takes place on the memory card or the internal memory English - 33
36 Recording Video Lamp SCAZ 5.00 A1 In dark environments you can enable the built-in video lamp (3) for video or photo recording. To do this, press the video lamp button (10). Pressing this button again will turn the video lamp off. 34 -English
37 SCAZ 5.00 A1 Playback Playback Depending on the selected mode you can use the Play button (13) to switch to the corresponding playback mode. In the upper-left corner of the screen a icon will indicate the playback mode. Playing Back Video Clips In Movie mode you can use the Play button (13) to switch to Playback mode. Press this button once again to return to Movie mode. The icon in the upper-left corner of the display shows the current mode. Playback mode Movie mode In Playback mode the following features are available: Move the navigation button (5) to the left or right to choose a recording. To start or stop playback, press the navigation button. Press the display button (11) to show or hide the display icons. English - 35
38 Playback SCAZ 5.00 A1 1 File protection 2 Playback icon 3 Current and total playback time 4 Starts playback 5 Current video number/ total number of videos 6 Scrolls one video up 7 Playback menu 8 Multiple video thumbnail view * 9 Scrolls one video down * This function can be selected via the touchscreen only. 36 -English
39 SCAZ 5.00 A1 Playback The following functions are available during video playback: Move the navigation button (5) to the left to rewind. To cancel the rewind function, press the navigation button. Move the navigation button (5) to the right for fast forward. To cancel the fast forward function, press the navigation button. Move the navigation button (5) upwards to increase the sound volume. Move the navigation button (5) downwards to decrease the volume. To pause playback, press the recording button (8). Pressing the recording button again will resume playback. To stop playback, press the navigation button (5). English - 37
40 Playback Playing Back Photos SCAZ 5.00 A1 In capture mode you can use the Play button (13) to switch to Playback mode. Press the Play button once again to return to Photo mode. The icon in the upper-left corner of the display shows the current mode. Playback mode Photo mode In Playback mode the following features are available: Move the navigation button (5) to the left or right to choose a recording. Press the display button (11) to show or hide the display icons. 38 -English
41 SCAZ 5.00 A1 Playback 1 File protection 2 Playback icon 3 Current picture number/ total number of pictures 4 Scrolls one picture up 5 Playback menu 6 Multiple picture thumbnail view * 7 Scrolls one picture down * This function can be selected via the touchscreen only. English - 39
42 The Menus The Menus SCAZ 5.00 A1 The camcorder uses different menus that offer multiple settings under each operating mode. Furthermore, there is a main menu allowing you to set the preferences for your camcorder. In the following section you will find menu operation instructions using the navigation button. However, you can also adjust the settings by tapping on the icons. The Main Menu Rotate the mode selector switch (7) to the SET position (see also on page 25 - Switching the Operating Mode). The menu contains eight items labelled with icons. Use either the navigation button (5) to select a menu item or tap the desired menu items with your finger. 40 -English
43 SCAZ 5.00 A1 The Menus Main Menu Icons Date/Time To set the date and time. Beep To turn the acoustic signals on or off. Auto PowerOff To select an automatic power off timeout. TV standard To select the TV standard. Format To format the memory card. Default Restores the factory-default settings. Language To select the menu language. Frequency Select the mains frequency English - 41
44 The Menus Date/Time SCAZ 5.00 A1 Here you can set the date and time (see also page 26 Setting Date and Time). Beep Here you can determine if a sound is output when pressing a button. This option enables or disables the power-on sound at the same time. Use the navigation button (5) to select the desired icon and then press the navigation button to confirm. Disables the beep. Enables the beep. Confirms the selection (when adjusting the settings via the touch-sensitive display). Auto PowerOff You can have the device power off automatically after a certain time to save battery power. If no operation is performed during the preset time, the device will power off. To power the camcorder back on, press the On/Off button (15). 42 -English
45 SCAZ 5.00 A1 The Menus Use the navigation button (5) to select the desired icon and then press the navigation button to confirm. Auto PowerOff disabled Power off after 1 minute Power off after 5 minutes Confirms the selection (when adjusting the settings via the touch-sensitive display). TV standard Choose between the TV systems PAL or NTSC. NTSC is the colour system used in America and Japan, PAL is used in Europe. This setting only applies when playing back using the video cable. Use the navigation button (5) to select the desired icon and then press the navigation button to confirm. Format This function lets you delete all contents from your memory card and internal memory and renew the file saving structure (formatting). Warning! All saved videos and pictures will be erased and cannot be restored. Make sure that all recordings you want to keep have been backed up on a different medium. English - 43
46 The Menus SCAZ 5.00 A1 To format the internal memory, you will first have to remove the inserted memory card (if any). It is only possible to format the internal memory if there is no memory card inserted. Use the navigation button (5) to select the desired icon and then press the navigation button to confirm. Does not format. Format the memory. Confirms the selection (when adjusting the settings via the touch-sensitive display). Default All device parameters (e.g. the menu language) will be reset to their factory-default values. This will not erase any data from your memory card. Use the navigation button (5) to select the desired icon and then press the navigation button to confirm. Does not apply any changes. Resets the device, Confirms the selection (when adjusting the settings via the touch-sensitive display). 44 -English
47 SCAZ 5.00 A1 Language The Menus Here you can set the menu language (see also page 26 Setting the Menu Language). Frequency Select the mains frequency to avoid any interference caused by fluorescent lighting. A mains frequency of 50 Hz is used across Europe; in America the mains uses a frequency of 60 Hz. Use the navigation button (5) to select the desired icon and then press the navigation button to confirm. English - 45
48 The Menus Video Menu SCAZ 5.00 A1 To open the Video menu, press the Menu button (12) while in Movie mode. Video Menu Icons White Balance To match the environmental lighting conditions. Resolution The recording size in pixels. Effect To select colour presets. Night Mode For recordings in low lighting conditions. Quality To select the recording quality. 46 -English
49 SCAZ 5.00 A1 The Menus White Balance White Balance is used to determine a colour temperature suitable for current lighting conditions. Select one of the preset options or use the Automatic setting. Use the navigation button (5) to select the desired icon and then press the navigation button to confirm. Automatic Daylight Cloudy Fluorescent Tungsten Confirms the selection (when adjusting the settings via the touch-sensitive display). Resolution The resolution determines the size of the recording in pixels. As a general rule: The higher the resolution, the more storage space is required. Choose between the following resolutions: 1080P 720P/60FPS HDTV (Full HD) Highest resolution of 1920 x 1080 pixels High resolution of 1280 x 720 pixels and a high 60fps frame rate English - 47
50 The Menus 720P/30FPS WVGA QVGA High resolution of 1280 x 720 pixels and a lower 30fps frame rate Medium resolution of 800 x 480 pixels Low resolution of 640 x 480 pixels SCAZ 5.00 A1 Use the navigation button (5) to select the desired icon and then press the navigation button to confirm. Effect You can record using different presets. Use the navigation button (5) to select the desired icon and then press the navigation button to confirm. Normal setting Black and white Sepia Confirms the selection (when adjusting the settings via the touch-sensitive display). The Sepia setting will create a black and white picture with a brown colour tint. This will make the picture look older. 48 -English
51 SCAZ 5.00 A1 Night Mode The Menus In order to obtain properly exposed recordings in dark environments, select Night mode. This will improve the quality of any night recordings. Use the navigation button (5) to select the desired icon and then press the navigation button to confirm. Disables Night mode. Enables Night mode. Confirms the selection (when adjusting the settings via the touch-sensitive display). English - 49
52 The Menus Quality SCAZ 5.00 A1 Here you can set the recording quality. Please note that a higher quality requires more storage capacity. Use the navigation button (5) to select the desired icon and then press the navigation button to confirm. High quality Normal quality Confirms the selection (when adjusting the settings via the touch-sensitive display). Video Playback Menu To open the Video playback menu, press the Menu button (12) while in video record mode. 50 -English
53 SCAZ 5.00 A1 Video Playback Menu Icons The Menus Delete a video recording To delete the selected video recording. Delete all video recordings Erases all video recordings. Protect Protects your recordings against accidental deletion. Autoplay Plays all videos in sequence. Deleting A Video Recording Use this option to delete a single video recording. Warning! After a recording has been erased, it cannot be restored. Move the navigation button (5) to the right to select the video you want to erase. To delete the currently displayed video, press the navigation button. English - 51
54 The Menus SCAZ 5.00 A1 When using the touch-sensitive display you can use the following buttons: To show the previous video. To show the next video. To delete the current video. To return without applying any changes. Deleting all video recordings All saved video recordings can be deleted in one go. Any captured pictures will not be erased. Use the navigation button (5) to select the desired icon and then press the navigation button to confirm. Does not erase anything. To erase all video recordings. Confirms the selection (when adjusting the settings via the touch-sensitive display). 52 -English
55 SCAZ 5.00 A1 Protect The Menus Here you can protect one or more recordings to avoid accidental deletion. Move the navigation button (5) to the right to select the video you want to protect. To protect the currently displayed video, press the navigation button. When using the touch-sensitive display you can use the following buttons: To show the previous video. To show the next video. To protect the current video. To return without applying any changes. Protected videos will appear with a icon on the display. To unprotect a video, repeat the above procedure. Autoplay This function allows you to play all recorded videos in sequence. English - 53
56 The Menus Photo Menu SCAZ 5.00 A1 To open the Photo menu, press the Menu button (12) while in Photo mode. Photo Menu Icons White Balance To match the environmental lighting conditions. Resolution The recording size in pixels. Effect To select colour presets. Night Mode For recordings in low lighting conditions. 54 -English
57 SCAZ 5.00 A1 The Menus Selftimer To delay the recording. Quality To select the recording quality. White Balance This setting is equivalent to the White Balance setting for video recording (see page 47). Resolution The resolution determines the size of the recording in pixels. As a general rule: The higher the resolution, the more storage space is required. Use the navigation button (5) to select the desired icon and then press the navigation button to confirm. Low resolution of 2048 x 1536 pixels Medium resolution of 2592 x 1944 pixels High resolution of 4608 x 3456 pixels (interpolated) Confirms the selection (when adjusting the settings via the touch-sensitive display). English - 55
58 The Menus Effect SCAZ 5.00 A1 This setting is equivalent to the Effect setting for video recording (see page 48). Night Mode This setting is equivalent to the Night mode setting for video recording (see page 49). Selftimer The self-timer delays the capture for a preset time after pressing the shutter button (21). This allows you to participate in the scene (e.g. for a group photo). Use the navigation button (5) to select the desired icon and then press the navigation button to confirm. Self-timer disabled. The photo will be captured 5 seconds after pressing the shutter button. The photo will be captured 10 seconds after pressing the shutter button. Confirms the selection (when adjusting the settings via the touch-sensitive display). During the delay time, the self-timer indicator (2) on the front panel flashes. 56 -English
59 SCAZ 5.00 A1 Quality The Menus This setting is equivalent to the Quality setting for video recording (see page 50). Photo Playback Menu To open the Photo playback menu, press the Menu button (12) while in photo Playback mode. Delete one picture Deletes the selected picture. Delete all pictures Deletes all pictures. Protect Protects your recordings against accidental deletion. Autoplay Plays all pictures in sequence. English - 57
60 The Menus Delete one picture SCAZ 5.00 A1 This allows you to erase a single picture. This function is operated the same way as the Delete function for video playback (see page 51). Delete all pictures All saved pictures can be deleted at once. Any captured videos will not be erased. This function is operated in the same way as the Delete function for video playback (see page 52). Protect This setting is equivalent to the Protect setting for video playback (see page 53). Autoplay This setting is equivalent to the autoplay setting for video playback (see page 53). 58 -English
61 SCAZ 5.00 A1 Connectors and Sockets Connectors and Sockets Viewing Recordings on a Television Screen Any recordings that you can view on the camcorder display can also be played back on a regular TV set. For this, your television set must have an appropriate Video In connector. Depending on the connectors available on the TV set, you can use the USB/AV cable or the HDMI cable. The HDMI cable will provide digital picture and sound and therefore offers the best quality. Simply operate the device as usual. For instance, enable the Autoplay (slideshow) function to view all pictures in sequence. Connecting via the HDMI Cable English - 59
62 Connectors and Sockets Connecting via the USB/AV Cable SCAZ 5.00 A1 Transferring Recordings to the Computer There are two possible ways to copy recordings from the camcorder to a computer: by connecting the device to a computer via the USB/AV cable by inserting the memory card into a card reader It is not possible to transfer data from the computer to the camcorder. The copy function will only allow for the transfer of data from the camcorder to the computer. 60 -English
63 SCAZ 5.00 A1 Connectors and Sockets Be careful when renaming any folders and files. Do NOT try to change the folder or file names stored on the device from the computer otherwise you may not be able to play back any files contained here with your camcorder. After you have copied your files or folders to the computer, you can rename or edit them on the computer. Using the USB port Use the supplied USB cable to connect your camcorder to the computer, as shown in the figure. Power the camcorder on. English - 61
64 Connectors and Sockets Using a Card Reader SCAZ 5.00 A1 If your computer features a card reader supporting SD memory cards, you can read the memory card s contents directly. Remove the memory card from the powered-off camcorder. Insert the memory card into the card reader of your computer (normally labelled SD/MMC). The PC will add the memory card contents under the drive letter in My Computer representing the card reader. Open My Computer on your PC and double-click on the disk drive representing the card reader. All recorded files can be found in the folder DCIM on this disk drive. Now you can copy the recorded files from the camcorder into a folder of your choice on the computer s hard disk. 62 -English
65 SCAZ 5.00 A1 Software Software The supplied software allows you to edit and play your recordings. System Requirements Operating system: Windows XP or Windows Vista or Windows 7 CPU: Intel/AMD Dual-Core processor or higher RAM: At least 1GB Graphics Adapter: DirectX 9 or DirectX 10-compatible (recommended) Interface: USB 1.1 or higher Memory: At least 2GB free hard disk space Installing the Software The bundled software is contained on the supplied CD-ROM. To be able to install the software, you first need to connect the camcorder to the computer by using the USB cable. Use the USB cable to connect the camcorder to your computer. Then power the camcorder on. Insert the supplied CD-ROM into the CD or DVD drive of your computer. The CD will launch automatically. Then follow the on-screen instructions to install. If the setup programme does not start automatically or you have cancelled it accidentally, you can launch the file TotalMedia HDCam.exe manually. English - 63
66 Software Uninstalling the Software SCAZ 5.00 A1 To uninstall the software, please use the Uninstall Wizard found in the Control Panel of your operating system. The Main Dialog 1 Navigation bar with multiple display options 2 The preview window shows previews and further information. 3 Toolbar for accessing the most common functions 64 -English
67 SCAZ 5.00 A1 Select language Software Here you can change the language of the software interface. From the main dialog, click: >Options >Preferences Select the desired language from the list and click OK to confirm. The software will prompt you that it will be necessary to restart it. Click "OK" to confirm the message. Then start the application again. Editing Recordings Viewing Recordings Use the USB cable to connect the camcorder to your computer. Then power the camcorder on. 4 Disk drives display and selection 5 Recordings stored on the selected disk English - 65
68 Software SCAZ 5.00 A1 The following options are available: From the navigation (4), select the disk drive for which you want to display the contents. Click on the star icon to rate the current recording. Click on the info icon to show further information on the current recording. To display a recording in a new window, double-click on it. In the display window, click the arrow icons, or use the arrow keys on your keyboard to display the previous or next recording. To view a video recording, double-click on it. The video window contains the icons Stop, Play and Pause. Click the arrow icons, or use the arrow keys on your keyboard to display the previous or next video recording. To delete a recording, click the Trash icon. The ensuing prompt needs to be confirmed with OK in order to execute the deletion. Importing Recordings To archive your recordings, you can use the Import function. The recordings will be copied to your computer. After you have imported your recordings, you will not need to connect the camcorder to view them. Select all recordings that you want to import from the currently selected disk drive and click "Import" on the bottom toolbar. A window with a user prompt will appear. To import the selected recordings, select the "Import Selected Scenes option. You can choose to import all or only all new recordings. If necessary, enter a folder name or use the default name. Click "OK" to confirm. Depending on the number of recordings, the copying of files can take a while. 66 -English
69 SCAZ 5.00 A1 Selecting the Navigation View Software There are different ways to open your imported recordings. In the libraries, you can sort them by folder name or date. Click on the folder icon to sort by folder name. Click on the calendar icon to sort by folder date. To open My Computer, click the button. Here you can find all the disk drives installed on your computer. For example, this allows you to access any recordings stored on a CD-ROM. English - 67
70 Software Preview Window SCAZ 5.00 A1 The preview window offers multiple options for sorting and editing your recordings. Shows all recordings according to their rating. Shows all recordings that haven t been imported yet. Here you can filter to display only pictures, only videos or all recordings. Drag the slider to adjust the display size for your recordings. Shows the recordings only. Shows the recordings together with other information. Here you can enter a keyword to search for. 68 -English
71 SCAZ 5.00 A1 Toolbar Software Import Merge videos Create AVCHD Upload to YouTube Upload to Facebook Photo Album Album page Imports all recordings from any connected devices. Creates movies from your video recordings. Burns your video files onto an AVCHD disk. Uploads video recordings to your YouTube account. Uploads video recordings to your Facebook account. Creates a photo album from your pictures. Creates a page (e.g. an invitation card) from your pictures. The icon entitled YouKu links to an Asian video portal and is not suitable for European countries. Import See page 66 - Importing Recordings. Merge videos Merge videos lets you merge multiple video clips to a movie. Click the merge videos icon to show the video editing timeline. Drag the desired video clips onto the timeline at the bottom of the window. English - 69
72 Software SCAZ 5.00 A1 Click the "Next" button to start the process. Specify the storage path on your computer and then click Save. Creating an AVCHD Disk AVCHD (Advanced Video Codec High Definition) is an innovative digital standard with high resolution and brilliant picture and sound quality. This format allows you to record onto writeable DVD disks and playback on suitable Blu-ray players. It is a good addition to an HDTV television set. Not all players support playback from self-recorded AVCHD disks. Insert a DVD±R, DVD±R DL, DVD±RW or DVD-RAM disk into your CD drive. Click the Create AVCHD Disk icon to open the disk compilation workspace. Drag the desired video clips onto the timeline at the bottom of the window. Click the "Next" button to start the process. Select the drive and folder from your hard disk and click OK. To be able to use this function your computer must feature a DVD drive capable of writing one of the following media types: DVD±R, DVD±R DL, DVD±RW or DVD-RAM 70 -English
73 SCAZ 5.00 A1 Cutting Video Clips Software You can remove any undesired sections from your video clips. From the video recordings overview, click on the scissor icon. The playback window with the currently selected recording will appear. Navigate to the beginning of the scene that you want to cut. Then click. Navigate to the end of the scene that you want to cut. Then click. Start cutting by clicking the confirmation icon. The title will be cut and a new clip without the selection will be created. Upload to YouTube Click on the YouTube upload icon. Drag the desired video recording onto the timeline at the bottom of the window. Click on Next. Enter the user name and password for your account and then click Login. Follow the YouTube on-screen instructions. Upload to Facebook Click on the Facebook upload icon. Drag the desired video recording onto the timeline at the bottom of the window. Click on Next. Enter your address and password and click "Login". Then follow the Facebook on-screen instructions. English - 71
74 Software Photo Album SCAZ 5.00 A1 With this option you can create an album consisting of multiple pictures. There are also several templates that you can use. Click the Photo Album icon. Drag the desired pictures onto the bar at the bottom of the window. Click on Next. The programme "ArcSoft Print Creations will launch automatically. Choose a category and then a template from the application. To do this, double-click on the desired template. Album page With this option you can create an album page consisting of one or multiple pictures. There are also several templates that you can use. Click the Album Page icon. Drag the desired pictures onto the bar at the bottom of the window. Click on Next. The programme "ArcSoft Print Creations will launch automatically. Choose a category and then a template from the application. To do this, double-click on the desired template. 72 -English
75 SCAZ 5.00 A1 Appendix Appendix Technical Specifications Capture sensor Lens Colour LCD Display 5 megapixels CMOS Wide-angle: 45cm to infinite Telephoto: 20cm to infinite F/ f= mm 7.5cm TFT Shutter speed Video: 1/15s ~ 1/2000s Photo: 2s ~ 1/4000s Photo mode resolutions Video mode resolutions Photo mode zoom Video mode zoom File format White Balance Effects Self-timer Video lamp Memory 3M (2048x1536), 5M (2592x1944), 16M (4608x3456, interpolated) QVGA 120fps (640x480), WVGA 60fps (800x480), 720p 30fps (1280x720), 720p 60fps (1280x720), 1080p 30fps (1920 x 1080) optical: 5x digital: 4x optical: 5x digital: 4x (not for 1080p nor QVGA) Video: AVI Photo: JPEG Automatic, Daylight, Cloudy, Fluorescent, Tungsten Normal, Black and white, Sepia 5s, 10s LED light 128 MB internal flash memory (partially used by the operating system), SD memory card reader max. 32GB, SD(HC) Class 6 English - 73
76 Appendix SCAZ 5.00 A1 SD memory card (included in the package) 4 GB TV Out PAL, NTSC, HDMI Power supply Rechargeable Li-Ion battery, NP V, 1700 mah Manufacturer: Roofer Technology Co., Ltd. Charger Manufacturer: Scope Technology Co., Ltd. Model: DJ04V20500A Input voltage: V AC, 50/60Hz Output voltage: 4.2 V 500 ma Operating temperature 0 C - 35 C Operating humidity max. 85 % rel. humidity Microphone Integrated Speakers Integrated Dimensions 60 x 62 x 120 mm (W x H x D with hand strap) Weight approx. 227g (without battery) 74 -English
English Dansk Deutsch
 English... 2 Dansk... 75 Deutsch... 147 V1.36 Table of Contents Introduction... 6 Intended Use... 6 Package Contents... 7 Technical Specifications... 8 Safety Instructions... 10 Note on mains disconnection...
Portal Registration. Check Junk Mail for activation . 1 Click the hyperlink to take you back to the portal to confirm your registration
 Portal Registration Step 1 Provide the necessary information to create your user. Note: First Name, Last Name and Email have to match exactly to your profile in the Membership system. Step 2 Click on the
3D NASAL VISTA 2.0
 USER MANUAL www.nasalsystems.es index index 2 I. System requirements 3 II. Main menu 4 III. Main popup menu 5 IV. Bottom buttons 6-7 V. Other functions/hotkeys 8 2 I. Systems requirements ``Recommended
3D NASAL VISTA TEMPORAL
 USER MANUAL www.nasalsystems.es index index 2 I. System requirements 3 II. Main menu 4 III. Main popup menu 5 IV. Bottom buttons 6-7 V. Other functions/hotkeys 8 2 I. Systems requirements ``Recommended
E-PAD Bluetooth hængelås E-PAD Bluetooth padlock E-PAD Bluetooth Vorhängeschloss
 E-PAD Bluetooth hængelås E-PAD Bluetooth padlock E-PAD Bluetooth Vorhängeschloss Brugervejledning (side 2-6) Userguide (page 7-11) Bedienungsanleitung 1 - Hvordan forbinder du din E-PAD hængelås med din
RPW This app is optimized for: For a full list of compatible phones please visit radiation. result.
 TM TM RPW-1000 Laser Distance Measurer This app is optimized for: For a full list of compatible phones please visit www.ryobitools.eu/phoneworks IMPORTANT SAFETY S READ AND UNDERSTAND ALL INSTRUCTIONS.
IBM Network Station Manager. esuite 1.5 / NSM Integration. IBM Network Computer Division. tdc - 02/08/99 lotusnsm.prz Page 1
 IBM Network Station Manager esuite 1.5 / NSM Integration IBM Network Computer Division tdc - 02/08/99 lotusnsm.prz Page 1 New esuite Settings in NSM The Lotus esuite Workplace administration option is
IPTV Box (MAG250/254) Bruger Manual
 Bruger Manual") IPTV Box (MAG250/254) Bruger Manual Når din STB (Set top Box) starter op, bliver der vist en pop up boks på skærmen, hvor du kan åbne EPG ved at trykke på F2 (Nogle bokse kan fortælle at den har brug for
IPTV Box (MAG250/254) Bruger Manual Når din STB (Set top Box) starter op, bliver der vist en pop up boks på skærmen, hvor du kan åbne EPG ved at trykke på F2 (Nogle bokse kan fortælle at den har brug for
Before you begin...2. Part 1: Document Setup...3. Part 2: Master Pages Part 3: Page Numbering...5. Part 4: Texts and Frames...
 InDesign Basics Before you begin...................2 Part 1: Document Setup................3 Part 2: Master Pages................ 4 Part 3: Page Numbering...............5 Part 4: Texts and Frames...............6
frame bracket Ford & Dodge
 , Rev 3 02/19 frame bracket 8552005 Ford & Dodge ITEM PART # QTY DESCRIPTION 1 00083 8 NUT,.50NC HEX 2 00084 8 WASHER,.50 LOCK 3 14189-76 2 FRAME BRACKET 4 14194-76 1 411AL FRAME BRACKET PASSENGER SIDE
how to save excel as pdf
 1 how to save excel as pdf This guide will show you how to save your Excel workbook as PDF files. Before you do so, you may want to copy several sheets from several documents into one document. To do so,
English... 2. Dansk... 74. Deutsch... 146 V 1.23
 English... 2 Dansk... 74 Deutsch... 146 V 1.23 Contents Trademarks... 6 Introduction... 6 Intended Use... 6 Package contents... 7 Technical specifications... 10 Safety instructions... 12 Recordings (photo/video)
Vores mange brugere på musskema.dk er rigtig gode til at komme med kvalificerede ønsker og behov.
 På dansk/in Danish: Aarhus d. 10. januar 2013/ the 10 th of January 2013 Kære alle Chefer i MUS-regi! Vores mange brugere på musskema.dk er rigtig gode til at komme med kvalificerede ønsker og behov. Og
Opera Ins. Model: MI5722 Product Name: Pure Sine Wave Inverter 1000W 12VDC/230 30A Solar Regulator
 Opera Ins Model: MI5722 Product Name: Pure Sine Wave Inverter 1000W 12VDC/230 30A Solar Regulator I.Precautions 1. Keep the product away from children to avoid children playing it as a toy and resultinginpersonalinjury.
User Manual for LTC IGNOU
 User Manual for LTC IGNOU 1 LTC (Leave Travel Concession) Navigation: Portal Launch HCM Application Self Service LTC Self Service 1. LTC Advance/Intimation Navigation: Launch HCM Application Self Service
English... 2. Dank... 47. Deutsch... 91
 English... 2 Dank... 47 Deutsch... 91 V 1.3 Contents Contents... 2 Trademarks... 5 Introduction... 5 Intended use... 5 Package Contents... 6 Technical specifications... 7 Safety instructions... 8 Explanation
DET KONGELIGE BIBLIOTEK NATIONALBIBLIOTEK OG KØBENHAVNS UNIVERSITETS- BIBLIOTEK. Index
 DET KONGELIGE Index Download driver... 2 Find the Windows 7 version.... 2 Download the Windows Vista driver.... 4 Extract driver... 5 Windows Vista installation of a printer.... 7 Side 1 af 12 DET KONGELIGE
Help / Hjælp
 Home page Lisa & Petur www.lisapetur.dk Help / Hjælp Help / Hjælp General The purpose of our Homepage is to allow external access to pictures and videos taken/made by the Gunnarsson family. The Association
INSTALLATION INSTRUCTIONS STILLEN FRONT BRAKE COOLING DUCTS NISSAN 370Z P/N /308960!
 Materials supplied: 1. (10) Zip Ties 2. (4) Hose Clamps 3. (2) Brake Duct Hose 4. (2) Brake Shields 5. (2) Front Brake Ducts ( Stock Fascia Only ) 6. (2) Washers 1 OD ( Stock Fascia Only ) 7. (8) Shims
ROTERENDE TABURET 360 GRADER MED HYL Brugsanvisning. ROTATING SHOWER STOOL WITH TRAY Installation Manual. Size: 148 x 210 mm 105g copper paper
 Size: 148 x 210 mm 105g copper paper ROTERENDE TABURET 360 GRADER MED HYL Brugsanvisning ROTATING SHOWER STOOL WITH TRAY Installation Manual Model. 10853 1. Fjern emballagen. 2. Taburettens ben samles
English Dansk Deutsch
 English... 2 Dansk... 53 Deutsch... 105 V 1.2 Contents 1. Intended use... 4 2. Package contents... 5 3. Technical specifications... 6 4. Safety instructions... 7 5. Overview... 12 5.1 Controls and displays...
DIVAR VIGTIGT! / IMPORTANT! MÅL / DIMENSIONS. The DIVAR wall lamp comes standard. with 2.4 m braided cord and a plug in power supply (EU or UK).
.") DIVAR VIGTIGT! / IMPORTANT! VIGTIGT læs vores anvisninger før du bruger produktet. Har du problemer med den elektriske installation, skal du kontakte en elektriker. Sørg for at altid slukke for strømmen
DIVAR VIGTIGT! / IMPORTANT! VIGTIGT læs vores anvisninger før du bruger produktet. Har du problemer med den elektriske installation, skal du kontakte en elektriker. Sørg for at altid slukke for strømmen
TM4 Central Station. User Manual / brugervejledning K2070-EU. Tel Fax
 TM4 Central Station User Manual / brugervejledning K2070-EU STT Condigi A/S Niels Bohrs Vej 42, Stilling 8660 Skanderborg Denmark Tel. +45 87 93 50 00 Fax. +45 87 93 50 10 info@sttcondigi.com www.sttcondigi.com
Sikkerhedsvejledning
 11-01-2018 2 Sikkerhedsvejledning VIGTIGT! Venligst læs disse instruktioner inden sengen samles og tages i brug Tjek at alle dele og komponenter er til stede som angivet i vejledningen Fjern alle beslagsdele
MS-H280-Pro Magnetic Stirrer
 MS-H280-Pro Magnetic Stirrer www..com Copyright: No part of this manual may be reproduced or transmitted without prior written permission of. VERSION201407 CONTENTS Chapter 1: Working Principle... 3 1
DANSK INSTALLATIONSVEJLEDNING VLMT500 ADVARSEL!
 DANSK INSTALLATIONSVEJLEDNING VLMT500 Udpakningsinstruktioner Åben indpakningen forsigtigt og læg indholdet på et stykke pap eller en anden beskyttende overflade for at undgå beskadigelse. Kontroller at
USER GUIDE Version 2.9. SATEL Configuration Manager. Setup and configuration program. for SATELLINE radio modem
 USER GUIDE Version 2.9 Setup and configuration program for SATELLINE radio modem 1 TABLE OF CONTENTS 1 TABLE OF CONTENTS... 2 2 GENERAL... 3 2.1 ABOUT SATEL CONFIGURATION MANAGER... 3 3 QUICK GUIDE TO
Vejledning til at tjekke om du har sat manuel IP på din computer.
 Indhold Vejledning til at, komme på nettet. (DANSK)... 2 Gælder alle systemer.... 2 Vejledning til at tjekke om du har sat manuel IP på din computer.... 2 Windows 7... 2 Windows Vista... 2 Windows XP...
Status på det trådløse netværk
 Status på det trådløse netværk Der er stadig problemer med det trådløse netværk, se status her: http://driftstatus.sdu.dk/?f=&antal=200&driftid=1671#1671 IT-service arbejder stadig med at løse problemerne
Privat-, statslig- eller regional institution m.v. Andet Added Bekaempelsesudfoerende: string No Label: Bekæmpelsesudførende
 Changes for Rottedatabasen Web Service The coming version of Rottedatabasen Web Service will have several changes some of them breaking for the exposed methods. These changes and the business logic behind
ATEX direktivet. Vedligeholdelse af ATEX certifikater mv. Steen Christensen stec@teknologisk.dk www.atexdirektivet.
 ATEX direktivet Vedligeholdelse af ATEX certifikater mv. Steen Christensen stec@teknologisk.dk www.atexdirektivet.dk tlf: 7220 2693 Vedligeholdelse af Certifikater / tekniske dossier / overensstemmelseserklæringen.
Shooting tethered med Canon EOS-D i Capture One Pro. Shooting tethered i Capture One Pro 6.4 & 7.0 på MAC OS-X 10.7.5 & 10.8
 Shooting tethered med Canon EOS-D i Capture One Pro Shooting tethered i Capture One Pro 6.4 & 7.0 på MAC OS-X 10.7.5 & 10.8 For Canon EOS-D ejere der fotograferer Shooting tethered med EOS-Utility eller
DIVAR VIGTIGT! / IMPORTANT! MÅL / DIMENSIONS
 DIVAR VIGTIGT! / IMPORTANT! VIGTIGT læs vores anvisninger før du bruger produktet. Har du problemer med den elektriske installation, skal du kontakte en elektriker. Sørg for at altid slukke for strømmen
QUICK START Updated:
 QUICK START Updated: 24.08.2018 For at komme hurtigt og godt igang med dine nye Webstech produkter, anbefales at du downloader den senest opdaterede QuickStart fra vores hjemmeside: In order to get started
Brug sømbrættet til at lave sjove figurer. Lav fx: Få de andre til at gætte, hvad du har lavet. Use the nail board to make funny shapes.
 Brug sømbrættet til at lave sjove figurer. Lav f: Et dannebrogsflag Et hus med tag, vinduer og dør En fugl En bil En blomst Få de andre til at gætte, hvad du har lavet. Use the nail board to make funn
NYT UDSEENDE OG FORBEDREDE KVALIFIKATIONER DEFINERER FUJIFILMS FINEPIX A345 ZOOM OG FINEPIX A350 ZOOM DIGITAL KAMERAER
 Kontakt: Jan Fugmann Petersen Fujifilm Danmark A/S tlf. 45 66 22 44 janp@fujifilm.dk - mobiltlf. 21 40 41 04 NYT UDSEENDE OG FORBEDREDE KVALIFIKATIONER DEFINERER FUJIFILMS FINEPIX A345 ZOOM OG FINEPIX
MultiProgrammer Manual
 MultiProgrammer Manual MultiProgrammeren bruges til at læse og skrive værdier til ModBus register i LS Controls frekvensomformer E 1045. Dansk Version side 2 til 4 The MultiProgrammer is used for the writing
 Instructions for use www.nilfisk-advance.com 1 2 3 PRECAUTIONARY MEASURES If the opening that sucks in the air, thesuction pipe orthe telescopic wand on pipe are blocked, you should switch off the vacuum
Varenr.: 553925 90 højre 553926 90 venstre 554027 90º højre med coating 554028 90º venstre med coating
 DK GH Skiftespor Varenr.: 55395 90 højre 55396 90 venstre 55407 90º højre med coating 55408 90º venstre med coating 553991 60º højre 553995 60º venstre 551058 60º højre med coating 551059 60º venstre med
QUICK START Updated: 18. Febr. 2014
 QUICK START Updated: 18. Febr. 2014 For at komme hurtigt og godt igang med dine nye Webstech produkter, anbefales at du downloader den senest opdaterede QuickStart fra vores hjemmeside: In order to get
Davo-Meg 1002 & 1002B Dansk manual Side 3-5 English user manual Page 6-8
 Davo-Meg 1002 & 1002B Dansk manual Side 3-5 English user manual Page 6-8 DK: Davo-Meg 1002: 87 98 301 819 Davo-Meg 1002B: 87 98 301 822 EAN: Davo-Meg 1002: 5703534100059 Davo-Meg 1002B: 5703534100202 Indhold
Aktivering af Survey funktionalitet
 Surveys i REDCap REDCap gør det muligt at eksponere ét eller flere instrumenter som et survey (spørgeskema) som derefter kan udfyldes direkte af patienten eller forsøgspersonen over internettet. Dette
Accessing the ALCOTEST Instrument Upload Data - NJSP Public Website page -
 Accessing the ALCOTEST Instrument Upload Data - NJSP Public Website page - www.njsp.org Public Information Access Public Information Page Selection Within the Public Information Drop Down list, select
Unitel EDI MT940 June 2010. Based on: SWIFT Standards - Category 9 MT940 Customer Statement Message (January 2004)
") Unitel EDI MT940 June 2010 Based on: SWIFT Standards - Category 9 MT940 Customer Statement Message (January 2004) Contents 1. Introduction...3 2. General...3 3. Description of the MT940 message...3 3.1.
Unitel EDI MT940 June 2010 Based on: SWIFT Standards - Category 9 MT940 Customer Statement Message (January 2004) Contents 1. Introduction...3 2. General...3 3. Description of the MT940 message...3 3.1.
Brugsanvisning. Installation Manual
 Manual size: 148 x 210 mm 175g copper paper(铜版纸印刷) UNIVERSAL BIL TAGBAGAGEBÆRER Brugsanvisning UNIVERSAL CAR ROOF RACK Installation Manual Model no. 10889 Tak fordi du valgte dette produkt, som vi håber
Skidding System. Challenge Us
 Skidding System n Malm Orstads cutting edge Engineering department designs and fabricates tailor made skidding systems for all kinds of enviroments. Our skidding systems are amongst the most efficient
RAVE. The New Radar Motion Sensor Rated IP67: Optimized for Harsh Outdoor Applications
 RAVE The New Radar Motion Sensor Rated IP67: Optimized for Harsh Outdoor Applications Product Presentation RAVE radar motion sensor In addition to the RaDec and RMS product families, the new RAVE radar
WIFI koder til Miljøagenturet: Brugernavn: AIACE course Kodeord: TsEG2pVL EU LOGIN KURSUS 21. AUGUST FORMIDDAG:
 WIFI koder til Miljøagenturet: Brugernavn: AIACE course Kodeord: TsEG2pVL EU LOGIN KURSUS 21. AUGUST 2019 - FORMIDDAG: EU Login er EU s NemID. Det er blot adgangsnøglen til en række EU-applikationer. Vælg
Project Step 7. Behavioral modeling of a dual ported register set. 1/8/ L11 Project Step 5 Copyright Joanne DeGroat, ECE, OSU 1
 Project Step 7 Behavioral modeling of a dual ported register set. Copyright 2006 - Joanne DeGroat, ECE, OSU 1 The register set Register set specifications 16 dual ported registers each with 16- bit words
Brinell Hardness Indentation Measurement System Operation Manual
 Thank you for purchasing Brinell hardness indentation measurement system, to avoid any unnecessary damage and loss, please read this Manual carefully before operation and keep it safety for further study.
Black Jack --- Review. Spring 2012
 Black Jack --- Review Spring 2012 Simulation Simulation can solve real-world problems by modeling realworld processes to provide otherwise unobtainable information. Computer simulation is used to predict
1. Basic safety information 3 2. Proper use 3
 307346 EN Motion detector LUXA 103-100 U WH 1030040 LUXA 103-100 UA WH 1030045 1. Basic safety information 3 2. Proper use 3 Disposal 3 3. Device description 4 4. Installation and connection 4 Installing
DANSK / ENGLISH DS PRO PROJEKTORBESLAG 180 CM MANUAL DS PRO PROJECTOR BRACKET 180 CM OWNERS MANUAL
 DANSK / ENGLISH DANSK SIDE 1 DS Pro PRO projektorbeslag PROJEKTORBESLAG 180 cm 180 CM Tillykke med dit nye DS Pro projektorbeslag 180 cm. For at opnå det bedste resultat bedes du læse denne manual og udelukkende
Vejledning til Sundhedsprocenten og Sundhedstjek
 English version below Vejledning til Sundhedsprocenten og Sundhedstjek Udfyld Sundhedsprocenten Sæt mål og lav en handlingsplan Book tid til Sundhedstjek Log ind på www.falckhealthcare.dk/novo Har du problemer
English... 2. Dansk... 29. Deutsch... 59
 English... 2 Dansk... 29 Deutsch... 59 V 1.3 Table of Contents Introduction... 3 Intended use... 3 Package contents... 3 Technical specifications... 4 Copyright... 4 Safety instructions... 5 Before you
Lithium-Ion Jump-Starters / Jumper Cables
 AUTOMOTIVE Lithium-Ion Jump-Starters / Jumper Cables Lithium-Ion Jump-Starter 1300: Part No. DRLJS130 1300 4 6 8 cylinder (6 liter gas 3 liter diesel) SafeJump technology prevents sparking and protects
Userguide. NN Markedsdata. for. Microsoft Dynamics CRM 2011. v. 1.0
 Userguide NN Markedsdata for Microsoft Dynamics CRM 2011 v. 1.0 NN Markedsdata www. Introduction Navne & Numre Web Services for Microsoft Dynamics CRM hereafter termed NN-DynCRM enable integration to Microsoft
BRUGERVEJLEDNING TIL REVOLTA TRANSFORMER 2-WAY VOLTAGE TRANSFORMER USER MANUAL RV-2400
 BRUGERVEJLEDNING TIL REVOLTA TRANSFORMER 2-WAY VOLTAGE TRANSFORMER USER MANUAL RV-2400 BETJENINGSVEJLEDNING 1. Vigtigt: Før du tilslutter spændingstransformerne til stikkontakten i dit hjem, skal du sørge
The purpose of our Homepage is to allow external access to pictures and videos taken/made by the Gunnarsson family.
 General The purpose of our Homepage is to allow external access to pictures and videos taken/made by the Gunnarsson family. Formålet med vores hjemmesiden er at gøre billeder og video som vi (Gunnarsson)
SPECIALTRYKKERIETS KUNDE WEBPORTAL KOM GODT I GANG
 SPECIALTRYKKERIETS KUNDE WEBPORTAL KOM GODT I GANG Jeg håber du får fornøjelse af vores nye værktøj. WebApproval skal gøre det nemmere og mere sikkert for dig at godkende din tryksager. Har du spørgsmål,
Elma DT 802D CO2 logger. Dansk/Norsk 2 English 4 EAN:
 Elma DT 802D CO2 logger Dansk/Norsk 2 English 4 EAN: 5706445840366 Elma DT_802D CO2 logger 2 Brugervejledning Sikkerhed Læs venligst denne brugermanual grundigt igennem og anvend udelukkende instrumentet
UNISONIC TECHNOLOGIES CO.,
 UNISONIC TECHNOLOGIES CO., 3 TERMINAL 1A NEGATIVE VOLTAGE REGULATOR DESCRIPTION 1 TO-263 The UTC series of three-terminal negative regulators are available in TO-263 package and with several fixed output
Hi-Res Audio/DNC Headset MDR-NC750
 Brugervejledning Hi-Res Audio/DNC Headset MDR-NC750 Indholdsfortegnelse Introduktion... 3 Introduktion...3 Oversigt... 3 De grundlæggende funktioner... 4 Sådan bærer du headsettet... 4 Tilslutning af dit
HR7775, HR7774. 4203.000.5832.4.indd 1 15-09-09 15:28
 HR7775, HR7774 4203.000.5832.4.indd 1 15-09-09 15:28 EN DA DE EL ES FI FR IT NL NO PT SV TR English Dansk Deutsch Ελληνικα Español Suomi Français Italiano Nederlands Norsk Português Svenska Türkçe AR FA
VIBRATION ALARM CLOCK
 VIBRATION ALARM CLOCK GB IE DK User manual and service information Brugervejledning og serviceinformation Vibrating Alarm Clock Auriol VWS2010 Operating and Safety Instructions... 2 Vibrerende vækkeur
Digital Quick Setup Guide
 Digital 9 Quick Setup Guide live, ch, sys The operating odes of the EM 946 Observing paraeters during transission live RF and audio level Diversity evaluation Configuring the syste sys Charge status of
Assembly Instructions. ROLZ-2 Portable AV/Conference Center
 1 Assembly Instructions ROLZ-2 Portable AV/Conference Center Rolz-2 Portable AV/Conference Center Part Drawing Description Qty Part Drawing Description Qty Hardware List A 1 ½ Flat Head Screw 2 EA P-1
Boligsøgning / Search for accommodation!
 Boligsøgning / Search for accommodation! For at guide dig frem til den rigtige vejledning, skal du lige svare på et par spørgsmål: To make sure you are using the correct guide for applying you must answer
PARALLELIZATION OF ATTILA SIMULATOR WITH OPENMP MIGUEL ÁNGEL MARTÍNEZ DEL AMOR MINIPROJECT OF TDT24 NTNU
 PARALLELIZATION OF ATTILA SIMULATOR WITH OPENMP MIGUEL ÁNGEL MARTÍNEZ DEL AMOR MINIPROJECT OF TDT24 NTNU OUTLINE INEFFICIENCY OF ATTILA WAYS TO PARALLELIZE LOW COMPATIBILITY IN THE COMPILATION A SOLUTION
Engelsk. Niveau D. De Merkantile Erhvervsuddannelser September Casebaseret eksamen. og
 052431_EngelskD 08/09/05 13:29 Side 1 De Merkantile Erhvervsuddannelser September 2005 Side 1 af 4 sider Casebaseret eksamen Engelsk Niveau D www.jysk.dk og www.jysk.com Indhold: Opgave 1 Presentation
WATER BATH I Instruction Manual. Water Bath. Digital Control. Cat. No
 Water Bath Digital Control Cat. No 340120 General Information 1. Unpack with care Please contact our sales office if any items are missing. 2. Read this instruction manual before start up. 3. For any question
Nyhedsmail, december 2013 (scroll down for English version)
") Nyhedsmail, december 2013 (scroll down for English version) Kære Omdeler Julen venter rundt om hjørnet. Og netop julen er årsagen til, at NORDJYSKE Distributions mange omdelere har ekstra travlt med at
Nyhedsmail, december 2013 (scroll down for English version) Kære Omdeler Julen venter rundt om hjørnet. Og netop julen er årsagen til, at NORDJYSKE Distributions mange omdelere har ekstra travlt med at
Danish Language Course for Foreign University Students Copenhagen, 13 July 2 August 2016 Advanced, medium and beginner s level.
 Danish Language Course for Foreign University Students Copenhagen, 13 July 2 August 2016 Advanced, medium and beginner s level Application form Must be completed on the computer in Danish or English All
Resource types R 1 1, R 2 2,..., R m CPU cycles, memory space, files, I/O devices Each resource type R i has W i instances.
 System Model Resource types R 1 1, R 2 2,..., R m CPU cycles, memory space, files, I/O devices Each resource type R i has W i instances. Each process utilizes a resource as follows: request use e.g., request
Elektriske apparater til husholdningsbrug o.l. Sikkerhed Del 1: Generelle krav
 Dansk standard Tillæg DS/IEC 60335-1/A1:2013 + Corr 1:2014 1. udgave 2014-05-08 Elektriske apparater til husholdningsbrug o.l. Sikkerhed Del 1: Generelle krav Household and similar electrical appliances
Engelsk. Niveau C. De Merkantile Erhvervsuddannelser September 2005. Casebaseret eksamen. www.jysk.dk og www.jysk.com.
 052430_EngelskC 08/09/05 13:29 Side 1 De Merkantile Erhvervsuddannelser September 2005 Side 1 af 4 sider Casebaseret eksamen Engelsk Niveau C www.jysk.dk og www.jysk.com Indhold: Opgave 1 Presentation
OG8020 Tablet Manual
 OG8020 Tablet Manual Each OGAWA top 3D massage chair is equipped with a tablet, which replace the traditional buttons remote to operate the chair via Bluetooth built-in, let you enjoy the most advanced
Danish Language Course for International University Students Copenhagen, 12 July 1 August Application form
 Danish Language Course for International University Students Copenhagen, 12 July 1 August 2017 Application form Must be completed on the computer in Danish or English All fields are mandatory PERSONLIGE
DK - Quick Text Translation. HEYYER Net Promoter System Magento extension
 DK - Quick Text Translation HEYYER Net Promoter System Magento extension Version 1.0 15-11-2013 HEYYER / Email Templates Invitation Email Template Invitation Email English Dansk Title Invitation Email
PMDK PC-Side Basic Function Reference (Version 1.0)
") PMDK PC-Side Basic Function Reference (Version 1.0) http://www.icpdas.com PMDK PC-Side Basic Function Reference V 1.0 1 Warranty All products manufactured by ICPDAS Inc. are warranted against defective
PMDK PC-Side Basic Function Reference (Version 1.0) http://www.icpdas.com PMDK PC-Side Basic Function Reference V 1.0 1 Warranty All products manufactured by ICPDAS Inc. are warranted against defective
Betjeningsvejledning
 Betjeningsvejledning Baby Cam BC-10 Version 1.3 ease read this user manual carefully before using this produc 1 ilure to understand operation procedures may result in injury Packing List Packing List Indhold
Specifikationer: Producer: Unitron a/s Kokmose 6, 6000 Kolding. Tlf Fax
 DK MANUAL TIL SMÅGRISE Number: 1212-1201 Number: 1212-1202 Number: 1212-1203 HOLDER TIL Number: 1212-1205 MIXERHJUL TIL Number: 1212-1210 Specifikationer: UniFeeder monteres på siden af skillevæg i faresti,
DANSK. INSTALLATIONSVEJLEDNING DS Pro Lærred med motor ADVARSEL!
 DANSK INSTALLATIONSVEJLEDNING DS Pro Lærred med motor Udpakningsinstruktioner Åben indpakningen forsigtigt og læg indholdet på et stykke pap eller en anden beskyttende overflade for at undgå beskadigelse.
VEDLIGEHOLDELSE AF SENGE
 DK VEDLIGEHOLDELSE AF SENGE VEDLIGEHOLDELSE AF SENGE Sengen er typisk det møbel i hjemmet som bruges i flest timer gennem døgnet. Det betyder at sengen udsættes for et stort slid, og det er derfor vigtigt
Bookingmuligheder for professionelle brugere i Dansehallerne 2015-16
 Bookingmuligheder for professionelle brugere i Dansehallerne 2015-16 Modtager man økonomisk støtte til et danseprojekt, har en premieredato og er professionel bruger af Dansehallerne har man mulighed for
GUIDE TIL BREVSKRIVNING
 GUIDE TIL BREVSKRIVNING APPELBREVE Formålet med at skrive et appelbrev er at få modtageren til at overholde menneskerettighederne. Det er en god idé at lægge vægt på modtagerens forpligtelser over for
Brugervejledning. MHL to HDMI Adapter IM750
 Brugervejledning MHL to HDMI Adapter IM750 Indholdsfortegnelse Indledning...3 Oversigt over MHL to HDMI Adapter...3 Kom godt i gang...4 Smart Connect...4 Opgradering af Smart Connect...4 Brug af MHL to
Brugermanual. EnVivo Cassette Converter
 Brugermanual EnVivo Cassette Converter INDHOLD Introduktion... 3 Produktegenskaber... 3 Udpakning af Cassette Converter... 3 Isætning / udskiftning af batterier... 4 Installation af software... 4 Beskrivelse
Basic statistics for experimental medical researchers
 Basic statistics for experimental medical researchers Sample size calculations September 15th 2016 Christian Pipper Department of public health (IFSV) Faculty of Health and Medicinal Science (SUND) E-mail:
United Nations Secretariat Procurement Division
 United Nations Secretariat Procurement Division Vendor Registration Overview Higher Standards, Better Solutions The United Nations Global Marketplace (UNGM) Why Register? On-line registration Free of charge
ME6212. High Speed LDO Regulators, High PSRR, Low noise, ME6212 Series. General Description. Typical Application. Package
 High Speed LDO Regulators, High PSRR, Low noise, Series General Description The series are highly accurate, low noise, CMOS LDO Voltage Regulators. Offering low output noise, high ripple rejection ratio,
Blackwire 215/225. Analog headset med ledning. Brugervejledning
 Blackwire 215/225 Analog headset med ledning Brugervejledning Indhold Velkommen 3 Brug for mere hjælp? 3 Hvad er der i æsken 4 Integrerede kontroltaster 5 Når du har dit headset på 6 Juster hovedbøjlen
Advarsel: Læs alle instrukser og færdiggør samlingen før brug. Det kan være en fordel at være to til at samle trampolinen.
 InGround trampolin Advarsel: - Indeholder små dele som kan forårsage kvælning. - Trampolinen må ikke bruges af børn under 3 år. - For at undgå at glide, bør trampolinen ikke bruges når den er våd. - Kun
Læs vejledningen godt igennem, før du begynder at samle vuggen. Please read the instruction carefully before you start.
 00 Samlevejledning på Vugge ssembly instruction for the cradle Læs vejledningen godt igennem, før du begynder at samle vuggen. Please read the instruction carefully before you start. www.oliverfurniture.dk
Tork Aftørringspapir Standard, M1. Fordel. Produktspecifikation. Beskrivelse. Farve: Hvid Type: Mini Centerfeed Rulle
 Fordel Allround aftørringspapir Ideel til rengøring af glas Velegnet til håndaftørring Godkendt til kontakt med fødevarer Tork Easy Handling, emballage som er let at løfte, åbne og folde sammen, når du
Recall information fra C. Reinhardt
 Ballerup, den 19. januar 2016 Recall information fra C. Reinhardt Kære alle Vi har modtaget en recall fra Suzuki Global. I dette brev kan du læse de vigtigste punkter vedrørende problemerne og hvordan
Remember the Ship, Additional Work
 51 (104) Remember the Ship, Additional Work Remember the Ship Crosswords Across 3 A prejudiced person who is intolerant of any opinions differing from his own (5) 4 Another word for language (6) 6 The
DAY HUNTER KIT ASSEMBLY INSTRUCTIONS
 DAY HUNTER KIT ASSEMBLY INSTRUCTIONS Attach the Shoulder Harness to the Frame 1. Pass the Upper Harness Attachment Straps (Diagram 1.) through the attachment points located inboard on the upper portion
Brugervejledning. Xperia P TV Dock DK21
 Brugervejledning Xperia P TV Dock DK21 Indholdsfortegnelse Indledning...3 Bagside oversigt over TV Dock...3 Kom godt i gang...4 Håndtering af LiveWare...4 Opgradering af Håndtering af LiveWare...4 Brug
Xperia TX TV Dock DK22 Xperia T TV Dock DK23
 Brugervejledning Xperia TX TV Dock DK22 Xperia T TV Dock DK23 Indholdsfortegnelse Indledning...3 Oversigt over TV Dock...3 Kom godt i gang...4 Smart Connect...4 Opgradering af Smart Connect...4 Brug af