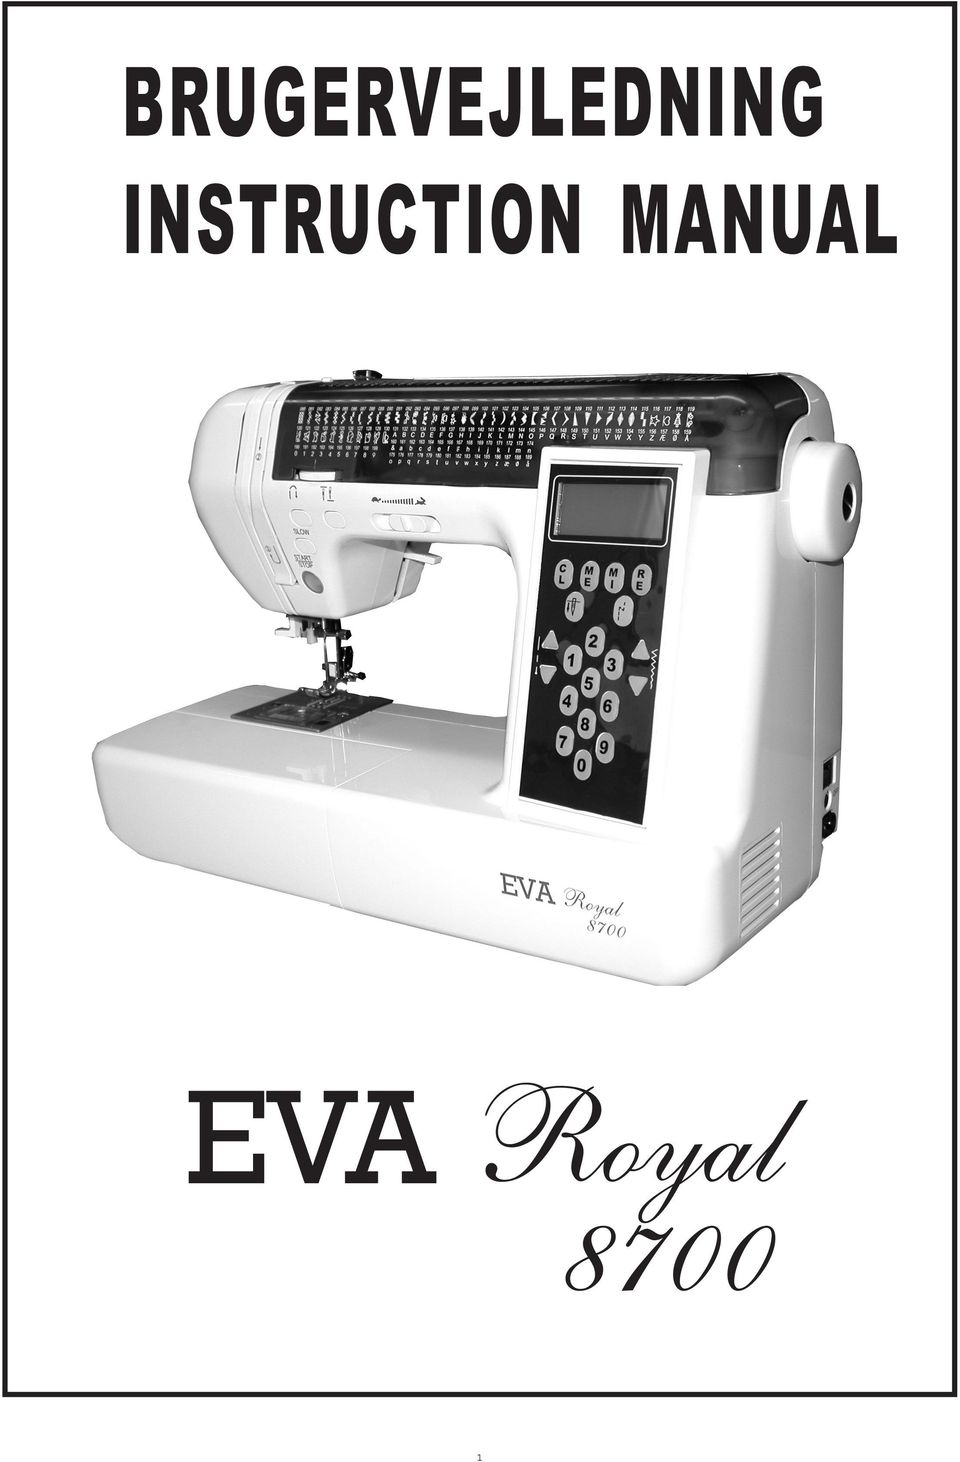
BRUGERVEJLEDNING INSTRUCTION MANUAL. EVA Royal 8700
|
|
|
- Birgit Sommer
- 10 år siden
- Visninger:
Transkript
1 BRUGERVEJLEDNING INSTRUCTION MANUAL EVA Royal 8700
2

3 DANSK ENGLISH DANSK ENGLISH

4 DANSK ENGLISH

5 Indholdsfortegnelse Indholdsfortegnelse...5 Sikkerheds instruktioner...6 Genanvendelse...7 Symaskinens dele...8 Tilbehør...0 Udskiftning af trykfod... Udskiftning af nål... Tilslutning af symaskinen... Kontrol knapper og transportørsænker... Fodpedal... Kontrol panel funktioner....5 Spoling...6 Trådning af symaskinen...8 Kom godt igang...0 Regulering af trådspænding... Nål og trådguide... Stikkesting... Overlock...6 Blindsting...7 Knaphuller stings zigzag...0 Strækkesting...0 Stinghukommelse... Patchwork... Applikation... Lynlås... Muslingesøm... Justering af dekorations sting... Vedligeholdelse...5 Fejlfinding...6 Stingoversigt...7 DANSK 5

6 RÅD OM SIKKERHED OG ADVARSLER. Vigtige sikkerheds anvisninger Ved brug af elektriske symaskiner skal de grundlæggende sikkerhedsforanstaltninger altid følges, også følgende:. Læs alle instruktionerne før brug af symaskinen.. Denne symaskine er lavet til almindelig husholdningsbrug. En symaskine må aldrig efterlades når den er tilsluttet el-nettet. Tag altid stikket ud af stikkontakten efter brug, og før rengøring af symaskinen. Advarsel!! DANSK For at undgå forbrænding, ild, elektrisk stød eller anden skade mod person.... Anvend ikke symaskinen som legetøj. Opsyn er nødvendig når symaskinen anvendes af børn.. Anvend kun symaskinen, som beskrevet i brugsanvisningen.. Anvend aldrig symaskinen.. hvis den har beskadiget ledning eller stikprop.. hvis den ikke kører ordentlig... hvis den har været tabt eller beskadiget... hvis den har været tabt i vand. Indlever symaskinen til nærmeste autoriserede forhandler eller servicecenter til eftersyn, elektrisk reparation eller mekanisk justering.. Anvend aldrig symaskinen hvis ventilationsåbningerne er blokerede. Hold ventilationsåbningerne på symaskinen og fodpedalen fri for støv og løse trævler. 5. Tab aldrig noget ind i symaskinen eller isæt genstande i åbningerne på symaskinen. 6. Anvend ikke symaskinen udendørs. 7. Anvend ikke symaskinen hvor sprayprodukter bliver brugt eller hvor oxygen bliver administreret. 8. Ved afbrydelse, sæt tænd/sluk knappen på OFF position, og tag stikket ud af stikkontakten. 9. Afbryd ikke ved at trække i ledningen. Ved afbrydelse tag fat i stikket, ikke i ledningen. 0. Hold fingrene væk fra alle bevægelige dele. Stor forsigtighed kræves omkring symaskinenålen.. Anvend altid den rigtige stingplade. Forkert stingplade kan beskadige maskinen.. Anvend ikke bøjede nåle.. Træk eller hiv ikke i stoffet under syningen. Det vil beskadige nålen så den knækker.. Sæt symaskinens tænd/sluk knap på OFF position når der justeres i nåleområdet, f.eks. ved trådning, nåleskift, udskiftning af trykfod m.m. 5. Afbryd altid maskinen på stikkontakten ved smøring eller ved anden service. 6. Afbryd altid på net-stikket før udskiftning af elpære. Udskift altid pæren med en tilsvarende. Lyd niveau er mindre end 70dB (A) GEM DENNE INSTRUKTION 6

7 Genanvendelse Vi er fast besluttet på at beskytte miljøet. Vi bestræber os på at vore produkter fremstilles så miljørigtige som muligt. Ønsker De at bortskaffe produktet, bedes De afhænde det på en miljørigtig måde Det afkrydsede skraldespandsmotiv, afbilledet ovenfor og på produktets el-label, betyder at produktet falder ind under Europa-Parlamentets og Rådets direktiv 00/96/EF om affald af elektrisk og elektronisk udstyr (WEEE) samt begrænsning af anvendelsen af visse farlige stoffer i elektrisk og elektronisk udstyr (ROHS) og må derfor ikke bortskaffes sammen med husholdningsaffald. Ønskes produktet bortskaffet skal De sørge for at produktet bliver afhændet ifølge nationale og lokale bestemmelser og at produktet afhændes i kategori små husholdningsapparater WEEE. De er ansvarlig for at produktet bortskaffes lovmæssigt korrekt. Ved søgning på Internettet eller ved kontakt til rette myndighed lokalt eller nationalt, kan De få oplyst hvor den nærmeste miljøstation er placeret og hvordan genanvendelsessystemet skal bruges. Hvis De køber et nyt produkt direkte fra os tager vi Deres gamle produkt tilbage uanset mærke. De kan hermed bidrage positivt til bekæmpelse af forurening samt genanvendelse og begrænsning af visse farlige stoffer under WEEE, samt disse stoffers indvirkning på miljøet. Farlige stoffer i elektroniske og elektriske produkter kan have en indflydelse på menneskelig sundhed og på miljøet. DANSK 7

8 SYMASKINENS DELE DANSK Lampedæksel. Retur knap. Nål op/ned position. Trådskærer 5. Hastigheds knap 6. Start/Stop knap (hvis fodpedal ikke er tilsluttet) 7. Forlængerbord 8. Stingpanel/topdæksel 9. Håndhjul 0. Kontrol panel. Trådgiver. Trådspændingsknap. Trådguide dæksel. Hastigheds knap 5. Trådhætte 6. Trådrulleholder 7. Spole trådføring 8. Spoleapparat 9. Spolestop 8

9 SYMASKINENS DELE FORTSAT DANSK 0. Håndtag. ON/OFF knap. Pedal tilslutning. El tilslutning. El kabel 5. Fodpedal 6. Tråd guide 7. Nåletrådearm 8. Nåletråder 9. Knaphulsarm 0. Trykfodsskrue. Stingplade. Spolehus dæksel. Trykfodsløfter. Trådskærer 5. Nåleholder skrue 6. Tråd guide 7. Trykfod 8. Transportørsænker

10 TILBEHØR. Nåle. Spoler. Spolehætte (stor). Spolehætte (lille) 5. Filt 6. Skruetrækker til stingplade 7. Skruetrækker (stor og lille) 8. Olie 9. Opsprætter m. børste 0. Spolepind. Blindstingsfod. Overlock fod. Lynlås fod. Quiltestang 5. Knaphuls fod DANSK 5 ÅBNING AF TILBEHØRSÆSKE For at åbne tilbehørsæsken, løft i venstre side foroven og træk imod dem selv. FRIARMS-SYNING Deres symaskine bruges let med eller uden forlængerbord. Forlængerbordet øger syområdet mens den er påsat. Ved at fjerne forlængerbordet, som vist her til højre, konverteres symaskinen til friarmssyning. 0

11 AF- OG PÅMONTERING AF TRYKFOD Trykfødder udskiftes afhængigt af hvilken type syning eller stingvalg De vælger. ADVARSEL: Undgå ulykke. Sluk for strømtilførsel inden De skifter trykfod.. Drej håndhjulet indtil nålen står i højeste position.. Hæv trykfoden.. Tryk på trykfodsudløseren og trykfoden falder ned. (Se illustration). Placer trykfoden således at pinden A passer op i slidsen B på trykfodsholderen. 5. Sænk trykfodsholderen for at låse trykfoden fast. 5 DANSK AFMONTERING AF TRYKFODSHOLDER Nogle trykfødder kræver at trykfodsholderen afmonteres før brug. Afmontering: hæv trykfodsholderen og løsen trykfodsholderskruen.(c) Påmontering: Trykfodsholderen skubbes så langt op på trykfodsstangen som muligt, skruen tilspændes. UDSKIFTNING AF NÅL C A B C B Trykfodspind Trykfodsholder slids Trykfodsholderskrue A Vælg altid en nål der passer til materiale valg. (Se nål og trådguide side ). ADVARSEL: undgå ulykke Sluk for strømtilførsel før De fjerner nålen 5. Drej på håndhjulet indtil nålen står i højeste position.. Løsn nåleholderskruen.. Tag nålen ud.. Sæt en ny nål i. Den flade side skal vende væk fra Dem selv. Skub nålen opad så langt den kan komme. 5. Stram nåleskruen igen. A. Kontroller nålen er ubeskadiget. Brug ikke bøjede eller på anden måde beskadigede nåle. A

12 TILSLUTNING AF SYMASKINEN Placer symaskinen på et fladt og stabilt underlag.. Sæt stikket i stikkontakten.. Forbind kablet med symaskinen. Se illustration.. Tryk på ON knappen.. En lampe indikerer at maskinen er tændt. 5. Sluk for symaskinen ved at trykke på knappen OFF, tag stikket ud af stikkontakten. DANSK FARE: Minimer risokoen for elektrisk stød Efterlad aldrig maskinen uden opsyn mens den er tilsluttet elnettet. Tag altid stikket ud af stikkontakten efter brug, og før rengøring/ vedligeholdese af symaskinen ADVARSEL: Mimimer faren for forbrænding, brand, elektrisk stød eller skade på personer. Afbryd ikke ved at trække i ledningen, tag fat i elstikket og træk ud af stikkontakten.

13 KONTROL KNAPPER OG TRANSPORTØRSÆNKNING A. RETURSYNINGSKNAP Symaskinen syr tilbage imens knappen holdes inde. Når knappen slippes kan der igen syes fremad ved at trykke på start/stop knappen eller ved at trykke på fodpedalen. B. NÅLEPOSITION KNAP Nåle positionen hæves eller sænkes ved at trykke på denne knap. Ved at trykke igen og igen på denne knap syes et sting af gangen. C. HASTIGHEDSKNAP Symaskinen syr hurtigere når knappen skubbes til højre og langsommere når den skubbes til venstre. (Virker ikke når fodpedal er tilsluttet) D. SY LANGSOM KNAP Ved at trykke på denne knap mens der syes, syr maskinen langsomt og stopper når knappen slippes. Tryk på start/stop knappen for at starte og symaskinen syr igen fremad med normal hastighed. DANSK E. START/STOP KNAP (Kun når pedal ikke er tilsluttet) Maskinen starter med at sy ved at trykke på denne knap, tryk igen og symaskinen stopper. (Maskinen syr langsomt i starten) F. TRANSPORTØRSÆNKNING Ved brodering eller når materiale skal styres med hånd, trykkes transportørknappen ind og skubbes bagud for at sænke transportøren. Til almindelig syning skubbes transportørknappen ind og imod Dem selv, dette hejser transportøren til sit højeste niveau. TIP:Transportørens normale position er, højeste position. A B C F E D
 D. SY LANGSOM KNAP Ved at trykke på denne knap mens der syes, syr maskinen langsomt og stopper når knappen slippes.")
14 BRUG AF FODPEDAL Ved brug af fodpedal kan start - stop og hastighed styres med foden. ADVARSEL: Undgå ulykke.. Afbryd strømmen. Sæt stikket fra fodpedalen i symaskinen.. Læg fodpedalen ved Deres fødder og tilslut strøm. Syhastigheden øges ved at trykke hårdere på pedalen. Slip fodpedalen og maskinen stopper automatisk. DANSK KONTROL KNAP FUNKTIONERNE Kontrolknap funktionerne ændres imens fodpedalen er tilsluttet maskinen. SIKKERHEDSFUNKTION Hvis maskinen er blokeret vil der lyde beep fra maskinen. Efter blokeringen er fjernet, tryk på fodpedalen og maskinen vil igen sy normalt. Se forgående side ADVASEL: -Mimimer faren for forbrænding, brand, elektrisk stød eller skade på personer.. Fodpedalen bør behandles med omhu, undgå at tabe den på gulvet m.v. Placer ikke noget ovenpå fodpedalen.. Anvend kun den fodpedal som tilhører symaskinen.

15 KONTROL PANEL FUNKTIONER C L M E LCD display: Nederst til venstre, vises stinglængde. Miderste sektion vises sting valg. Nederst til højre vises stingbredde. CL slet knappen: Når memory funktionen anvendes, og De finder en indtastningsfejl, eller ønsker at slette et stingvalg fra memory funktionen, bruges knapperne ved fig. 9 til at bladre med. Tryk på CL knappen og det viste sting slettes. Memory funktionen går dernæst automatisk videre til næste sting. ME starter hukommelses funktionen: Tryk på ME knappen, et lys indikerer at funktionen er klar til brug. Indtast den/de ønskede sting, bogstaver eller figurer. Et maximum af 0 stingvalg kan lagres i hukommelsen (undtagen knaphul og knap isyning). Maskinen syr de indtastede sting lige efter hinanden, i midten af LCD displayet vises stingene under syningen(000-99) C L M E M I MEMORY MIRROR REPEAT.5 R E DANSK R E 5 M I RE starter gentagelses funktionen: Tryk på RE knappen, et lys indikerer at funktionen er klar til brug. Tryk på RE knappen for at få gentaget de indtastede sting, tryk dernæst på start knappen og symaskine syr stingene uafbrudt indtil der trykkes på stop knappen. For at slette RE funktionen trykkes der på RE, lyset slukkes og funktionen er annulleret. MI starter spejlvendings funktionen: Tryk på MI for at spejlvende sting. sting: bliver bliver AUTOMATISK RETURSYNINGS knap: Tryk på knappen og maskinen syr sting fremad, sting bagud og dernæst stopper. Til alle andre sting (undtaget knaphulssting) syr maskinen gange oveni hinanden, dernæst fremad. NÅLESÆNKNINGS knap: Tryk på knappen og nålen sænkes. Når der trykkes på start/stop knappen for at stoppe maskinen stopper nålen altid i nedsænket position. Sting længde knapper: Justerer stinglængde. Tryk på den øverte knap for at gøre sting længere, tryk på nederste knap for at gøre sting kortere. Anvendes også sammen med ME knappen (viser antal af valgte sting). Sting bredde knapper: Justerer stingbredde. Tryk på den øverste knap for at gøre sting bredere, tryk på nederste knap for at gøre sting smallere. Anvendes også sammen med ME knappen. (viser aktuel nummer af sting der vises i midter display). Sting: 00 forskellige sting kan vælges (se side 7). Sting vælges ved at indtaste sting numre (0-9) på kontrol panelet. Det/de valgte sting vises midt på LCD displayet. A A bliver 5

16 SPOLING UDTAGNING AF SPOLE. For at tage spolen ud af maskinen, skub udløseren mod højre, samtidig med at der trykkes ned på venstre hjørne af spoledækslet.. Løft spolen ud med fingerspidserne. SPOLING DANSK Sæt en trådrulle på trådrulleholderen og sæt en trådhætte på.. Før tråden gennem trådførerguiden. Før tråden gennem spoleguiden.. Før tråden om spoleguiden som illustreret. 5. Twist tråden rundt om spolen nogle gange. 6. Placer spolen på spolepinden og skub mod højre. Spolefunktionen vises i LCD displayet når maskinen er klar. 7. Start symaskinen. 8. Sæt hastigheden på maksimum. 9. Når spolen er fuld slår den automatisk fra. 0. Skub spolen til ventre. Tag spolen af spoleapparatet. Klip tråden over. 6

17 DANSK ISÆTNING AF SPOLE. Placer spolen i spolekapslen med trådretningen mod uret.. Træk tråden ind i rillen (A). A. Træk tråden mod venstre og langs indersiden af trådstrammerens fjerder (B) indtil den glider i slidsen( C) pas på at tråden ikke glider ud af slidsen (A) C B A C B A. Træk ca 5 cm tråd ud og fastgør spoledækslet. 7
 pas på at tråden ikke glider ud af slidsen (A) C B A C B")
18 TRÅDNING AF SYMASKINEN TRÅDNING AF OVERTRÅD. Hæv trykfoden.. Nål op/ned knappen sættes til op position. Sæt en trådrulle på trådrulleholderen og sæt en trådhætte på.. Før tråden igennem trådguiden. 5. Før tråden som pilemarkeringerne viser på maskinen DANSK For at tråde trådgiveren, før tråden gennem rillen og nedad. 7. Tråd den nederste del af guiden, som vist på illustrationen overfor. Se næste side for brug af den automatiske nåletråder. 8

19 NÅLETRÅDER (AUTOMATISK). Sænk trykfoden.. Nål op/ned sættes i op position.. Sænk nåletråderen langsomt og træk tråden gennem trådguiden (A), træk let opad og mod højre.. Sænk nåletråderen så meget som muligt. Nåletråderen drejer og en trådkrog bliver ført gennem nåleøjet. A 5. Træk tråden under trådkrogen, ved nåleøjet. 6. Hold tråden løst, hejs langsomt nåletråder tilbage til original position. Trådkrogen drejer og trækker tråden igennem nåleøjet i form af en løkke. 5 DANSK 7. Træk ca 5 cm tråd ud fra nåleøjet. OBS: Nåletråderen kan kun bruges sammen med nålestr. 80, 90 og ADVARSEL: Undgå ulykke. Sænk ikke nåletråderen mens symaskinen er i brug. Sluk altid for maskine under trådning af nål. OPTAGNING AF UNDERTRÅD. Hæv trykfoden.. Hold overtråden løst og tryk på nål op/ned knappen. Håndhjulet vil dreje en hel omgang.. Træk ganske let i overtråden. Undertråden kommer op af spolehuset ienløkke.. Træk trådene bag trykfoden ca 5 cm. 9

20 KOM GODT IGANG Symaskinen er sat til automatisk at sy stikkesting når maskinen tændes. ADVARSEL: Undgå ulykke. START OG AFSLUTNING AF SØM 000 Vær ekstra forsigtig/opmærksom omkring nåleområdet mens De syr. Symaskinen transporterer automatisk stoffet fremad, ryk eller træk derfor ikkeistoffet. DANSK Brug/påsæt zigzag trykfod Se side for udskiftning af trykfod.. Læg stoffet under trykfoden.. Sænk trykfoden.. Hold let på trådene når De starter med at sy. Slip igen efter enkelte sting er syet. 5. Tilpas hastigheden mens De syr. 6. Stop symaskinen ved slutningen af søm. 7. Hæv trykfoden. 8. Ved enden af et søm, stop og drej håndhjulet mod Dem selv indtil nålen er i højeste position. Hæv trykfoden og tag stoffet ud af symaskinen. Træk stoffet op til trådskæreren (sidder på lampedækslet) og skær tråden over. 0

21 RETUR SYNING Retursyning anvendes til fæstning af sømme.. Læg stoffet i maskinen hvor De ønsker retursyning og sænk trykfoden.. Tryk returknappen ind og sy nogle enkelte sting. (Anvendes fodpedalen,slippes denne sålænge retursyning ønskes).. Tryk på start knappen og genoptag syning. (Anvendes fodpedal: Returknappen slippes, tryk igen på fodpedalen. Ved afslutning på et søm, tryk på returknappen og sy nogle enkelte sting retur. DANSK HJØRNESYNING. Stop syning når De kommer til et hjørne.. Sænk nålen ned i stoffet. For at sænke nålen kan De enten bruge nål op/ned knappen eller dreje håndhjulet imod Dem selv.. Hæv trykfoden.. Brug nålen som omdrejningspunkt og vend stoffet. 5. Sænk trykfoden og genoptag syning. 5 SYNINGITYKTSTOF Når De syr i tykt stof, har trykfoden tendens til at løfte forenden og syning bliver besværligt. Følg nedenstående for at lette syning.. Hæv trykfoden.. Skub trykfjerderen mod venstre til den låser sig fast.. Start syning. Sålænge trykfjerderen er i spænd, syr makinen jævnt hen over materialet. A. Trykfods stangen kan løftes trin længere op, skulle materialet være ekstra tykt. a SØM GUIDE Numrene på stingpladen indikerer afstanden mellem nålens center position og linien. Numrene forrest viser millimeter, numrene bagerst viser tommer. Før stoffet langs den ønskede sømbredde. / 5/8 / 7/
22 DANSK REGULERING AF TRÅDSPÆNDING Trådspændingen skal være korrekt justeret. Trådspændingen reguleres ved at stramme eller løsne på trådspændingsknappen. A 5 A. Korrekt trådspænding Over- og undertråd skal være i balance i midten af stoffet. (Se illustration) B. Tråden er synlig på oversiden af stof. Juster trådspændingen til et lavere tal. B 5 C C. Tråden er synlig på undersiden af stof. Juster trådspændingen til et højere tal. 5 D. TRÅDSPÆNDING TIL ZIGZAG SYNING D Det bedste resultat ved zigzag syning opnåes ved at overtrådsspændingen er sat en lille smule lavere end til almindelig syning. Overtråden skal kunne anes på bagsiden af stoffet.
23 TIP Som vist på tegningen overfor er stingene på oversiden af stoffet ok, mens undersiden er kludret. Dette skyldes for det meste at overtråden ikke er trådet korrekt. Se side 8 for korrekt trådning af overtråd. ADVARSEL: Undgå ulykke DANSK Transportøren fører automatisk stoffet fremad, ryk eller træk derfor ikke i stoffet. Det kan medføre at nålen knækker eller sting bliver ujævne. NÅL OG TRÅD GUIDE Anvend altid nål og tråd tykkelse som passer til stoffet der skal syes. Stof type Let stof: ren bomuld, silke, syntetisk stof, crepe m.fl. Tråd Bomuld Silke Syn Nåle str. 9/70-/80 0/70-/80 Medium stof: middel kraftig bomuld, fløjl, tynd uld stof m.fl. Bomul Silke 50 Syn /80-/90 Tykt stof: kraftig bomuld, denim, tweed, gabardine, gardin stof m.fl. Stræk stof: tricot, nappa, jersey m.fl. Ctn.# 0-50 Silke 50 Syn Bomuld Silke 50 Tråd til strik /90-6/00 /80-/90 Nål til strik og syntetisk stof For udskitning af nål se side.
24 STIKKE STING Sting bredden vises i LCD displayet nederst til højre. Brug sting bredde knappen til at justere nålepositionen. Ventre position.5-0. Midter position Højre position DANSK SYNING OG HÆFTNING AF SØM. Før stoffet ind under trykfoden og sænk den. Hold let på over og undertråd.. Tryk på START/STOP knappen for at påbegynde syning. (Tryk på fodpedalen hvis denne er tilsluttet) Før stoffet forsigtigt fremad mens der syes for at guide stoffet.. Ved afslutning af søm tryk på retursynings knappen for at fæstne.. Slip retur knappen og tryk på START/STOP knappen; sy til enden af sømmet. 5. Hæv trykfoden og skær tråden. 5
25 ZIGZAG STING Deres symaskine kan sy zigzag sting i mange forskellige bredder og længder. For at ændre på sting længde og bredde se side 5 DANSK Påsæt alm. trykfod. Zigzag sting kan med fordel anvendes til kantsyning og sammensyning af stykker stof. For at hæfte strik eller stræk stof, sy så tæt som muligt langs kanten. Ved sammensyning af stykker stof, sy så tæt som muligt langs kanten C L M E M I R E SATIN STING ELLER APPLIKATION De kan sy satin sting eller applications sting med zigzag sting ved at gøre stinglængden kortere
26 OVERLOCK - ZIGZAG STING A B DANSK BRUG AF OVERLOCK TRYKFOD Placer stoffet imod guiden på trykfoden, sådan at nålen kommer så tæt som muligt ud mod kanten af stoffet. A. Overlock sting (bredde ) anvendes til at forhindre stoffet trævler. B. Nogle sting syr stikke sting og trævlekant på samme tid. Disse kan med fordel anvendes når der syes i trævlbar stof og stræk stof. ADVARSEL: Undgå ulykke. Ved brug af disse sting bør overlock trykfoden anvendes Sæt dog ikke sting bredde under 5 da det kan ske at nålen rammer trykfoden og knækker. BRUG AF ZIGZAG TRYKFOD Ved brug af zigzag trykfoden placeres stoffet således at nålen ligger tæt ved kanten. C D C. Brug en smal zigzag bredde til syning af tyndt eller fint stof. D. Juster bredde og længde på sting 0/05 ved syning af forskellige strik og stæk stof tykkelse. E. Ved 0,5 cm søm sy først, og klip dernæst det overskydende stof af så tæt som muligt på stingene. Vær forsigtig med ikke at klippe i sting. E 6
27 DANSK BLINDSTING Dette sting anvendes når man ikke ønsker at sting skal ses på retsiden af stoffet.. Fold stoffet som vist på tegningen. efterlad 5mm (ca /6 tomme) udover den foldede kant.. Guiden (A) på blindstingsfoden sikrer at stoffet føres jævnt fremad når De syr blindsting. Guiden (A) justeres ved at dreje på justeringsskruen (B).. Stoffet lægges under trykfoden, så den ombukkede fold ligger til venstre for nålen. Se tegning. Vrang Overlock cm Vrang 5mm(/6 ) 5mm (/6 ). Sænk trykfoden og sy sømmet. Før stoffet jævnt langs guiden. 5. Vend stoffet når syninger er færdiggjort. B A OBS: Hvis for meget af stingene kan ses på ret siden af stoffet, vælg en smallere sting bredde eller flyt guiden på trykfoden til venstre. Hvis stingene ikke rammer sømmet øges stingbredden, eller flyt guiden på trykfoden til højre. Ret 5 Vrang 7
28 DANSK KNAPHULLER Marker placering og længde af knaphullet på stoffet. Sæt knappen på basen og skub fremad. a * passer knappen ikke på basen justeres skyderen til knappens tykkelse og diameter. a= længde + tykkelse af knappen.. Før overtråden gennem hullet på trykfoden og fastgør knaphulstrykfoden.. Placer stoffet under trykfoden således, at midten af liniemærket er midt under hullet i trykfoden. Sænk knaphulstrykfoden. 5. Sænk knaphulsarmen således at den er placeret bagved forhøjningen på trykfoden (se illustration 5 ). 6. Hold let ved overtråden og start maskinen. 5 6 OBS: Maskinen vil ikke sy, hvis knaphulsarmen ikke er sænket korrekt og knaphulstrykfoden placeret rigtigt. 8
29 KNAPHULLER FORTSAT DANSK 7. Knaphullet bliver syet i rækkefølgen som vist på illustrationen og stopper automatisk. 8. Hæv trykfoden og skær tråden. For at sy knaphullet igen, hæv trykfoden og gentag trinene. 9. Stik en knappenål i for enden af knaphullet så der ikke skæres hul i stingene. Skær knaphullet i midten med opsprætteren. 8 9 ADVARSEL: Undgå ulykke. Vær forsigtig med ikke at sætte fingrene ind foran opsprættern. A A. VED SYNING I STRÆK STOF For at få det bedste resultat syes knaphullet med et stykke pergamentpapir hæftet på vrangen af stoffet. OBS: Sting tætheden af knaphul kan justeres med stinglængde knappen. 9
30 6 STINGS ZIGZAG stings zigzag anvendes f.eks. til at sy i elastik og lave kantsting med. A B DANSK A. Syning i elastik Mens der syes, stræk elastikken let både foran og bagved nålen. Vær forsigtig med ikke at bøje nålen. B. Kantsting Anvendes til at sy let trævlbar stof og strik. Placer stoffet så stingene falder så tæt som muligt på højre kant. STRÆKKE STING VedbrugafstrækkestingfårDeetstærktog flexibelt sting der giver sig sammen med stoffet. Anvendes med fordel sammen med stræk- og strikket stof og ved søm der kræver fleksibilitet. Elastik sting er særdeles velegnet til robust stof såsom denim. Det anbefales at De anvender en nål beregnet til strik og syntetisk stof, for at undgå ujævnhed i sting og at nålen knækker. 0
31 STING HUKOMMELSE. For lethed kan De gennemse de indtastede sting når hukommelses funktionen er i brug. Sting bredde knapperne ændrer sig til at fungere som bladre op/ned knapper. Venstre side af LCD displayet viser total antal sting der er indkodet i hukommelsen. Højre side af displayet viser nummeret på stinget der ses i midter displayet.. Ved at bruge sting bredde knapper kan De kontrollere sting indkodet i hukommelsen. Midter displayet viser stingene i indtastet rækkefølge.. Hvis De finder en indtastningsfejl eller ønsker at ændre på et af de indtastede sting skal De stå på det stingvalg der kommer før stinget De vil overskrive, herefter indtaster De det korrekte sting, og hukommelses funktionen overskriver det forkerte sting. Fx.: Sting nr er indtastet i hukommelsen og de ønsker at ændre 00 til 05 skal displayet vise 00, indtast 05 for at overskrive 00. OBS: Hvis det første sting er forkert skal alle sting gentastes.. Hvis De ønsker at slette et sting fra hukommelsen brug sting bredde knapper til at finde- og få sting vist i displayet. Tryk på CL for at slette, LCD displayet viser nu det næste sting i rækken. Hvis de ønsker at tilføje flere sting skal De huske at bruge op/ned knapper til at gå til enden af stingrækken. DANSK 5. Når De har sat maskinen igang med at sy det indtastede, er det ikke længere mulig at slette eller ændre stingvalg. For at ændre skal ME funktionen startes forfra. 6. For at afslutte hukommelses funktionen trykkes på ME knappen, lyset går ud og funktionen er ikke længere tilgængelig. MEMORY 0 0 TIP: Skriv rækkefølgen af sting De ønsker at sy ned på et stykke papir. Det er hjælpsomt når De kontrollerer hukommelses funktionen. C L M E M I R E
32 PATCH WORK Ved brug af flere slags stof, bliver patch work ekstra dekorativ.. Læg to stykker stof sammen med retsiden imod hinanden og ri sammen.. Fold sømmen ud.. Læg stoffet med retsiden opad og sy med sømmet placeret i midten af trykfoden. Således at stingene falder på begge sidder af sømmet. DANSK APPLIKATION Læg applikationen på stoffet, sy enten med satin sting eller applikations sting. Ved let trævlbar stof, bukkes sømmet ca5mm.. Sy langs kanten af applikationen. Ret den lige del af stinget til, således at det rammer kanten på applikationen, det får det til at syne håndlavet.. Ved skarpe hjørner, sættes nålen i laveste position og trykfoden løftes. Brug nålen som omdrejningspunkt og drej stoffet.
33 DANSK LYNLÅS SYNING Påsæt lynlås trykfoden til enten på højre eller venstre side af nålen.. Illustration : Nålen syr på venstre side af foden.. Illustration :Nålen syr på højre side af foden.. Hæft lynlåsen fast til stoffet og sæt sytøjet i symaskinen. Nålen skal være på venstre side af trykfoden. Sy højre side af lynlåsen på, idet De fører lynlåsen så tæt på nålen som muligt. Når De har syet næsten hele sømmen lynes lynlåsen op (nålen bliver siddende i stoffet) så sømmen også bliver pæn lige helt oppe ved lukningen. Ved syning i venstre side, skydes foden så nålen er i højre side. Sy lynlåsen fast som beskrevet ovenfor. PIPE SYNING Piping bruges som ekstra dekoration eller finish. Brug lynlås trykfoden til at sy piping, trykfoden sættes på højre side af nålen. Læg pipingen mellem stykker stof. Sy så tæt som muligt op til pipingen.
34 MUSLINGE STING Muslinge sting anvendes når der ønskes en dekorativ afslutning langs kanter. MUSLINGE KANT. Fold stoffet med ret siden sammen og sy tæt på kanten.. Klip stoffet langs sømmen efterlad ca mmtilsøm.. Vend stoffet og skub forsigtigt den buede sømudistoffet. DEKORATIV MUSLINGE STING. Fold stoffet med vrang siden sammen og sy tæt langs kanten.. Klip langs ydersiden af kanten. (Vær opmærksom på at De ikke klipper i stingene).. Brug stof lim eller lign. til at beskytte kanten af muslinge stingenen. DANSK Ret sider lagt sammen Vrang sider lagt sammen JUSTERING AF DEKORATIONS STING Anvend standard trykfod til syning af dekorations sting. En lille udfræsning på undersiden tillader syning af satin sting og den brede åbning i trykfoden gør at De klart kan se stingene. Nogle af de dekorative sting kan justeres i længde og bredde. Dette ses i LCD displayet. Hvor meget der kan øges/mindskes afhænger af sting. Vises 00 i stinglængde og bredde kan der ikke ændres på disse sting. Prøv Dem frem indtil de får det ønskede resultat. OBS: Ikke alle sting kan justeres i længde og bredde. SYNING I LET STOF Anvendes let/tyndt stof anbefales det at bruge pergamentpapir.
35 DANSK VEDLIGEHOLDELSE For at sikre det bedste resultat ved syning er det nødvendigt at rengøre og vedligholde de grundlæggende dele. Afbryd altid maskinen ved smøring eller anden service. Fjern altid over- og undertråd fra maskinen. () RENGØRING AF TRANSPORTØR OG GRIBER OMRÅDET. Hæv nålen til højeste position.. Fjern stingpladen (). Udtag spolekapsel (). Rens transportør og griber området med børsten. OBS: dryp en dråbe symaskine olie som vist på illustration ved pil A. 5. Indsæt spolekasel ved at anbringe fremspinget () Op imod fjederen (). Monter stingpladen. () () () () A 5
36 FEJLFINDING FEJL ÅRSAG LØSNING SIDE Overtråden knækker Maskinen er ikke trådet rigtigt. Tråden er viklet om spolen. Nål sat forkert i. Trådspændingen for stram. Forkert trådvalg eller af dårlig kvalitet. Tråd maskinen om. Rens spole området og tråd spolen om. Udskift/ sæt ny nål i. Juster trådspændingen. Vælg korrekt tråd Undertråden knækker Springer sting over Spolen er ikke trådet korrekt. Spolen er ujævn spolet eller for fuld Smuds i spole og griber leje. Nål sat forkert i. Er nålen beskadiget. Forkert nåle str. Forkert nåle str. til stræk stof. Tråd spolen om. Spol spolen om. Rens spole og griber leje. Sæt nålen korrekt i. Udskift nålen. Vælg korrekt nåle str. til stof. Anvend stræknål DANSK Stof rynker Maskinen er ikke trådet korrekt Spolen er ikke trådet korrekt. Uskarp nål. Trådspænding for stram. Tråd overtråden om. Tråd spolen om. Udskift nåi. Juster trådspændingen Uregelmæssige sting Spolen er ikke trådet korrekt. Overtråden er ikke trådet korrekt. Trådspændingen justeret forkert. Tråd spolen om. Tråd overtråden om. Juster trådspændingen Nåletråderen tråder ikke gennem nåleøjet Nålen er ikke hævet. Nål sat forkert i. Nålen er bøjet. Hæv nålen. Sæt nålen korrekt i. Udskift nålen. Stoffet transporteres ikke ordentligt Transportøren er sænket. Trådrester og støv har samlet sig i og omkring transportøren. Hæv transportøren. Rens transportør området. 5 Nålen knækker Der rykkes i stoffet under syning. Nålen rammer trykfoden. Nål sat forkert i. Forkert nål og tråd i forhold til stof. Rykikkeistof. Vælg korrekt trykfod til job. Sæt nål korrekt i. Vælg korrekt nål og tråd. 0 6 Maskinen larmer og kører ujævnt Smuds og trådrester i griber eller på nålestangen. Fjern stingpladen og spolen, rens transportør og griberleje. 5 Maskinen vil ikke sy Kontroller at symaskine er tilsluttet elnettet. Er symaskinen tændt? Spoleapparatet er skubbet til højre. Trykfoden er ikke sænket. Knaphuls syning; - Knaphulsarmen er ikke sænket helt. Knaphulstrykfod er ikke sat på. - Tilslut til elnettet. Tænd for symaskinen. Skub spolearmen mod venstre. Sænk trykfoden. - - Sænk trykfodsarmen. Påsæt knaphulstrykfod
37 STING OVERSIGT Det fremhævede i dekorations stingene er et sting DANSK a b c d 65 e f h i 70 j k l m n 75 o 5 A B C D E F 5 K P G L Q H M R I N S J O T p u 86 z q v r w s x 80 t 85 y U V W X Y Z
38 DANSK Royal Consul Europe A/S Ring gratis til vor levende brugervejledning på: Åbent fra mandag til fredag fra kl til kl
39 INDEX Index...5 Safety instructions...6 Recycling...7 Mainparts...8 Accessories...0 Changing presser foot... Inserting needle... Connecting the machine... Control buttons & drop feed lever... Foot controller... Control panel functions...5 Bobbin winding...6 Threading the machine....8 Startingtosew...0 Adjusting thread tensions... Fabric, thread and needle table... Straight stitch sewing... Overcasting-overlocking...6 Blind hem stitchin...7 Buttonhole sewing...8 Multi-stitchzigzag...0 Elastic stitch sewing...0 Stitchmemory... Patchwork... Applique... Inserting zippers... Scallop stitch... Adjusting decorative patterns... Maintenance...5 Helpful hints...6 Patternchart...7 ENGLISH 5
40 IMPORTANT PLEASE READ CAREFULLY The wires in this mains lead are coloured in accordance with the following code BLUE-NEUTRAL BROWN-LIVE (OR ACTIVE) As the colours of the mains lead of this appliance may not correspond with the coloured markings identifying the terminals in your plug -PROCEED AS FOLLOWS: The earth plug pin is unnecessary. As the Machine is designed under double insulation structure, the earth wire is removed from the machine. The wire coloured BROWN must be connected to the terminal marked L or A or coloured RED. The wire coloured BLUE must be connected to the terminal marked N or coloured BLACK. Neither core is to be connected to the earth terminal of a three-pin plug. IMPORTANT SAFETY INSTRUCTIONS When using an electrical appliance, basic safety precautions should always be followed, including the following: Read all instructions before using (this appliance). DANGER - - To reduce the risk of electric shock: An appliance should never be left unattended when plugged in. Always unplug this appliance from the electric outlet immediately after using and before cleaning. WARNING - - To reduce the risk of burns, fire, electric shock, or injury to persons:. Do not allow to be used as a toy. Close attention is necessary when this appliance is used by or near children.. Use this appliance only for its intended use as described in this manual. Use only attachments recommended by the manufacturer as contained in this manual.. Never operate this appliance if it has a damaged cord or plug, if it is not working properly, if it has been dropped or damaged, or dropped into water. Return the appliance to the nearest authorized dealer or service centre for examination, repair, electrical or mechanical adjustment.. Never operate the appliance with any air openings blocked. Keep ventilation openings of the sewing machine and foot controller free from the accumulation of lint, dust, and loose cloth. 5. Never drop or insert any object into any opening. 6. Do not use outdoors. 7. Do not operate where aerosol (spray) products are being used or where oxygen is being administered. 8. To disconnect, turn all controls to the off (~O") position, then remove plug from outlet. 9. Do not unplug by pulling on cord. To unplug, grasp the plug, not the cord. ENGLISH Danger. Always unplug before relamping. Always replace the bulb with one of the same type.. Do not reach for an appliance that has fallen into water. Unplug immediately.. Do not place or store appliance where it can fall or be pulled into a tub or sink. Do not place or drop into water or other liquid. WARNING. Keep fingers away from all moving parts. Special care is required around the sewing machine needle.. Always use proper needle plate. The wrong plate can cause the needle to break.. Do not use bent needles.. Do not pull or push fabric while stitching. It may deflect the needle causing it to break. 5 Unplug the foot controller when making any adjustments in the needle area, such as threading needle, changing needle, threading bobbin, or changing presser foot, etc. 6. Always unplug sewing machine from the electrical outlet when removing covers, lubricating, or when making any other user servicing adjustments mentioned in the instruction manual. 7. Never operate on a soft surface such as a bed or couch where the air openings may be blocked. The sound pressure is less than 70dB (A) SAVE THESE INSTRUCTIONS 6
41 Recycling We are committed to the protection of the environment. We strive to minimize to environmental impact of our products by continuously improving product design and our manufacturing methods. At end of life please dispose of this product in an environmentally responsible way. The crossed-out wheelie bin symbol featured above and on the product's data-plate means that this product falls under the scope of the E.U. Waste Electrical and Electronic Equipment (WEEE) directive and Restriction of the Use of Certain Hazardous Substances in Electrical and Electronic Equipment (ROHS) directive and should not be disposed of with your household waste. At end of life, you must ensure that this product is disposed of in accordance with national and local legislation and that it is sorted as Category Small Domestic Appliances WEEE. You may be liable under local and national laws for improper disposal of this product. Please consult the web, or a competent national or local body, for the return and collections systems available to you and the locations of your nearest recycling points. If you purchase a new product direct from us we will take your old product back, irrespective of the brand, if it is a like for like sale. As an individual you can make a positive impact on reuse, recycling and other forms of recovery of WEEE. This will reduce use of landfill and minimize the environmental impact of the products you use. Hazardous substances in electronic and electrical products can have a harmful impact on human health and on the environment. ENGLISH 7
42 MAIN PARTS ENGLISH. Lamp cover. Reverse Stitch Button. Needle Up/Down Button. Thread cutter 5. Slow button 6. Start/stop button 7. Extension table 8. Stitch panel/top cover 9. Handwheel 0. Control panel. Thread take-up lever (inside). Thread tension regulator. Thread guide plate. Speed control button 5. Spool cap 6. Spool pin 7. Bobbin winder thread guide 8. Bobbin winder shaft 9. Bobbin winder stop 8
43 MAIN PARTS CONTINUED ENGLISH 0. Carrying Handle. Power Switch. Controller Plug. Terminal Box. Power Line Cord 5. Foot Controller 6. Lower Thread Guide 7. Needle Threader Lever 8. Needle Threader 9. Buttonhole Lever 0. Presser Foot Thumb. Needle Plate. Slide Cover. Presser Foot Lifter. Thread Cutter 5. Needle Clamp Screw 6. Needle Thread Guide 7. Presser Foot 8. Drop Feed Lever
44 ACCESSORIES. Needle set. Bobbins. Spool pin cap (large). Spool pin cap (small) 5. Felt washer 6. Needle plate screwdriver 7. Screwdriver (large and small) 8. Oil 9. Seamripper with brush 0. Spool pin. Blindhem foot. Overcasting foot. Zipper foot. Quilting guide 5. Buttonhole foot ENGLISH 5 OPENING THE ACCESSORY CASE To open the accessory case, lift up on the top left side of the table and pull toward you. CONVERTING TO FREE-ARM SEWING Your machine can be used either as a flat-bed, or as a free-arm model. With the extension table in position, it provides a working surface as a standard flat-bed model. By removing the extension table (just pull it off to the left as shown), the machine converts into a free-arm model. 0
45 CHANGING THE PRESSER FOOT The presser foot must be changed according to the sewing job or stitch you sew. CAUTION:To prevent accidents. Turn OFF the power switch before you change the presser foot.. Turn the handwheel toward you until the needle is at its highest position.. Raise the presser foot lifter.. Remove the presser foot by pushing the presser foot release lever toward you.. Place desired foot with its pin A directly under the slot B in presser foot holder. 5. Lower the presser foot lifter and the presser foot will snap into place REMOVING THE PRESSER FOOT HOLDER You may need to remove the presser foot holder to use some presser feet. To remove, raise the presser foot lifter and loosen the presser foot thumb screw (C). To attach, tighten the screw after raising the presser foot holder. INSERTING THE NEEDLE C B 5 A Presser foot pin B Presser foot holder slot C Presser foot thumb screw A ENGLISH Select a needle of the right type and size for the fabric to be sewn. (See Fabric, Thread and Needle Table on page ). CAUTION:To prevent accidents. Turn OFF the power before removing the needle. 5. Turn the handwheel toward you until the needle is at its highest position.. Loosen the needle clamp screw.. Remove the needle.. Insert new needle into needle clamp with the flat side to the back and push the needle into the clamp until it reaches stopper. 5. Tighten the needle clamp screw. A. Place needle on a flat surface and check toseeifbent. Do not use any bent or dull needles. A
46 ENGLISH CONNECTING THE MACHINE Place the machine on a stable table.. Connect the power cord to the machine by inserting the -hole plug into the plug socket. Connect the power cord plug to the electric outlet.. Turn the power switch.. A lamp will indicate machine is switched on. 5. To disconnect, turn the power switch to the position, then remove plug from outlet. DANGER: -To reduce the risk of electric shock. Never leave the machine unattended when plugged in. Always unplug machine from the electricity outlet immediately after using and before maintenance. WARNING: -To reduce the risk of burns, fire, electric shock, or injury to persons. Do not unplug by pulling on the cord. To unplug, grasp the plug, not the cord.
47 CONTROL BUTTONS & DROP FEED LEVER A. REVERSE STITCH BUTTON The machine will continue to sew in reverse at slow speed while the button is pressed and stop when the button is released. B. NEEDLE UP/DOWN BUTTON Needle position is either raised or lowered by pressing this button. Pressing the button repeatedly, allows one stitch sewing. C. SPEED CONTROL BUTTON The machine will sew faster when the button is slid to the right, and slower when slid to the left. D. SLOW BUTTON While sewing, by pressing this button, machine will sew at slow speed and stop when released. Press start/stop button again, and the machine will resume sewing at normal speed. E. START/STOP BUTTON (Only when footcontroller is disconnected) The machine will start running when start/stop button is pressed and will stop when pressed a second time. The machine will rotate slowly in the begining. ENGLISH F. DROP FEED LEVER For darning of free motion embroidery or whenever fabric is to be moved by hand, press in and push backwards to lower the fabric feed dogs. For ordinary sewing, push and pull the lever towards you, this raises feed dogs to their highest position, for most types of sewing, the lever should be in this position. A B C F E D
48 ENGLISH FOOT CONTROLLER When the foot controller is connected, the speed of the machine is controlled by the footcontroller and not the speed control button as described on page CAUTION: To prevent accidents.. Turn off the power switch.. Push foot controller plug into the jack on the machine.. Place foot controller at your feet and turn on power switch. Sew faster by increasing the pressure on the controller. To stop, remove your foot from the controller. CONTROL BUTTON FUNCTIONS The control button functions described on previous page will change when the foot control is connected. SAFETY FEATURE OF ELECTRONIC MODEL If the machine is jammed, it will stop with three beep sounds. After the cause of jamming is removed, step on the foot control and it will run in normal condition. See previvous page WARNING: -To reduce the risk of burns, fire, electric shock, or injury to persons.. Handle the foot controller with care and avoid dropping it on the floor. Be sure not To place anything on top of it.. Use only foot controller provided with this machine.
49 CONTROL PANEL FUNCTIONS C L M E LCD display: Bottom left display the stitch size, middle section display the number of selected pattern. Bottom right display stitch width. CLEAR delete button: when the memory function is in use, and you find a fault or wish to delete a pattern from the memory, please use the buttons by fig. 9 to look through selected patterns. Press the CL button to erase the pattern shown in LCD display. The memory function automaticly displays the next pattern. ME starts memory function: Press the ME button, a light indicates that you can start the memory function. Key-in the pattern numbers to the memory, a maximum of 0 patterns can be stored in the memory. (can not memory BH & button pattern). The machine will sew the patterns in the order they have been keyed in. LCD display shows the selected pattern (000-99) being sewn C L M E M I MEMORY MIRROR REPEAT.5 R E ENGLISH R E 5 M I RE: starts repeat function: Press RE button, a light indicates that you can start the repeat function. When using the memory function and you want to repeat sewing the same selection of patterns, press RE button, then press start button, sewing machine will continuously repeat patterns selected, until the stop button is pressed. To cancel, please press RE button. MIRROR button: press MI to mirror the stitch selected. letter: become A become become AUTO REVERSE button: Sews forward stitches, backwards stitches and then forward when sewing straight stitches. For all other patterns (exept buttonhole stitches) the needle moves up and down times then starts sewing the pattern. NEEDLE DOWN button: Press the button and the needle stops in down position whenever you use the start/stop button. Stitch lenght buttons: Press upper button for a longer stitch, press lower button for a shorter stitch. Is also used together with ME button (displays quantity of patterns selected). Stitch width buttons: Press upper button for a wider stitch, press lower button for a narrower stitch. Is also used together with ME button (displays stitch number showing in the middle display) Patterns: 00 kinds (displayed at the back of the manaul) Select patterns by pressing the pattern numbers (0-9) you have selected. The pattern number is displayed in the middle upper part of the display. A 5
50 ENGLISH BOBBIN WINDING REMOVING THE BOBBIN. Remove the bobbin cover by sliding the release lever to right and push down the left corner of bobbin cover at the same time.. Remove the bobbin from the machine. BOBBIN WINDING Place a spool of thread onto the spoolpin and put the spool cap on it.. Pass thread through the thread guide.. Pass thread through the bobbin winder thread guide.. Pass thread from spool through thread guides as shown. 5. Twist thread round the bobbin a few times. 6. Place the bobbin on bobbin winderspindle and push to the right to engage. Bobbin winder will appear on L.C.D when ready for winding. 7. Start the sewing machine. 8. Set the speed control to maximum. 9. The bobbin winding will stop when bobbin is full. 0. Push the bobbin and spindle to the left. Remove the bobbin from the spindle and cut the thread. 6
51 INSERTING THE BOBBIN. Place bobbin into bobbin holder with thread unwinding counter clockwise.. Draw thread into notch (A). ENGLISH A. Pull thread toward the left and along the inside of the spring (B) until it slips into notch (C) being sure that thread does not slip out of notch (A). C B A C B A. Pull thread out about 0 inches and replace the bobbin cover by inserting the left side and lowering the right side till snaps into position. 7
52 ENGLISH THREADING THE MACHINE THREADING THE UPPER THREAD. Raise the presser foot lifter.. Press the needle up/down button and set needle in up position. Place a spool of thread onto spool pin and set the spool cap.. Pass thread through thread guide. 5. Pass thread along the arrow marks on the machine To thread the take-up lever, draw thread up and bring thread back down again. 7. Thread through the lower thread guide, needle thread guide and through the needle eye. Refer to next page for instructions on how to use the needle threader. 8
53 NEEDLE THREADER (AUTOMATIC). Lower the presser foot.. Set needle in up position.. Lower the threader slowly and draw thread through thread guide (A) and pull lightly upwards and towards the right.. Lower the lever as far as it will go, the threader will turn and a hookpin go through the needle eye. A 5. Draw thread through the lower guide by the needle eye Hold thread loosely and slowly return lever to original position Hook will turn and pass thread through needle eye while making a loop of thread 7. Pull out thread about 0 inches from needle eye. ENGLISH Note: The needle threader can only be used for needlesizes 80, 90 and CAUTION: To prevent accidents. Do not lower the threader lever while machine is operating. Always disconnect sewing machine before threading. DRAWING UP THE BOBBIN THREAD. Raise the presser foot.. Hold the upper thread loosely and press needle up/down button. The handwheel will turn one complete turn.. Pull upper thread lightly. Bobbin thread will come up in a loop.. Pull both threads about 0 inches and under the presser foot. 9
54 STARTINGTOSEW The machine is set to automatically sew straight stitches when the power switch is turned on. CAUTION: To prevent accidents. START AND END OF SEAM 000 While sewing, special care is required around the needle area. As the machine automatically feeds the fabric, do not pull nor push fabric ENGLISH Check the presser foot (General purpose presser foot). Refer to page for changing thepresserfoot.. Place the fabric under the presser foot.. Lower the presser foot.. Hold back threads when starting machine. Let threads go after sewing a few stitches. 5. Regulate the speed while sewing. 6. Stop machine when you reach end of seam. 7. Raise the presser foot lifter. 8. When you have reached the end of a seam, stop sewing and turn the hand wheel toward you to bring the needle to it s highest position. Raise the presser foot and pull the fabric out from under the foot to the back of the machine. Cut the threads on the thread cutter on the left side of the machine. 0
55 REVERSE STITCHING Reverse stitching is used to reinforce ends of seams.. Place the fabric in position where reverse stitching is to be made and lower the presser foot.. Press reverse stitch button and sew -5 stitches. (Using foot control, press pedal while pressing reverse stitch button).. Press start button and resume sewing. (Using foot control, release reverse stitch button and press foot control to sew forwards).. When you reach the end of seam, press reverse stitch button and sew -5 reverse stitches. TURNING CORNERS. Stop the machine when you reach a corner.. Lower needle into the fabric. To lower the needle, you can either use the needle up/down button or turn the handwheel toward you.. Raise the presser foot.. Use the needle as a pivot and turn fabric. 5. Lower the presser foot and resume sewing. 5 ENGLISH SEWING HEAVY FABRIC When sewing heavy fabrics, the toe end of presser foot tends to lift up and sewing cannot be started smoothly. In such case, set as follows.. Raise the presser foot.. Push the lock button located on the right side of regular foot and lower the foot.. Start sewing. As presser foot hinge is locked, fabric will be feeded smoothly. A.Thepresserbarliftercanberaisedstep higher for placing heavy materials under the presser foot easily. a SEAM GUIDE ON THE STITCH PLATE The figure on each guide line on the stitch plate indicates the distance between this guide line and the center needle position. Guide the fabric along the specific guide line in order to get the desired seam allowance between the stitching and the edge of the fabric. / 5/8 / 7/
56 ADJUSTING THE THREAD TENSIONS Thread tension must be properly balanced. If adjustment is required, it can be made by changing the upper thread tension. A 5 A. Correct Thread Tension Upper and bobbin threads should interlock in the middle of the fabric. B. When bobbin thread appears on top side of fabric. Turn the tension dial to a lower number to loosen the upper thread tension. B 5 ENGLISH TOP BOTTOM C C. When upper thread appears on the bottom side of fabric. 5 Turn the tension dial to a higher number to tighten the upper thread tension. TOP BOTTOM D. Thread Tension for Zigzag Stitches To sew zigzag stitches, thread tension should be set to a slightly weaker tension than when sewing straight stitches. You will obtain a nicer stitch when upper thread appears slightly on bottom side of fabric. D TOP BOTTOM
57 Helpful Hint Like shown on drawing, stitches on top side of fabric are good but bottom side tends to have a bunch of thread, it usually means that the upper thread is not threaded correctly Refer to page 8 for correct threading. CAUTION: To prevent accidents. The feed dog will feed the fabric automatically. Do not pull or push fabric with hands. This could cause needle breakage or poor quality stitches. ENGLISH FABRIC, THREAD AND NEEDLE TABLE Select size of thread and needle according to the fabric to be sewn. Type of Fabric Light Weight-thin georgette, organdy, viole, taffeta, silk, etc. Thread Size Ctn.# Silk Syn Needle Size 9/70-/80 0/70-/80 Medium Weight-gingham, pique, linen, cotton, satin, thin corduroy, velvet Ctn.# Silk 50 Syn /80-/90 Heavy Weight-gabardine, tweed, denim, corduroy Stretch-double knit, tricot, spandex, jersey Ctn.# 0-50 Silk 50 Syn Ctn.#50-80 Silk 50 Thread for knit /90-6/00 /80-/90 Needle for knit and synthetic fabric To change needle, see page.
58 STRAIGHT STITCH SEWING Straight stitch patterns should be selected according to the type of fabric being sewn The size of stitch width is displayed on the LCD at the lower right side. Use stitch width control button to adjust the needle position. Left position.5-0. Middle position Right position ENGLISH STRAIGHT SEWING AND FASTENING OF SEAM. Position the fabric under the presser foot. Hold upper and bobbin thread loosely.. Lower the presser foot lever and press START/STOP button to start sewing. (When foot control is used, press the pedal.) Place hand lightly on the fabric while sewing to guide the fabric.. When you reach the end of seam, press the reverse button to sew - stitches.. Release the reverse button, press start/stop button and sew forwards until you reach the end of the seam. 5. Raise the presser foot and cut thread. 5
59 ZIGZAG STITCH Your machine can sew zigzag stitches of various widths and lengths by changing the settings of the stitch width and stitch length. See page 5 for changing width and length. Attach all purpose presser foot ENGLISH Zigzag stitches are very good for joining two pieces of fabrics or overlocking. For joining knit or stretch fabrics, sew with the left side of the zigzag stitching along the seam line. For overlocking, sew with the right side of the zigzag at the edge of the fabric. SATIN STITCHING OR APPLIQUE Youcansewasatinstitchwiththezigzagstitchby shortening the stitch length C L M E M I R E 5
60 OVERCASTING-OVERLOCKING A B USING THE OVERCASTING FOOT Position the fabric against the guide plate of the overcasting foot so that the needle falls near the edge of the fabric. A. Overcasting stitches (width ) are used to prevent fabric raveling. B. Some stitches can sew overcasting and regular stitches at the same time. Therefore, it is convenient to use when sewing easy to ravel and stretch fabrics. ENGLISH CAUTION: To prevent accidents. Overcasting foot should be used for sewing Patterns do not change the stitch width below 5.0. It is possible that needle could hit the presser foot and break when sewing other patterns and width. USING THE GENERAL PURPOSE FOOT When using the all-purpose foot, place the fabric so that the needle will fall near the edge of fabric. C. Use a narrower zigzag width for thin or fine fabrics. D. Adjust the width and length of stitch 0/05 for various weights of knit and stretch fabrics. E. For/ inch seam allowances, sew then trim the excess fabric close to the stitching. Be careful not to cut thread when cutting the fabric edge. C E D 6
61 BLIND HEM STITCHING This stitch is used when you do not wish stitches to show on right side of fabric.. Fold the fabric as shown on drawing. Leave 5mm (approximately /6 inch) extended past the forlded edge.. The guide (A) on the blind hem foot ensures even feeding of the fabric when blind hem stitching. The guide (A) is adjusted by rurning the adjusting screw (B). Reverse Side Overcasting Reverse Side cm 5mm(/6 ) 5mm (/6 ) ENGLISH. Place fabric so that the straight stitches are on the extended hem edge and the Zigzag stitches just catch one thread of the folded edge. Turn the screw so that the guide barely touches the folded edge of fabric.. Lower the presser foot and sew hem, guiding facric evenly along the guide. 5. Turn the fabric over when you have completed sewing. B A Note: If too much of the stitching shows on the right side of the fabric, change to a narrower stitch width or move the guide on the foot to the left. If the zigzag does not meet the fold, widen the stitch width or move the guide on the foot to the right. 5 Right Side Reverse Side 7
62 BUTTONHOLE SEWING Mark position and length of buttonhole on fabric.. Set button on the base and slide base forward to secure button. a ENGLISH * If button does not fit on the base, adjust slide on base to diameter of button plus thickness of button. a= Length of button + thickness. Pass upper thread through the hole of buttonhole foot and attach buttonhole foot to machine. Bring upper and bobbin threads to the left under foot.. Position fabric under presser foot so that the center line mark is in the center of the needle opening in the buttonhole foot. With the main part of the foot pushed to the back lower the presser foot lever. 5. Lower the buttonhole foot lever so it is positioned behind the raised finger on the foot (see step 5 illustration). 6. Hold upper thread lightly and start the machine. 5 6 Note: Machine will not start to sew if buttonhole Lever is not lowered properly or buttonhole Foot is not positioned correctly. 8
63 ENGLISH BUTTONHOLE SEWING CONTINUED Machine will sew the buttonhole in the order as shown and stop automatically after sewing. 8. Raise the presser foot and cut thread. To sew over same buttonhole, raise presser foot to return to original position 9. Cut center of buttonhole being careful not to cut stitches on either side. Use a pin as a stopper. 8 9 CAUTION: To prevent accidents. When using seam ripper, do not put your finger in the path of ripper. A A. WHEN SEWING STRETCH FABRIC It is suggested that you use parchment on the backside of the fabric. Note: Density of buttonhole legs may be adjusted with stitch length control. 9
64 TRICOT STITCH Used for sewing on elastic band and overcast stitching on knit fabrics. A. Elastic Sewing Stretch elastic in front and back of needle while sewing. Be careful not to bend needle while stitching. B. Overcast stitching Used for easy to ravel and knit fabrics. Guide fabric so stitch on right side is at the edge on the fabric. A B ENGLISH ELASTIC STITCH SEWING It assures you of a stitch that is strong and flexible and will give with the fabric without breaking. Good for stretch or knit fabrics and seams that require flexibility. It is good for joining durable fabrics such as denims. We recommend that you use a needle for knit and synthetic fabrics to prevent skipped stitches and thread breakages. 0
65 STITCH MEMORY. For convenience, you can review the keyed-in pattern list when the memory function is in use. Stitch width buttons change function to serve as an up/down function. On the left hand side, stitch lenght display shows total number of patterns keyed-in.. By using the stitch width buttons you can check patterns already stored in the memory function. The middle display shows the patterns in the order they have been keyed-in.. If you find a mistake or wish to change a selected pattern; to change: find selected pattern and go one step back, key-in the desired pattern number. This will override/delete the unwanted pattern. Fx.: Pattern no s is in the memory, and you wish to change 00 to 05 you must have 00 showing in display, then you key-in the correct number. If the first pattern is incorrect, you need to key-in all patterns again.. If you want to delete a pattern from the memory; use the stitch width buttons to find pattern, when the stitch is shown in display, press CL to delete pattern. The LCD display will show the next pattern stored in the original memory. If you wish to add further patterns please make sure last keyed in pattern is shown in display. 5. Once you have started sewing with the memory function, you cannot change or delete patterns. In order to change memory selection you must start from the begining ENGLISH 6. To stop using the memory function press the ME button, the light will go out and the funtion is no longer available MEMORY 0 0 HELPFUL HINT: Write down on a piece of paper the sequence of stitches you wish to sew. This helps when you check the memory function is keyed-in correct. C L M E M I R E
66 PATCH WORK For additional decorative purposes, use different kind of materials.. Place two pieces of fabric right sides Together and sew a basting stitch.. Press the seam open.. Place fabric right side up and stitch with the seam line in the center of the foot Stitches should fall on both sides of the seam line. ENGLISH APPLIQUE Position the applique on fabric with fabric glue, fusible iron on stabilizer or basting stitches. (When using fabric with frayed edges for the applique, press under / inch on all the edges.). Sew along the edge of the applique. Align the straight part of the stitch with the edge of the applique to give this project a handmade appearance.. When pivoting corners, lower the needle in the right side of the stitch. Raise the presser foot and use the needle to pivot and turn the fabric.
67 INSERT ZIPPERS Align the right side or the left side of the zipper foot pin with the presser foot holder, lower the presser foot lever to attach the foot.. Needle stitches to the left of foot.. Needle stitches to the right of foot.. To insert zipper, consult the zipper package for instructions on how to prepare zipper placket and place zipper. To sew close to the zipper on the right side, snap the zipper foot onto the presser foot holder on the left side so the needle passes through the opening on the left side of the foot. Snap the foot onto the presser foot holder on the other side of the foot to sew close to the left side of the zipper. ENGLISH PIPING To insert piping, purchase pre-made piping or cover cording with a bias strip of fabric using the zipper foot snapped on to the right side of the presser foot holder. Place the piping between two layers of fabric. Stitch with the piping next to the foot so the stitching is tight against the cord.
68 SCALLOP STITCH These stitches are used to sew a decorative edge on garments and table cloths. SCALLOP HEM DECORATIVE SCALLOP EDGE. Place the fabric with wrong sides together and stitch near the edge.. Trim along the outside edge of the stitching (being careful not to cut the stitching).. Use seam sealant or fabric glue to secure edges of the scallop stitching.. Fold the fabric with right sides together and sew near the edge.. Cut the fabric along the seam leaving an allowance of mm(/8 )for seaming. Note the allowance..turn fabric with right sides out and gently push out the curved seam press. ENGLISH Right sides together Wrong sides together ADJUSTING DECORATIVE PATTERNS Use the standard presser foot for decorative stitch patterns. An indentation on the underside permits the flow of satin stitching and the open front allows clear visibility. You can tailor some decorative stitch patterns by adjust the length and width of the pattern. In LCD display you will be able to see if adjustment to pattern can be made. If the 00 is shown i both stitch lenght and width no adjustment can be made. Experiment with sample fabric until you get the desired length and width. Note: Some stitch patterns do not have both length and width adjustment. SEWING LIGHTWEIGHT FABRICS When sewing lightweight fabrics, it is suggested that you use interfacing on the backside of the fabric.
69 ENGLISH MAINTENANCE () To ensure the best possible operation of your machine, it is necessary to keep the essential parts clean at all times. Always disconnect the machine from power supply by removing the plug from the electric outlet. CLEANING THE FEED DOG AND HOOK AREA. Raise the needle to its highest position.. Remove the needle plate (). Remove the bobbin and bobbin case (). Clean the feed dog and hook area with the lint brush. NOTE: Put drop of sewing machine oil on the hook race as indicated by the arrow A. 5. Replace the bobbin case with the projection () Positioned against the spring (). Replace the needle Plate. () A () () () 5
70 HELPFUL HINTS PROBLEM CAUSE CORRECTION PAGE Upper thread breaks Machine not properly threaded. Thread entwined around bobbin. Needle inserted incorrectly. Thread tension too tight. Thread of incorrect size or poor quality Rethread machine. Clean bobbin area and rethread bobbin case. Reinsert needle Readjust thread tension Choose correct thread Lower thread breaks Bobbin threaded incorrectly. Bobbin wound unevenly or too full. Dirt in the bobbin and hook area. Rethread the bobbin Rewind the bobbin Clean the bobbin an hook area Machine skips stitches Fabric puckers Needle inserted incorectly Bent or blunt needle. Incorrect size of needle. Incorrect size needle on stretch fabric. Machine not properly threaded. Bobbin threaded incorrectly. Blunt needle. Thread tension too tight. Reinsert needle Insert new needle. Choose correct size needle for fabric. Use stretch needle. Rethread machine Rethread the bobbin. Insert new needle. Readjust thread tension ENGLISH Machine makes loose stitches or loops Bobbin threaded incorrectly. Machine not properly threaded. Tension not adjusted properly. Rethread the bobbin. Rethread machine. Readjust thread tension Threader does not thread needle eye Needle is not raised. Needle inserted incorrectly. Bent needle. Raise the needle. Reinsert needle. Insert new needle. Machine does not feed properly Feed dogs are lowered. Lint and dust accumulated around feed dogs. Raise the feed dogs. Clean the feed dogs area. 5 Needle breaks Fabric pulled while sewing. Needle is hitting the presser foot. Needle inserted incorrectly. Incorrect size needle or thread for fabric being sewn. Do not pull fabric. Select correct foot and pattern. Reinsert needle. Choose correct size needle and thread. 0 6 Machine runs with difficulty Dirt or lint accumulated in the hook race and feed dog. Remove the needle plate and bobbin case and clean the hook race and feed dog. 5 Machine will not run Cord not plugged into electrical outlet. Power switch is not turned on. Bobbin winder spindle is pushed to the right. Presser foot is not lowered. Buttonhole sewing mode; Buttonhole lever is not lowered completely Buttonhole foot is not attached. - - Insert plug fully into outlet. Turn on the switch. Push spindle to the left. Lower the foot. - - Lower the buttonhole lever. Attach the buttonhole foot
71 PATTERN CHART Bold part of decorative pattern is one unit of pattern ENGLISH a b c d 65 e f h i 70 j k l m n 75 o 5 A B C D E F 5 K P G L Q H M R I N S J O T p u 86 z q v r w s x 80 t 85 y U V W X Y Z
72 Royal Consul Europe Ringvejen 59 DK-7900 Nykøbing Mors Denmark Tlf.: Fax: Website: [email protected] 9
TOYOTA Quilt 50 TOYOTA
 VIGTIGE SIKKERHEDANVISNINGER Læs alle instruktioner før brug. For at undgå elektrisk stød ved brug af elektrisk symaskine skal grundlæggende sikkerhedsforanstaltninger altid følges: 1. Symaskinen må aldrig
VIGTIGE SIKKERHEDSINSTRUKTIONER
 Brugsanvisning VIGTIGE SIKKERHEDSINSTRUKTIONER Ved anvendelse af elektriske maskiner bør grundlæggende sikkerhedsregler altid overholder, herunder følgende: Læs samtlige instruktioner, før du tager symaskinen
I NV-900. Indhold: April 2008 Side 1
 Indhold: Skærmbillede af NV900 Side 2 Sømme i symaskinen Side 3 Brugen af udjævningsknappen på zigzagfoden J Side 4 Overlocksøm med guide og kantskærer Side 5 Blindsting Side 6 Stretchsøm Side 7 Knaphuller
DIVAR VIGTIGT! / IMPORTANT! MÅL / DIMENSIONS. The DIVAR wall lamp comes standard. with 2.4 m braided cord and a plug in power supply (EU or UK).
.") DIVAR VIGTIGT! / IMPORTANT! VIGTIGT læs vores anvisninger før du bruger produktet. Har du problemer med den elektriske installation, skal du kontakte en elektriker. Sørg for at altid slukke for strømmen
DIVAR VIGTIGT! / IMPORTANT! VIGTIGT læs vores anvisninger før du bruger produktet. Har du problemer med den elektriske installation, skal du kontakte en elektriker. Sørg for at altid slukke for strømmen
DIVAR VIGTIGT! / IMPORTANT! MÅL / DIMENSIONS
 DIVAR VIGTIGT! / IMPORTANT! VIGTIGT læs vores anvisninger før du bruger produktet. Har du problemer med den elektriske installation, skal du kontakte en elektriker. Sørg for at altid slukke for strømmen
Symaskine HN 5069. Brugervejledning
 Symaskine HN 5069 Brugervejledning Før symaskinen tages i brug, skal sikkerhedsanvisningerne følges, og brugervejledningen læses. Fare! 1. Hvis symaskinen er uden opsyn, skal strømmen afbrydes. Strømmen
INSTALLATION INSTRUCTIONS STILLEN FRONT BRAKE COOLING DUCTS NISSAN 370Z P/N /308960!
 Materials supplied: 1. (10) Zip Ties 2. (4) Hose Clamps 3. (2) Brake Duct Hose 4. (2) Brake Shields 5. (2) Front Brake Ducts ( Stock Fascia Only ) 6. (2) Washers 1 OD ( Stock Fascia Only ) 7. (8) Shims
ROYAL CONSUL EUROPE A/S 59 DK-7900
 EVA Royal 3800 Dansk English Brugervejledning Operators Manual ROYAL CONSUL EUROPE A/S Ringvejen 59 DK-7900 Nykoebing Mors Tlf. +45 96 69 16 00 Fax + 45 96 69 16 01 www.royal-consul.dk e-mail: [email protected]
EVA Royal 1234DF. ROYAL CONSUL EUROPE A/S Ringvejen 59 DK-7900 Nykoebing Mors Denmark +45 96 69 16 00 www.royal-consul.dk e-mail: rce@royal-consul.
 EVA Royal 1234DF Dansk English Brugervejledning Operators Manual ROYAL CONSUL EUROPE A/S Ringvejen 59 DK-7900 Nykoebing Mors Denmark +45 96 69 16 00 www.royal-consul.dk e-mail: [email protected] DANSK
LUL s Flower Power Vest dansk version
 LUL s Flower Power Vest dansk version Brug restgarn i bomuld, bomuld/acryl, uld etc. 170-220 m/50 g One size. Passer str S-M. Brug større hæklenål hvis der ønskes en større størrelse. Hæklenål 3½ mm. 12
frame bracket Ford & Dodge
 , Rev 3 02/19 frame bracket 8552005 Ford & Dodge ITEM PART # QTY DESCRIPTION 1 00083 8 NUT,.50NC HEX 2 00084 8 WASHER,.50 LOCK 3 14189-76 2 FRAME BRACKET 4 14194-76 1 411AL FRAME BRACKET PASSENGER SIDE
ZIGZAGSØMME. Sæt sømvælgeren på B.
 ZIGZAGSØMME Sæt sømvælgeren på B. Sådan fungerer stingbreddevælgeren Den maksimale zigzagstingbredde i zigzagsømme er 5. Du kan dog gøre stingene smallere i alle sømmene. Stingbredden bliver større, i
Sikkerhedsvejledning
 11-01-2018 2 Sikkerhedsvejledning VIGTIGT! Venligst læs disse instruktioner inden sengen samles og tages i brug Tjek at alle dele og komponenter er til stede som angivet i vejledningen Fjern alle beslagsdele
E-PAD Bluetooth hængelås E-PAD Bluetooth padlock E-PAD Bluetooth Vorhängeschloss
 E-PAD Bluetooth hængelås E-PAD Bluetooth padlock E-PAD Bluetooth Vorhängeschloss Brugervejledning (side 2-6) Userguide (page 7-11) Bedienungsanleitung 1 - Hvordan forbinder du din E-PAD hængelås med din
Isætning af nål. Undervisningsmateriale. Instruktion:
 Isætning af nål Instruktion:. Løsn nåleholder skrue en halv omgang.. Pres nålen helt op med den flade side så den peger bagud.. Stram derefter nåleholderskruen Front Back Nålen: Runde side af kolben Skaft
Montage bjælkeklipper BM 870 III Art. No / BM 875 III Art. No
 Montage bjælkeklipper BM 870 III Art. No. 112871 / BM 875 III Art. No. 112872 Assembly scythe mower BM 870 III Art. No. 112871 / BM 875 III Art. No. 112872 Motor og driv enhed. Engine and drive unit. Løsdele
QUICK START Updated:
 QUICK START Updated: 24.08.2018 For at komme hurtigt og godt igang med dine nye Webstech produkter, anbefales at du downloader den senest opdaterede QuickStart fra vores hjemmeside: In order to get started
DANSK INSTRUKTIONSBOG, JUKI OVERLOCK, MO- 644/6544DE MO- 644D/ 654DE. 2-nåle, 2-3-4-trådet Overlockmaskine
 MO- 644D/ 654DE 2-nåle, 2-3-4-trådet Overlockmaskine 1 Side Indhold Side Indhold 3 Sikkerhedsforeskrifter 17 Trådning, undergribertråd, rød 4 Maskinens detaljer 18 Trådning,undergribertråd, rød, mo-644
Daglig huskeliste Daily checklist
 Daglig huskeliste Daily checklist Quick release er spændt Nakkestøtte korrekt højde Fodskåle korrekt højde Fodremme spændt Tjek jævnligt bolte og skruer for efterspænding Quick release locked Headrest
Montage bjælkeklipper BM 5001R Art. No. 112870. Assembly scythe mower BM 5001R Art. No. 112870
 Montage bjælkeklipper BM 5001R Art. No. 112870 Assembly scythe mower BM 5001R Art. No. 112870 Løsdele pose pakket, afdækninger, skaftkonsol, skaft højre og venstre. Lose parts plastic bag, covers, handle
HR7775, HR7774. 4203.000.5832.4.indd 1 15-09-09 15:28
 HR7775, HR7774 4203.000.5832.4.indd 1 15-09-09 15:28 EN DA DE EL ES FI FR IT NL NO PT SV TR English Dansk Deutsch Ελληνικα Español Suomi Français Italiano Nederlands Norsk Português Svenska Türkçe AR FA
TM4 Central Station. User Manual / brugervejledning K2070-EU. Tel Fax
 TM4 Central Station User Manual / brugervejledning K2070-EU STT Condigi A/S Niels Bohrs Vej 42, Stilling 8660 Skanderborg Denmark Tel. +45 87 93 50 00 Fax. +45 87 93 50 10 [email protected] www.sttcondigi.com
DANSK INSTALLATIONSVEJLEDNING VLMT500 ADVARSEL!
 DANSK INSTALLATIONSVEJLEDNING VLMT500 Udpakningsinstruktioner Åben indpakningen forsigtigt og læg indholdet på et stykke pap eller en anden beskyttende overflade for at undgå beskadigelse. Kontroller at
Brugsanvisning. Installation Manual
 Manual size: 148 x 210 mm 175g copper paper(铜版纸印刷) UNIVERSAL BIL TAGBAGAGEBÆRER Brugsanvisning UNIVERSAL CAR ROOF RACK Installation Manual Model no. 10889 Tak fordi du valgte dette produkt, som vi håber
I NV Indhold: Maj 2008 Side 1
 Indhold: Skærmbillede af NV1200 Side 2 Sømme i symaskinen Side 3 Brugen af udjævningsknappen på zigzagfoden J Side 4 Overlocksøm med guide og kantskærer Side 5 Blindsting Side 6 Stretchsøm Side 7 Knaphuller
Montering af læsseudstyr Mounting of Loading Equipment. SupraVac 2000
 Montering af læsseudstyr Mounting of Loading Equipment SupraVac 2000 DK Montering af læsseudstyr på SupraVac 2000 Det er vigtigt, at læsseudstyret monteres og justeres som angivet nedenfor. Forkert justering
$99_brotherE_cover Brugsanvisning Dansk XC8375-0212 Printed in China
 Brugsanvisning VIGTIGE SIKKERHEDSREGLER Følg altid de grundlæggende sikkerhedsregler vedrørende brug af maskinen, herunder følgende: Læs samtlige instruktioner, inden maskinen tages i brug. FARLIGT - Sådan
QUICK START Updated: 18. Febr. 2014
 QUICK START Updated: 18. Febr. 2014 For at komme hurtigt og godt igang med dine nye Webstech produkter, anbefales at du downloader den senest opdaterede QuickStart fra vores hjemmeside: In order to get
ROTERENDE TABURET 360 GRADER MED HYL Brugsanvisning. ROTATING SHOWER STOOL WITH TRAY Installation Manual. Size: 148 x 210 mm 105g copper paper
 Size: 148 x 210 mm 105g copper paper ROTERENDE TABURET 360 GRADER MED HYL Brugsanvisning ROTATING SHOWER STOOL WITH TRAY Installation Manual Model. 10853 1. Fjern emballagen. 2. Taburettens ben samles
INSTRUKTIONS- VEJLEDNING
 SP00-serien SYMASKINE TIL HJEMMEBRUG INSTRUKTIONS- VEJLEDNING Læs vejledningen omhyggeligt før brug, og følg altid instruktionerne. Opbevar vejledningen et praktisk sted, så du let kan slå op i den. Hvis
Læs vejledningen godt igennem, før du begynder at samle vuggen. Please read the instruction carefully before you start.
 00 Samlevejledning på Vugge ssembly instruction for the cradle Læs vejledningen godt igennem, før du begynder at samle vuggen. Please read the instruction carefully before you start. www.oliverfurniture.dk
Brugsanvisning. Symaskine. Produktkode (Product Code): 888-X53/X54/X55/X56
: 888-X53/X54/X55/X56") Brugsanvisning Symaskine Produktkode (Product Code): 888-X/X/X/X6 Besøg os på http://solutions.brother.com, hvor du kan få produkt-support og svar på ofte stillede spørgsmål (FAQ). VIGTIGE SIKKERHEDSOPLYSNINGER
Brugsanvisning Symaskine Produktkode (Product Code): 888-X/X/X/X6 Besøg os på http://solutions.brother.com, hvor du kan få produkt-support og svar på ofte stillede spørgsmål (FAQ). VIGTIGE SIKKERHEDSOPLYSNINGER
Boligsøgning / Search for accommodation!
 Boligsøgning / Search for accommodation! For at guide dig frem til den rigtige vejledning, skal du lige svare på et par spørgsmål: To make sure you are using the correct guide for applying you must answer
Symaskine ABC. med. Kyndøl Symaskiner 66178183
 Symaskine ABC med Kyndøl Symaskiner 66178183 Symaskine ABC lær din symaskine at kende Vi kender det alle sammen vi bruger ligesøm og zigzag på vores symaskine, og ikke mere! Men der er jo faktisk rigtig
Varenr.: 553925 90 højre 553926 90 venstre 554027 90º højre med coating 554028 90º venstre med coating
 DK GH Skiftespor Varenr.: 55395 90 højre 55396 90 venstre 55407 90º højre med coating 55408 90º venstre med coating 553991 60º højre 553995 60º venstre 551058 60º højre med coating 551059 60º venstre med
SkyVision Linear Installation manual, comfort _0216, Comfort, Item no Version 02/16
 SkyVision Linear Installation manual, comfort 5.6.07_06, Comfort, Item no. 0606 Version 0/6 Installation Manual VITRAL SkyVision Linear Comfort Trækarme skal altid opbevares tørt/ Wooden upstands must
BRUGERVEJLEDNING TIL REVOLTA TRANSFORMER 2-WAY VOLTAGE TRANSFORMER USER MANUAL RV-2400
 BRUGERVEJLEDNING TIL REVOLTA TRANSFORMER 2-WAY VOLTAGE TRANSFORMER USER MANUAL RV-2400 BETJENINGSVEJLEDNING 1. Vigtigt: Før du tilslutter spændingstransformerne til stikkontakten i dit hjem, skal du sørge
SAMLEVEJLEDNINGER / COLLECTION GUIDES
 SAMLEVEJLEDNINGER / COLLECTION GUIDES INDHOLDSFORTEGNELSE GENERELT 1 MONTERINGSHULLER 3 ANGLE BORDBEN 5 PIN BORDBEN 9 LINK U - BEN 11 CROSS BUKKE 13 INDEX GENERAL 2 MOUNTING SPOTS 4 ANGLE TABLE LEGS 6
SkyVision Comfort Installation manual _0517, Comfort, Item no Version 05/17
 SkyVision Comfort Installation manual 5.6.02_0517, Comfort, Item no. 2022 Version 05/17 Installation Manual VITRAL SkyVision Comfort Trækarme skal altid opbevares tørt/ Wooden upstands must always be kept
Instruktionsbog DK: HZL-27Z, HZL-29Z
 Instruktionsbog DK: HZL-27Z, HZL-29Z 1 Indholdsfortegnelse Side Indhold Side Indhold 3 Sikkerhedsforeskrifter 21 Nål skiftes 4-6 Maskinens detaljer 22 Zigzag-søm 7 Tilbehør 23 3-punkts zigzag 8 Spolepinde
Monteringsvejledning / Mounting instructions. Chameleon betræk / Chameleon cover system
 Monteringsvejledning / Mounting instructions Chameleon betræk / Chameleon cover system Monteringsvejledning / Mounting instructions Bred presenningsbunden ud på gulvet. 1. Place the bottom of the tarpaulin
Overlocker 3034D. Indhold:
 Indhold: Trådspænding Side 2 Stinglængde Side 2 Differentiale Side 2 Skærebredde Side 2 Trykfodtryk Side 3 Åbn Dæksel Side 3 Håndhjul Side 3 Udskiftning af trykfod Side 3 Fjern stingfingeren Side 4 Friarm
Brugervejledning / User manual
 Brugervejledning / User manual No. 8700032 Airtracks til hjemmetræning og sport AirTracks for home and sport 2 Indholdsfortegnelse / Index Anbefalinger til brug af airtracks... 4 Sådan pumpes airtracken
GEM DISSE ANVISNINGER Design og specifikationer kan ændres uden forudgående varsel.
 INSTRUKTIONSBOG VIGTIGE SIKKERHEDSANVISNINGER Dette apparat er ikke beregnet til brug af personer (inklusive børn) med reducerede fysiske, sansemæssige eller mentale evner, eller manglende erfaring eller
Bestplay fodboldmål 300x200 cm
 Bestplay fodboldmål 300x200 cm ADVARSEL! Hvis du ikke følger alle instruktioner præcist, kan det medføre alvorlig personskade. Sikkerhedsadvarsel Læs alle instrukser og færdiggør samlingen før brug. Det
Brugsanvisning til coverlock. Ïëîñêîøîâíàÿ øâåéíàÿ ìàøèíà. Ðóêîâîäñòâî ïî ýêñïëóàòàöèè ÐÓÑÑÊÈÉ DANSK
 Brugsanvisning til coverlock Ïëîñêîøîâíàÿ øâåéíàÿ ìàøèíà. Ðóêîâîäñòâî ïî ýêñïëóàòàöèè INDHOLD: DANSK I. Navne på dele og deres funktioner... II. Forberedelse før trådning... 8 III. Trådning... 9 IV. Stingtyper...
SIKKERHEDSANVISNINGER Denne husholdningssymaskine er konstrueret i overensstemmelse med IEC/EN 60335-2-28.
 BRUGERHÅNDBOG E20 SIKKERHEDSANVISNINGER Denne husholdningssymaskine er konstrueret i overensstemmelse med IEC/EN 60335-2-28. Elektrisk tilslutning Denne symaskine skal betjenes i overensstemmelse med den
Help / Hjælp
 Home page Lisa & Petur www.lisapetur.dk Help / Hjælp Help / Hjælp General The purpose of our Homepage is to allow external access to pictures and videos taken/made by the Gunnarsson family. The Association
DANSK. INSTALLATIONSVEJLEDNING DS Pro Lærred med motor ADVARSEL!
 DANSK INSTALLATIONSVEJLEDNING DS Pro Lærred med motor Udpakningsinstruktioner Åben indpakningen forsigtigt og læg indholdet på et stykke pap eller en anden beskyttende overflade for at undgå beskadigelse.
Montageanvisning Assembly instructions. MultiDicer KMD 12, 18
 Montageanvisning instructions MultiDicer KMD 12, 18 2 DK Kongskilde MultiDicer KMD 12 og KMD 18 samles som vist på efterfølgende tegninger. 1. Tegning 121117963 Kongskilde MultiDicer leveres fra fabrikken
Date of issue Fremstillingsdato. Machine no , Maskinnr. ALSCO SAN DIEGO
 JENSEN CLASSIC FOLDER JENSEN MAX STACKER MANUAL MANUAL Date of issue 2005.11.04 Fremstillingsdato Machine no. 760790, 492147 Maskinnr. Distributor / Forhandler Project Manufacturer / Fabrikant JENSEN USA
Samlevejledning til tremmeseng 70 x 140 Assembly instruction for cot 70 x 140
 Samlevejledning til tremmeseng 70 x 140 Assembly instruction for cot 70 x 140 Læs vejledningen godt igennem før du begynder. Read the assembly instruction carefully before you start. OLIVER FURNITURE /
MO-50e/51e BRUGSANVISNING 2-NÅLS, 3/4-TRÅDET OVERLOCKER
 2-NÅLS, 3/-TRÅDET OVERLOCKER MO-50e/51e BRUGSANVISNING VIGTIGT Denne brugsanvisning bør læses nøje med forståelse for øje inden produktet tages i brug. Opbevar brugsanvisningen til fremtidig brug. VIGTIGE
SIKKERHEDSANVISNINGER Denne husholdningssymaskine er konstrueret i overensstemmelse med IEC/EN 60335-2-28.
 BRUGERHÅNDBOG E10 SIKKERHEDSANVISNINGER Denne husholdningssymaskine er konstrueret i overensstemmelse med IEC/EN 60335-2-28. Elektrisk tilslutning Denne symaskine skal betjenes i overensstemmelse med den
- The knowledge to make a difference
 - The knowledge to make a difference TILLYKKE MED DIT NYE AKVARIUM Denne vejledning vil hjælpe dig let gennem opstilling og samling af dit nye MOVE akvarium. Vi anbefaler du læser vejledningen grundigt
DANSK / ENGLISH DS PRO PROJEKTORBESLAG 180 CM MANUAL DS PRO PROJECTOR BRACKET 180 CM OWNERS MANUAL
 DANSK / ENGLISH DANSK SIDE 1 DS Pro PRO projektorbeslag PROJEKTORBESLAG 180 cm 180 CM Tillykke med dit nye DS Pro projektorbeslag 180 cm. For at opnå det bedste resultat bedes du læse denne manual og udelukkende
Portal Registration. Check Junk Mail for activation . 1 Click the hyperlink to take you back to the portal to confirm your registration
 Portal Registration Step 1 Provide the necessary information to create your user. Note: First Name, Last Name and Email have to match exactly to your profile in the Membership system. Step 2 Click on the
Brugsvejledning. Instruction manual. Eva Royal 8632
 Brugsvejledning Instruction manual Eva Royal 863 DANSK DANSK ENGLISH E NG LISH INDHOLDSFORTEGNELSE INDHOLDSFORTEGNELSE 3 SIKKERHEDS INSTRUKTIONER 4 SYMASKINENS DELE 5 SYMASKINENS DELE FORTSAT 6 TILBEHØR
Brugermanual. USB Pladespiller
 Brugermanual USB Pladespiller INDHOLD BESKRIVELSE... 4 KOM I GANG... 6 Strøm... 6 Forstærker forbindelse... 6 Afspilning af plade... 6 USB/SD afspilning og optagelse... 7 VEDLIGEHOLDELSE... 9 Skift tonearm
Indledning. Ved at ændre bogens titel fra Kniplingssyning fra Hedeboegnen til Udklipshedebo, har jeg valgt syningens oprindelige betegnelse.
 Indledning Denne bog Udklipshedebo er en revideret udgave af bogen Kniplingssyning fra Hedeboegnen, Borgens Forlag 1993, hvor min medforfatter var Marianne Lotzbeck. Ved at ændre bogens titel fra Kniplingssyning
Kursus i overlocker. Trådningsdiagram til 640D.
 Trådningsdiagram til 640D. Side 1 Trådningsdiagram til 925D, 929D M1034D og 940D. Side 2 Trådspændingerne: Gul 4 Rød 4 Grøn 4 Blå 4 Blå: 7 Grøn: 7 Side 3 Sådan finder man de forskellige knapper på 640D.
TELT. Oversigt over dele. Følg opstillingsanvisningerne for at opnå det bedste resultat.
 TELT Følg opstillingsanvisningerne for at opnå det bedste resultat. Opstillingstid: ca. 25 min. Krævet antal personer til opstilling: 2 Oversigt over dele Kabine Pløkker (18 stk.) Yderdug Bæretaske Ekstra
Manual Transmission Remove and Install (2,0 DOHC 8V Engine) ( ) Remove
 ( ) Remove") Manual Transmission Remove and Install (,0 DOHC 8V Engine) (6 4 0) Workshop Equipment Transmission jack Materials Brake fluid (Super Dot 4) ESD-M6C57-A Remove. Standard preparatory measures: Make a note
Manual Transmission Remove and Install (,0 DOHC 8V Engine) (6 4 0) Workshop Equipment Transmission jack Materials Brake fluid (Super Dot 4) ESD-M6C57-A Remove. Standard preparatory measures: Make a note
The River Underground, Additional Work
 39 (104) The River Underground, Additional Work The River Underground Crosswords Across 1 Another word for "hard to cope with", "unendurable", "insufferable" (10) 5 Another word for "think", "believe",
INSTRUCTION BOOKLET BETJENINGSVEJLEDNING VACUUM CLEANER STØVSUGER VC5D
 INSTRUCTION BOOKLET BETJENINGSVEJLEDNING VACUUM CLEANER STØVSUGER VC5D GARANTI Kære kunde, Vore produkter underligger en streng kvalitetskontrol. Skulle dette apparat ikke fungere efter hensigten, beklager
Vejledning til at tjekke om du har sat manuel IP på din computer.
 Indhold Vejledning til at, komme på nettet. (DANSK)... 2 Gælder alle systemer.... 2 Vejledning til at tjekke om du har sat manuel IP på din computer.... 2 Windows 7... 2 Windows Vista... 2 Windows XP...
how to save excel as pdf
 1 how to save excel as pdf This guide will show you how to save your Excel workbook as PDF files. Before you do so, you may want to copy several sheets from several documents into one document. To do so,
2006/1. Golfvogn - Golftrolley G150. DK Betjeningsvejledning GB User manual
 2006/1 DK Betjeningsvejledning GB User manual Golfvogn - Golftrolley G150 Texas A/S - Knullen 2 - DK-5260 Odense S - Denmark Tel. +45 6395 5555 - www.texas.dk - [email protected] 1. Indholdsfortegnelse 2.
3D NASAL VISTA 2.0
 USER MANUAL www.nasalsystems.es index index 2 I. System requirements 3 II. Main menu 4 III. Main popup menu 5 IV. Bottom buttons 6-7 V. Other functions/hotkeys 8 2 I. Systems requirements ``Recommended
Chiroform Massageapparat
 Chiroform Massageapparat Dobbelt virkende acupresserende massageapparat Med infrarød varme UN-2000M Læs denne brugsanvisning omhyggeligt før brug, og gem den til senere brug. Dette apparat er ikke til
Specifikationer: Producer: Unitron a/s Kokmose 6, 6000 Kolding. Tlf Fax
 DK MANUAL TIL SMÅGRISE Number: 1212-1201 Number: 1212-1202 Number: 1212-1203 HOLDER TIL Number: 1212-1205 MIXERHJUL TIL Number: 1212-1210 Specifikationer: UniFeeder monteres på siden af skillevæg i faresti,
MS-H280-Pro Magnetic Stirrer
 MS-H280-Pro Magnetic Stirrer www..com Copyright: No part of this manual may be reproduced or transmitted without prior written permission of. VERSION201407 CONTENTS Chapter 1: Working Principle... 3 1
Kontrollér, at nedenstående tilbehør findes i kassen. Kontakt leverandøren, hvis der mangler noget, eller hvis noget af tilbehøret er beskadiget.
 S_brotherDa.book Page A Wednesday, October 8, 00 : PM Medfølgende tilbehør Kontrollér, at nedenstående tilbehør findes i kassen. Kontakt leverandøren, hvis der mangler noget, eller hvis noget af tilbehøret
Davo-Meg 1002 & 1002B Dansk manual Side 3-5 English user manual Page 6-8
 Davo-Meg 1002 & 1002B Dansk manual Side 3-5 English user manual Page 6-8 DK: Davo-Meg 1002: 87 98 301 819 Davo-Meg 1002B: 87 98 301 822 EAN: Davo-Meg 1002: 5703534100059 Davo-Meg 1002B: 5703534100202 Indhold
DET KONGELIGE BIBLIOTEK NATIONALBIBLIOTEK OG KØBENHAVNS UNIVERSITETS- BIBLIOTEK. Index
 DET KONGELIGE Index Download driver... 2 Find the Windows 7 version.... 2 Download the Windows Vista driver.... 4 Extract driver... 5 Windows Vista installation of a printer.... 7 Side 1 af 12 DET KONGELIGE
Model Brugsanvisning Instruction manual
 Model 11560 Brugsanvisning Instruction manual DK GB CAMPINGTOILET Dele Toiletlåg Toiletsæde Vandpåfyldningsstuds Pumpestempel Låsebeslag 10 liters skylletank Tømmetud Skyderventil Niveauindikator 20 liters
Basic statistics for experimental medical researchers
 Basic statistics for experimental medical researchers Sample size calculations September 15th 2016 Christian Pipper Department of public health (IFSV) Faculty of Health and Medicinal Science (SUND) E-mail:
Elna Lotus på MoMA. Lotus var for Elna en salgssucces over hele verden med over en million solgte maskiner.
 Elna Lotus på MoMA En kompakt symaskine med et unikt design: Den originale Elna Lotus fra 1968 er udstillet på The Museum of Modern Art (MoMA) i New York. Lotus var for Elna en salgssucces over hele verden
User Manual for LTC IGNOU
 User Manual for LTC IGNOU 1 LTC (Leave Travel Concession) Navigation: Portal Launch HCM Application Self Service LTC Self Service 1. LTC Advance/Intimation Navigation: Launch HCM Application Self Service
Fejemaskine med integreret opsamler Sweeper with integrated collector box MS 920
 DK GB Betjeningsvejledning User manual Fejemaskine med integreret opsamler Sweeper with integrated collector box MS 920 Texas A/S - Knullen 22 - DK-5260 Odense S - Denmark Version 14.1 Tel. +45 6395 5555
Elektrisk & Automatisk kædeslibeanlæg
 Elektrisk & Automatisk kædeslibeanlæg Art nr: 75700675 EAN nr: 5709133750688 1 af 9 230 / 50Hz / 85Watt 5300 Diameter.108mm Huldiameter.23mm 35 til højre og venstre 1/4 + 3/8 Ca. 2,1kg Øvrige Sikkerhedsforanstaltninger
Brug sømbrættet til at lave sjove figurer. Lav fx: Få de andre til at gætte, hvad du har lavet. Use the nail board to make funny shapes.
 Brug sømbrættet til at lave sjove figurer. Lav f: Et dannebrogsflag Et hus med tag, vinduer og dør En fugl En bil En blomst Få de andre til at gætte, hvad du har lavet. Use the nail board to make funn
Brugsanvisning KEEPING THE WORLD SEWING
 Brugsanvisning KEEPING THE WORLD SEWING SIKKERHEDSANVISNINGER Denne husholdningssymaskine er konstrueret i overensstemmelse med IEC/EN 60335--8. Elektrisk tilslutning Denne symaskine skal betjenes i overensstemmelse