SolarVenti Standard (SV) Roof Installation Manual
|
|
|
- Karina Jessen
- 8 år siden
- Visninger:
Transkript

1 SolarVenti Standard (SV) Roof Installation Manual Dach Installationsanleitung Roof Manuel d installation Roof Manual de instalación Střecha - Montážní instrukce Tag Installationsvejledning Roof Monteringsanvisning Roof Installationsinstruktioner Roof Asennusohjeet Tv. 38

2

3 General information General information (*) Check reference on page 11 Weitere Erläuterungen siehe Seite 12 Se noter på side 16 Reportez vous à la page 13 Se merknader på side 17 Comprobar referencias en el pagina 14 Se anmärkningarna på sidan 18 Další informace naleznete na straně 15 Katso ohjeet sivulta 19 SolarVenti EMA 2014

4 I. Roof Kit... 1 Dachmontagesatz French title Spanish title Střešní sada Tagsæt Norwegan title Swedish title Finnish title I.I Stand Assembly. 4 Zusammenbau der Dachstützen Samling af tagstativer French title Norwegan title Spanish title Swedish title Skládání stojanu Finnish title II. Additional installation tips...11 Weitere Montage-Tipps...12 French title...13 Más consejos para la instalación...14 Další instalační tipy...15 Yderligere tips til installationen...16 Norwegan title...17 Swedish title...18 Finnish title...19 (*) SolarVenti EMA 2014
 SolarVenti www.solarventi.")
5 I. Roof Kit I. Roof Kit Type 1 Type 2 SolarVenti 1

6 I. Roof Kit 1 Option 2 [mm] I II III IV SV7 900 ± ± ± 100 SV ± ± ± 100 SV ± ± ± 100 SV ± ± ± 100 Max. 600 Max. 900 Max. 900 Max. 900 (*) SolarVenti 2
 SolarVenti www.solarventi.")
7 I. Roof Kit (*) SolarVenti 3

8 I.I Stand Assembly I.I Stand Assembly SolarVenti 4

9 I.I Stand Assembly SV7-14 SV20-30 x y Option 1 Option 2 Option 3 SolarVenti 5

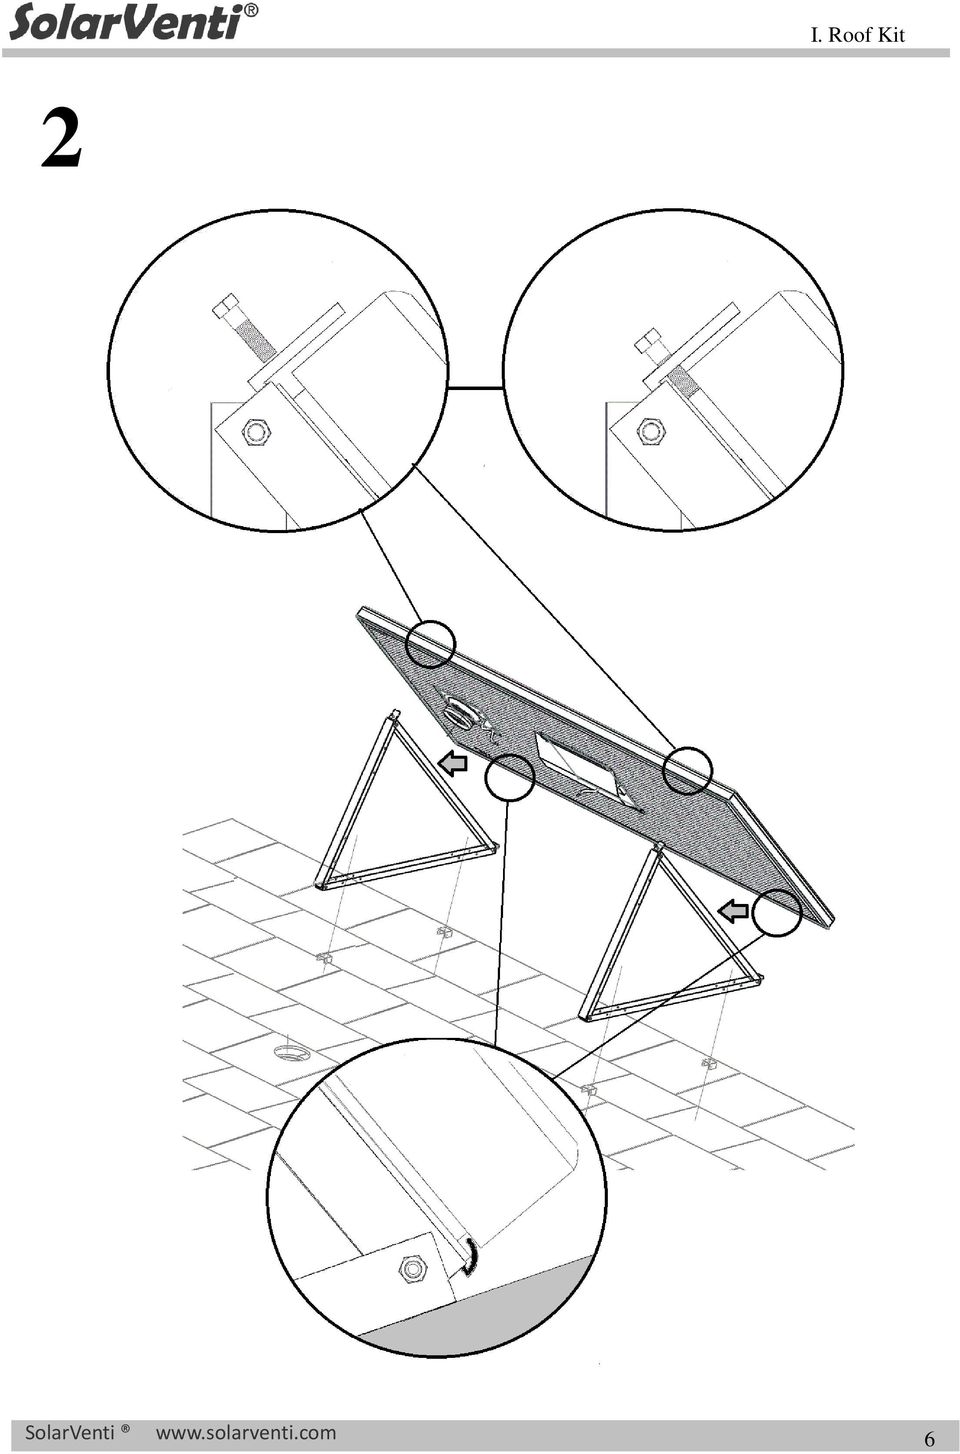
10 I. Roof Kit 2 SolarVenti 6
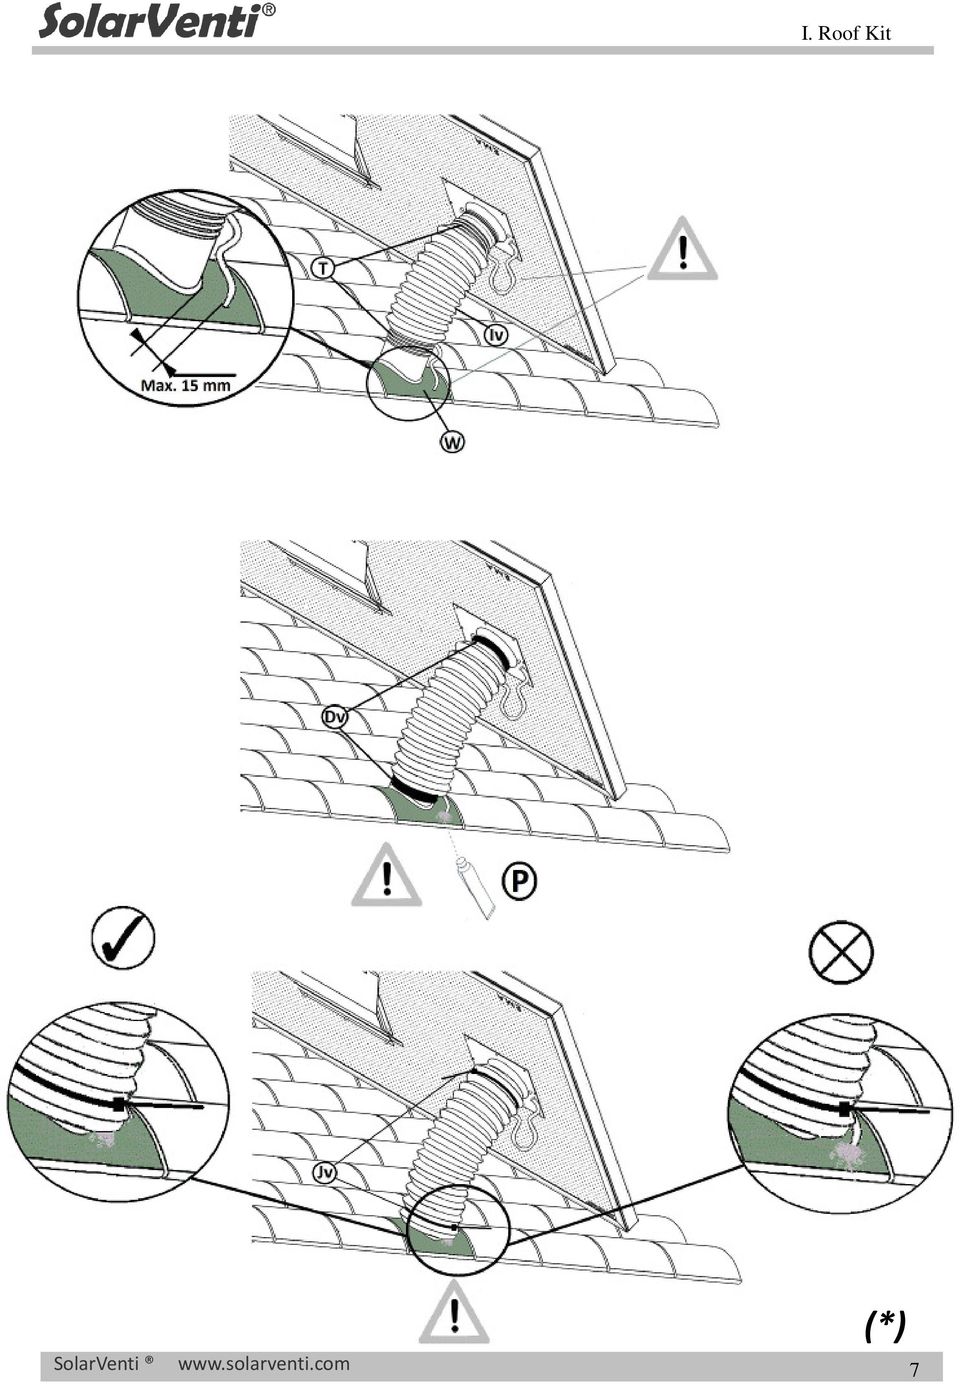
11 I. Roof Kit (*) SolarVenti 7
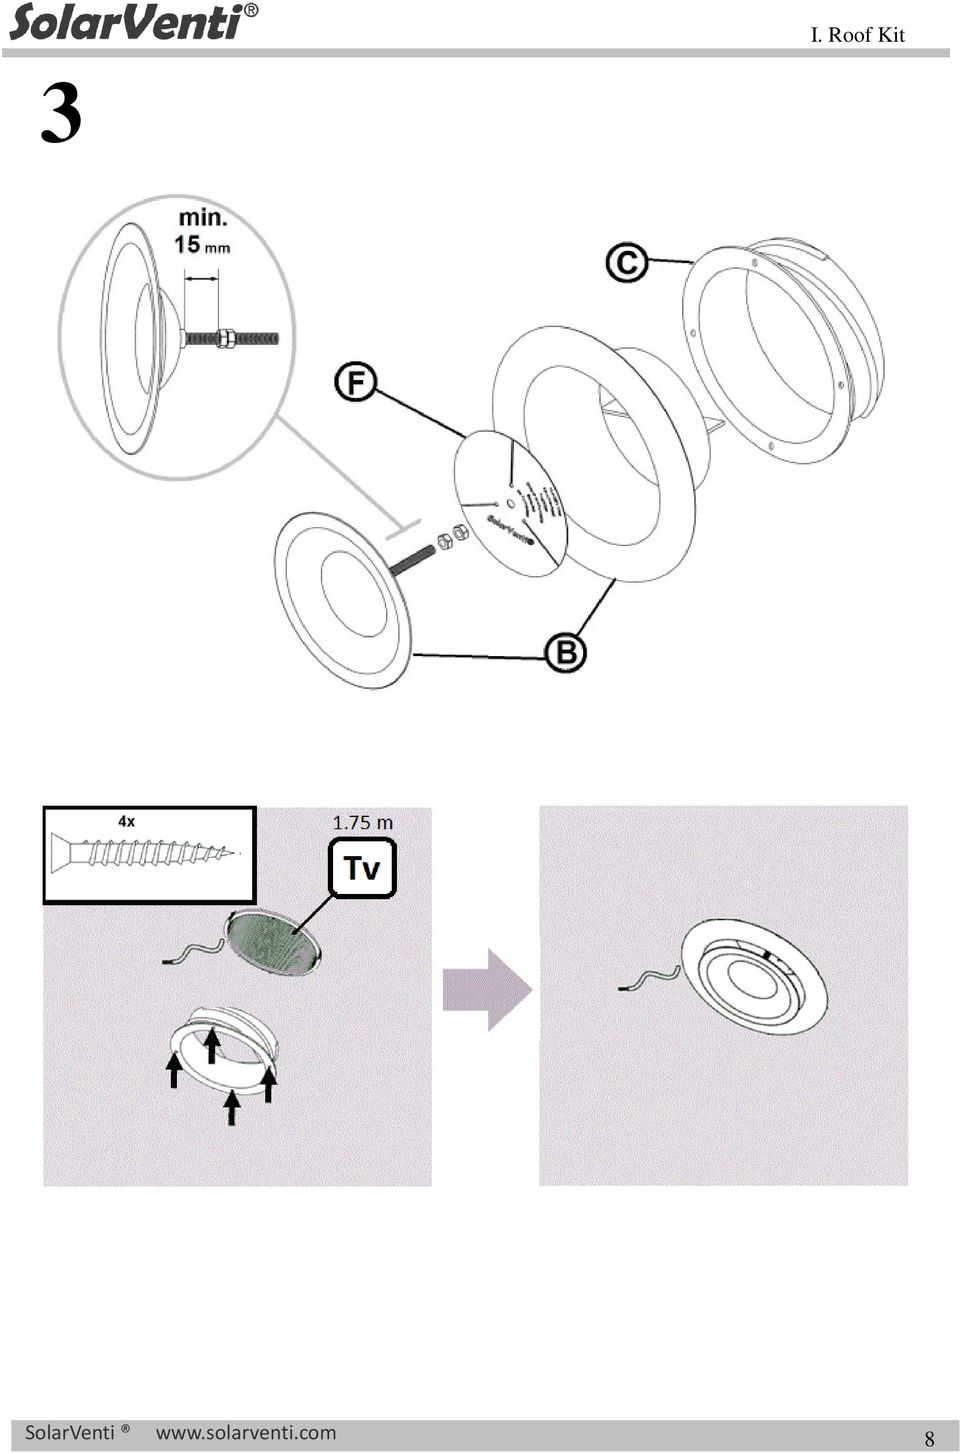
12 I. Roof Kit 3 SolarVenti 8
13 Notes Notes SolarVenti 9

14 Notes Notes SolarVenti 10
15 Installation Manual for mounting SV standard to the roof Additional installation tips II. Further installation tips Installation manual for controller/switch, ventilation kit and other SolarVenti accessories is found in the wall manual that comes with the solar air collector. INTRO TOOLS Optimal airflow: In a leaky building there is no need for an exhaust/pressure valve. However, a valve for air outlet should be installed in a very tight building. As far as possible inject the air into the driest room and extract from the most humid room to eliminate the risk of leading the moisture through the rest of the building. The hole: Drilling through a roof can be challenging and the tools needed to make the hole will depend on the roof material. Contact your local SolarVenti installer for further advice regarding the drilling and the installation. Take care not to drill into cables, power sockets, etc. The optimal diameter of the hole is Ø133 mm on the inside and Ø140 mm on the outside. However, it is possible to use a diameter of Ø135 mm both inside and outside. s. 2 Measurements: All measurements in this installation manual apply to SolarVenti standard models. Measurements do NOT apply to SolarVenti (K) basement models. Racks: Drill two holes in the long aluminum rod (Ev3) (see assembly instructions for the racks on page 4-5) and secure it (Ev3) on the roof - follow the instructions on page 3. Only then, finish assembling the racks on the roof. s. 3 Corrugated roof (brick, fiber cement, etc.): Use pressure pads (X2). Avoid leaks: Make sure that the roof ducting (W) is firmly secured and without any bubbles. The upper edge of the ducting must be placed under a roof tile. Its other edges must always finish in a downward roof wave if necessary cut with a utility knife to fit. Non-corrugated roof types (eg. roofing felt, slate, etc.): Use spacers (X1). Avoid leaks: Apply glue on the underside of the roof ducting (W) within the white tape edge and fasten the ducting (W) to the roof within 2-5 min. Take care to avoid formation of bubbles. Apply glue around the ducting foil, put water on your finger and smooth out the glue with your finger. s. 7 Waterproof cabling: Pull the cord through the flex hose (Iv) and down through a small hole which you make in the ducting (W) close to aluflex tube (T). Leave a small piece (5-10 cm) of cord hanging loose beside the collector on the outside of the flexible hose so that water can drain away here. Apply glue around the cable entry to make it waterproof. Place the armaflex strip (Dv) around the aluflex tube and the cable, and ensure that the flex hose (Iv) covers the cable. The plastic strips (Jv) are to be tightened around the flexible hose (Iv) approximately in the middle of the armaflex fitting (Dv). SolarVenti 11

16 Installationsanleitung für SolarVenti Standard Modell Weitere Montage-Tipps II. Further installation tips Die Montage der Steuerung, des Belüftungssets und des anderen SolarVenti Zubehörs finden Sie in der Installationsanleitung, die dem SolarVenti beigelegt ist. ALLGEMEINES WERKZEUG Optimale Luftverteilung: In einem dichten Gebäude muss eine Entlüftung (Absaugset/Druckventil) unbedingt installiert werden. Der Lufteinlass muss möglichst immer in dem trockensten Raum platziert werden und die Entlüftung immer im feuchtesten Raum. Das Loch: Welche Werkzeuge für die Bohrung durch ein Dach benötigt werden, hängt von der Beschaffenheit ab. Die Bohrung kann sich als schwierig erweisen. Sind Sie unsicher bezüglich der Bohrung oder Installation eines SolarVentis, ist die Installation durch einen SolarVenti Fachbetrieb durchzuführen.. Stellen Sie sicher, dass Sie nicht in Kabel u.ä. bohren. Der optimale Durchmesser des Loches im Innenraum beträgt Ø133 mm und an der Außenwand Ø140 mm. Haben Sie nur einen Bohraufsatz, können Sie stattdessen Ø135 mm sowohl für den Innenund Außenbereich benutzen. S. 2 Maße: Alle hier angegebenen Maße sind passend zu den SolarVenti Standard Modellen. Die Maße passen somit NICHT zu den SolarVenti (K) Keller Modellen. Wandgestelle: Bohren Sie zwei Löcher in die langen Aluminiumsstangen (Ev3) (siehe Seite 4-5) und befestigen Sie (Ev3) auf dem Dach folgen Sie den Instruktionen auf Seite 3. Bauen Sie erst danach das Gestell auf dem Dach zusammen. S. 3 Welliges Dach (Ziegelstein, Eternit u.ä.): Benutzen Sie Druckentlaster (X2). Vermeiden Sie Undichtigkeiten: Die Dachdurchführung (W) muss gut befestigt werden und darf keine Blasen schlagen. Die oberste Kante der Dachdurchführung muss von einem Dachziegel abgedeckt werden. Die übrigen Kanten müssen auf einer heruntergehenden Welle enden schneiden Sie evtl. überschüssige Folie ab. Andere Dachtypen (Dachpappe, Schiefereternit u.ä.): Benutzen Sie Abstandshalter (X1). Vermeiden Sie Undichtigkeiten: Verteilen Sie ein Streifen Kleber auf der Rückseite der Dachdurchführung (W) innerhalb der weißen Tapekante. Befestigen Sie (W) auf dem Dach innerhalb von 2-5 min. vermeiden Sie dabei Blasen. Schmieren Sie Kleber um die Folie der Dachdurchführung und glätten Sie es mit einem befeuchteten Finger aus. S. 7 Wasserdichte Kabelführung: Führen Sie das Kabel durch den Luftschlauch (Iv) und das kleine Loch, dass Sie nahe des Aluflexrohres (T) machen. Lassen Sie einen Überschuss von 5-10 cm Kabel aus dem Luftschlauch hängen, so dass Regenwasser hier abtropfen kann. Machen Sie die Kabeldurchführung wasserdicht, indem Sie das Loch mit Kleber abdecken. Befestigen Sie den Armaflex-Streifen (Dv) um das Aluflexrohr (T) und decken Sie das Kabel mit der Luftschlange (Iv) ab. Befestigen Sie die Kabelbinder (JV) um den Luftschlauch (Iv) mittig auf (DV). SolarVenti 12

17 II. Further installation tips Basement Installation manual Further Installation Tips INTRO Blow into dry room: As far as possible the air inlet must always be installed in the most dry room and the outlet in the room containing most humidity. In this way you don t risk the humid air to spread through the entire basement. K vs. Standard: All measurements in this manual are fitting to the SolarVenti (K) models. The measurements DO NOT fit to the standard SolarVenti air collectors (SV14, SV20, SV30). TOOLS The wall of the basement: It can be challenging to drill through the wall of a basement. Furthermore the tools, which are needed, depend on the consistency of the wall. E.g. you can risk loose insulation in the cavity dam, which you have to secure before drilling. Contact your local SolarVenti installer for further advices regarding the drilling and installation of a SolarVenti. The hole: Make sure that you don t drill into cables etc. The centre of the air inlet must be minimum 100 mm below the ceiling. The optimal diameter of the indoor hole is Ø133 mm and Ø140 mm for the outdoor hole. If you only have one drilling bit, you can use Ø140 mm for both the indoor and outdoor hole. Screws: We don t provide screws for mounting the air collector to the wall. p. 6, 12, 18, 20 Cable: The cable of the Solar Air Collector can either go through the hole of the air inlet as shown above or can be drilled as a separate 6-8 mm hole, which can be placed wherever you like. p. 8 Insulation: Insulation of the pipe is needed. Get the insulation in a building supply store or buy an insulation matt and aluminium cover from SolarVenti. p. 8, 14 Stands: Drill two holes in every stand and mount them to the wall with screws fitting to the construction of the wall. p. 10 Angle: Find the referencepoint which indicates the place of the fan on the Solar Air Collector. Mark the triangle on the wall. The gray triangle is the possible area, where the air inlet hole will be placed. The drilling can be made within this area. (If an Extra Extension Kit is used as an add on the max. length of the triangle will be 2010 mm instead of 1010 mm) If you use the whole length of the pipe G, you need to drill the hole on the bottom line. Whereas you drill a hole inside the grey field, you need to cut the pipe. SolarVenti 13

18 II. Further installation tips Standard Installationsvejledning Yderligere tips til installationen Installationsvejledning til regulator/afbryder, ventilationssæt og andet SolarVenti tilbehør findes i vægvejledningen, der følger med luftsolfangeren. INTRO VÆRKTØJ Optimal luftflow. Ved en utæt bygning er der ikke behov for en udsugning/ trykventil. Installer dog en ventil til luftudstrømning i en meget tæt bygning. Indblæsningen skal så vidt muligt ske i bygningens tørreste rum og udsugningen fra det fugtigste rum ellers risikerer man at presse fugten ud i resten af bygningen. Hullet: At bore et hul gennem taget kan være vanskeligt. Dertil kommer, at værktøjet, der skal bruges til at lave hullet, afhænger af tagets beskaffenhed. Få råd og vejledning hos din lokale SolarVenti installatør, hvis du er i tvivl om installationen. Sørg for, at der ikke er nogen ledninger, stikkontakter e.l., hvor boringen skal foretages. Den optimale diameter af hullet er Ø133 mm på indersiden og Ø140 mm på ydersiden. I tilfælde af, at du kun har en borekrone, kan du dog bruge Ø135 mm til både det indvendige og udvendige hul. s. 2 Mål: Alle mål angivet i denne montagevejledning gælder for SolarVenti standard modeller. Målene gælder IKKE for SolarVenti (K) kældermodeller.. Stativer: Bor først to huller i den lange aluminiumsstang (Ev3) (se samlevejledning for stativerne side 4-5) og fastgør (Ev3) på taget følg instruktioner på side 3. Saml først herefter stativerne færdig på taget. s. 3 Bølget tag (tegl, eternit o.l.): Brug trykaflastere (X2). Undgå utætheder: Sørg for at taggennemføringen (W) sidder godt fast og ikke slår bobler. Taggennemføringens øverste kant skal ligge ind under en tagplade/teglsten. Dens øvrige kanter skal altid slutte på en nedadgående tagbølge skær evt. til med en hobbykniv. Ikke-bølgede tagtyper (fx tagpap, skiffereternit o.l.): Brug afstandsholdere (X1). Undgå utætheder: Smør lim på undersiden af taggennemføringen (W) indenfor den hvide tapekant og sæt taggennemføringen (W) fast på taget inden for 2-5 min. undgår at den slår bobler. Smør lim rundt om taggennemførings-folien, kom vand på din finger og glat limen ud med fingeren. s. 7 Vandtæt kabelføring: Træk ledningen gennem flexslangen (Iv) og ned gennem et lille hul, du laver i gennemføringen (W) tæt på aluflexrøret (T). Lad et lille overskud (5-10 cm) af ledningen hænge løst ved luftsolfangeren udenfor flexslangen, så vandet kan dryppe af her. Påfør lim rundt om kabelgennemføringen, så det bliver vandtæt. Sæt armaflexstrimlen (Dv) rundt om aluflexrøret og kablet og få flexslangen (Iv) til at dække kablet. Plaststripsene (Jv) skal strammes rundt om flexslangen (Iv) ca. midt på (Dv). SolarVenti 14

19 II. Further installation tips Standardní montážní instrukce Další montážní tipy Montážní instrukce k regulátoru/vypínači, ventilační sadě a dalšímu příslušenství SolarVenti najdete v montážních instrukcích k montáži na zeď, které jsou přiloženy u panelu. INTRO NÁŘADÍ Optimální objemový průtok vzduchu. U budov, které nejsou zcela hermeticky uzavřené není potřeba další odtah. Nainstalujte však odtah u velmi utěsněných budov. Talířový ventil, přes který se vzduch vhání dovnitř by měl být umístěn v nejsušší místnosti a ventil na odtah naopak v nejvlhčí místnosti jinak by docházelo k rozhánění vlhkosti do zbytku budovy. Otvor do střechy: Nářadí k tomuto účelu je speciální dle materiálu a složení střechy. Zeptejte se svého prodejce či technika, pokud si přejete rady s vrtání otvoru. Zde lze využít korunkový vrták s průměrem Ø mm. Pro vrtání otvoru do stropu lze využít korunkový vrták s průměrem Ø mm. Pokud jsou střešní krytinou tašky, je možné pouze jednu tašku vyndat a nahradit průchodkou, a tím se vyhnout vrtání do střechy. s. 2 Rozměry: Všechny rozměry, které jsou zde uvedené, platí pro standardní modely SolarVenti. Rozměry NESEDÍ na sklepní modely. Stativy: Vyvrtejte nejdřív 2 dírky do dlouhého hliníkového profilu (Ev3)(podívejte se na instrukce ke skládání stativů na straně 4-5) a upevněte (Ev3) do střechy postupuje del instrukcí na straně 3. Teprve poté dosestavte stativy na střeše. s. 3 Vlnité střechy (tašky, eternit a pod.): Použijte pryžové podložky (x2). Zabraňte netěsnostem: Zajistěte, aby průchodka byla dobře připevněna ke střeše a nikde se nevytvořily žádné bubliny. Horní hrana průchodky musí být trochu zastrčena pod tašky/šablony. Postraní hrany průchodky musí končit na klesající části vlny pokud to nevychází, upravte velikost průchodky tak, aby to sedělo. Rovné střechy (např. lepenka, šablony eternitu a pod.): Použijte distanční držáky (X1). Zabraňte netěsnostem: Naneste tmel na spodní stranu průchodky (W) v rozmezí bílého lepícího okraje a přidržte průchodku (W) na střeše 2-5 min.-dejte pozor, aby se nikde nevytvořily žádné bubliny. Naneste tmel kolem dokola celé průchodky a namočeným prstem tmel uhlaďte. s. 7 Protažení kabelu: protáhněte kabel přes flexibilní hadici (lv) a pak dolů zkrz malou dírku, kterou zhotovíte v průchodce (W) blízko aluflex hadice (T). Nechte kousek kabelu (5-10cm) viset u panelu, mimo flexi hadici, tak aby zde mohla odkapávat voda. Naneste tmel kolem kolem prostupu kabelu, tak aby se stala dírka vodotěsnou.upevnetě černé těšnění (Dv) kolem aluflex roury a kabelu a zakryjte to celé šedivým izolačním návlekem (lv). Stahovací pásky (Jv) je třeba utáhnout kolem flexihadice(lv) zhruba uprostřed (Dv). SolarVenti 15


20 II. Further installation tips Installationsvejledning til tagmontage Yderligere tips til installationen Installationsvejledning til regulator/afbryder, ventilationssæt og andet SolarVenti tilbehør findes i vægvejledningen, der følger med luftsolfangeren. INTRO VÆRKTØJ Optimal luftflow. Ved en utæt bygning er der ikke behov for en udsugning/ trykventil. Installer dog en ventil til luftudstrømning i en meget tæt bygning. Indblæsningen skal så vidt muligt ske i bygningens tørreste rum og udsugningen fra det fugtigste rum ellers risikerer man at presse fugten ud i resten af bygningen. Hullet: At bore et hul gennem taget kan være vanskeligt. Dertil kommer, at værktøjet, der skal bruges til at lave hullet, afhænger af tagets beskaffenhed. Få råd og vejledning hos din lokale SolarVenti installatør, hvis du er i tvivl om installationen. Sørg for, at der ikke er nogen ledninger, stikkontakter e.l., hvor boringen skal foretages. Den optimale diameter af hullet er Ø133 mm på indersiden og Ø140 mm på ydersiden. I tilfælde af, at du kun har en borekrone, kan du dog bruge Ø135 mm til både det indvendige og udvendige hul. s. 2 Mål: Alle mål angivet i denne montagevejledning gælder for SolarVenti standard modeller. Målene gælder IKKE for SolarVenti (K) kældermodeller.. Stativer: Bor først to huller i den lange aluminiumsstang (Ev3) (se samlevejledning for stativerne side 4-5) og fastgør (Ev3) på taget følg instruktioner på side 3. Saml først herefter stativerne færdig på taget. s. 3 Bølget tag (tegl, eternit o.l.): Brug trykaflastere (X2). Undgå utætheder: Sørg for at taggennemføringen (W) sidder godt fast og ikke slår bobler. Taggennemføringens øverste kant skal ligge ind under en tagplade/teglsten. Dens øvrige kanter skal altid slutte på en nedadgående tagbølge skær evt. til med en hobbykniv. Ikke-bølgede tagtyper (fx tagpap, skiffereternit o.l.): Brug afstandsholdere (X1). Undgå utætheder: Smør lim på undersiden af taggennemføringen (W) indenfor den hvide tapekant og sæt taggennemføringen (W) fast på taget inden for 2-5 min. undgå, at den slår bobler. Smør lim rundt om taggennemførings-folien, kom vand på din finger og glat limen ud med fingeren. s. 7 Vandtæt kabelføring: Træk ledningen gennem flexslangen (Iv) og ned gennem et lille hul, du laver i gennemføringen (W) tæt på aluflexrøret (T). Lad et lille overskud (5-10 cm) af ledningen hænge løst ved luftsolfangeren udenfor flexslangen, så vand kan dryppe af her. Påfør lim rundt om kabelgennemføringen, så det bliver vandtæt. Sæt armaflexstrimlen (Dv) rundt om aluflexrøret og kablet, og få flexslangen (Iv) til at dække kablet. Plaststripsene (Jv) skal strammes rundt om flexslangen (Iv) ca. midt på (Dv). SolarVenti 16

21 II. Further installation tips Standard Installationsvejledning Yderligere tips til installationen Installationsvejledning til regulator/afbryder, ventilationssæt og andet SolarVenti tilbehør findes i vægvejledningen, der følger med luftsolfangeren. INTRO VÆRKTØJ Optimal luftflow. Ved en utæt bygning er der ikke behov for en udsugning/ trykventil. Installer dog en ventil til luftudstrømning i en meget tæt bygning. Indblæsningen skal så vidt muligt ske i bygningens tørreste rum og udsugningen fra det fugtigste rum ellers risikerer man at presse fugten ud i resten af bygningen. Hullet: At bore et hul gennem taget kan være vanskeligt. Dertil kommer, at værktøjet, der skal bruges til at lave hullet, afhænger af tagets beskaffenhed. Få råd og vejledning hos din lokale SolarVenti installatør, hvis du er i tvivl om installationen. Sørg for, at der ikke er nogen ledninger, stikkontakter e.l., hvor boringen skal foretages. Den optimale diameter af hullet er Ø133 mm på indersiden og Ø140 mm på ydersiden. I tilfælde af, at du kun har en borekrone, kan du dog bruge Ø135 mm til både det indvendige og udvendige hul. s. 2 Mål: Alle mål angivet i denne montagevejledning gælder for SolarVenti standard modeller. Målene gælder IKKE for SolarVenti (K) kældermodeller.. Stativer: Bor først to huller i den lange aluminiumsstang (Ev3) (se samlevejledning for stativerne side 4-5) og fastgør (Ev3) på taget følg instruktioner på side 3. Saml først herefter stativerne færdig på taget. s. 3 Bølget tag (tegl, eternit o.l.): Brug trykaflastere (X2). Undgå utætheder: Sørg for at taggennemføringen (W) sidder godt fast og ikke slår bobler. Taggennemføringens øverste kant skal ligge ind under en tagplade/teglsten. Dens øvrige kanter skal altid slutte på en nedadgående tagbølge skær evt. til med en hobbykniv. Ikke-bølgede tagtyper (fx tagpap, skiffereternit o.l.): Brug afstandsholdere (X1). Undgå utætheder: Smør lim på undersiden af taggennemføringen (W) indenfor den hvide tapekant og sæt taggennemføringen (W) fast på taget inden for 2-5 min. undgår at den slår bobler. Smør lim rundt om taggennemførings-folien, kom vand på din finger og glat limen ud med fingeren. s. 7 Vandtæt kabelføring: Træk ledningen gennem flexslangen (Iv) og ned gennem et lille hul, du laver i gennemføringen (W) tæt på aluflexrøret (T). Lad et lille overskud (5-10 cm) af ledningen hænge løst ved luftsolfangeren udenfor flexslangen, så vandet kan dryppe af her. Påfør lim rundt om kabelgennemføringen, så det bliver vandtæt. Sæt armaflexstrimlen (Dv) rundt om aluflexrøret og kablet og få flexslangen (Iv) til at dække kablet. Plaststripsene (Jv) skal strammes rundt om flexslangen (Iv) ca. midt på (Dv). SolarVenti 17

22 II. Further installation tips Basement Installation manual Further Installation Tips INTRO Blow into dry room: As far as possible the air inlet must always be installed in the most dry room and the outlet in the room containing most humidity. In this way you don t risk the humid air to spread through the entire basement. K vs. Standard: All measurements in this manual are fitting to the SolarVenti (K) models. The measurements DO NOT fit to the standard SolarVenti air collectors (SV14, SV20, SV30). TOOLS The wall of the basement: It can be challenging to drill through the wall of a basement. Furthermore the tools, which are needed, depend on the consistency of the wall. E.g. you can risk loose insulation in the cavity dam, which you have to secure before drilling. Contact your local SolarVenti installer for further advices regarding the drilling and installation of a SolarVenti. The hole: Make sure that you don t drill into cables etc. The centre of the air inlet must be minimum 100 mm below the ceiling. The optimal diameter of the indoor hole is Ø133 mm and Ø140 mm for the outdoor hole. If you only have one drilling bit, you can use Ø140 mm for both the indoor and outdoor hole. Screws: We don t provide screws for mounting the air collector to the wall. p. 6, 12, 18, 20 Cable: The cable of the Solar Air Collector can either go through the hole of the air inlet as shown above or can be drilled as a separate 6-8 mm hole, which can be placed wherever you like. p. 8 Insulation: Insulation of the pipe is needed. Get the insulation in a building supply store or buy an insulation matt and aluminium cover from SolarVenti. p. 8, 14 Stands: Drill two holes in every stand and mount them to the wall with screws fitting to the construction of the wall. p. 10 Angle: Find the reference point which indicates the place of the fan on the Solar Air Collector. Mark the triangle on the wall. The gray triangle is the possible area, where the air inlet hole will be placed. The drilling can be made within this area. (If an Extra Extension Kit is used as an add on the max. length of the triangle will be 2010 mm instead of 1010 mm) If you use the whole length of the pipe G, you need to drill the hole on the bottom line. Whereas you drill a hole inside the grey field, you need to cut the pipe. SolarVenti 18
23 II. Further installation tips Basement Installation manual Further Installation Tips INTRO Blow into dry room: As far as possible the air inlet must always be installed in the most dry room and the outlet in the room containing most humidity. In this way you don t risk the humid air to spread through the entire basement. K vs. Standard: All measurements in this manual are fitting to the SolarVenti (K) models. The measurements DO NOT fit to the standard SolarVenti air collectors (SV14, SV20, SV30). TOOLS The wall of the basement: It can be challenging to drill through the wall of a basement. Furthermore the tools, which are needed, depend on the consistency of the wall. E.g. you can risk loose insulation in the cavity dam, which you have to secure before drilling. Contact your local SolarVenti installer for further advices regarding the drilling and installation of a SolarVenti. The hole: Make sure that you don t drill into cables etc. The centre of the air inlet must be minimum 100 mm below the ceiling. The optimal diameter of the indoor hole is Ø133 mm and Ø140 mm for the outdoor hole. If you only have one drilling bit, you can use Ø140 mm for both the indoor and outdoor hole. Screws: We don t provide screws for mounting the air collector to the wall. p. 6, 12, 18, 20 Cable: The cable of the Solar Air Collector can either go through the hole of the air inlet as shown above or can be drilled as a separate 6-8 mm hole, which can be placed wherever you like. p. 8 Insulation: Insulation of the pipe is needed. Get the insulation in a building supply store or buy an insulation matt and aluminium cover from SolarVenti. p. 8, 14 Stands: Drill two holes in every stand and mount them to the wall with screws fitting to the construction of the wall. p. 10 Angle: Find the reference point which indicates the place of the fan on the Solar Air Collector. Mark the triangle on the wall. The gray triangle is the possible area, where the air inlet hole will be placed. The drilling can be made within this area. (If an Extra Extension Kit is used as an add on the max. length of the triangle will be 2010 mm instead of 1010 mm) If you use the whole length of the pipe G, you need to drill the hole on the bottom line. Whereas you drill a hole inside the grey field, you need to cut the pipe. SolarVenti 19
24 SolarVenti provides a healthy indoor climate in your basement Avoid humidity Avoid stale smell Avoid mould and fungus Local dealer / installer: Produced in Denmark SolarVenti A/S Fabriksvej 8 DK Thorsø Tlf /
SolarVenti Standard (SV) Roof Installation Manual
 Roof Installation Manual") SolarVenti Standard (SV) Roof Installation Manual Dach Installationsanleitung Roof Manuel d installation Roof Manual de instalación Roof Instalační manuál Tag Installationsvejledning Roof Monteringsanvisning
SolarVenti Standard (SV) Roof Installation Manual Dach Installationsanleitung Roof Manuel d installation Roof Manual de instalación Roof Instalační manuál Tag Installationsvejledning Roof Monteringsanvisning
SolarVenti Standard (SV) Wall Installation Manual
 Wall Installation Manual") SolarVenti Standard (SV) Wall Installation Manual Wand Installationsanleitung Wall Manuel d installation Wall Manual de instalación Zed - Montážní instrukce Væg Installationsvejledning Wall Monteringsanvisning
SolarVenti Standard (SV) Wall Installation Manual Wand Installationsanleitung Wall Manuel d installation Wall Manual de instalación Zed - Montážní instrukce Væg Installationsvejledning Wall Monteringsanvisning
Basement Installation manual
 Basement Installation manual Keller Installationsanleitung Sous sol Manuel d installation Sótano Manual de instalación Suterén instalační manuál Kælder Installationsvejledning Kjeller Monteringsanvisning
frame bracket Ford & Dodge
 , Rev 3 02/19 frame bracket 8552005 Ford & Dodge ITEM PART # QTY DESCRIPTION 1 00083 8 NUT,.50NC HEX 2 00084 8 WASHER,.50 LOCK 3 14189-76 2 FRAME BRACKET 4 14194-76 1 411AL FRAME BRACKET PASSENGER SIDE
SolarVenti Standard (SV) Wall Installation Manual
 Wall Installation Manual") SolarVenti Standard (SV) Wall Installation Manual Wand Installationsanleitung Wall Manuel d installation Wall Manual de instalación Wall Instalační manuál Væg Installationsvejledning Wall Monteringsanvisning
SolarVenti Standard (SV) Wall Installation Manual Wand Installationsanleitung Wall Manuel d installation Wall Manual de instalación Wall Instalační manuál Væg Installationsvejledning Wall Monteringsanvisning
Sikkerhedsvejledning
 11-01-2018 2 Sikkerhedsvejledning VIGTIGT! Venligst læs disse instruktioner inden sengen samles og tages i brug Tjek at alle dele og komponenter er til stede som angivet i vejledningen Fjern alle beslagsdele
Montage bjælkeklipper BM 870 III Art. No / BM 875 III Art. No
 Montage bjælkeklipper BM 870 III Art. No. 112871 / BM 875 III Art. No. 112872 Assembly scythe mower BM 870 III Art. No. 112871 / BM 875 III Art. No. 112872 Motor og driv enhed. Engine and drive unit. Løsdele
DIVAR VIGTIGT! / IMPORTANT! MÅL / DIMENSIONS. The DIVAR wall lamp comes standard. with 2.4 m braided cord and a plug in power supply (EU or UK).
.") DIVAR VIGTIGT! / IMPORTANT! VIGTIGT læs vores anvisninger før du bruger produktet. Har du problemer med den elektriske installation, skal du kontakte en elektriker. Sørg for at altid slukke for strømmen
DIVAR VIGTIGT! / IMPORTANT! VIGTIGT læs vores anvisninger før du bruger produktet. Har du problemer med den elektriske installation, skal du kontakte en elektriker. Sørg for at altid slukke for strømmen
Montage bjælkeklipper BM 5001R Art. No. 112870. Assembly scythe mower BM 5001R Art. No. 112870
 Montage bjælkeklipper BM 5001R Art. No. 112870 Assembly scythe mower BM 5001R Art. No. 112870 Løsdele pose pakket, afdækninger, skaftkonsol, skaft højre og venstre. Lose parts plastic bag, covers, handle
Podia samlevejledning
 Montering af Podia. Assembly of Podia. 1 af 12 Stykliste. Podia er bygget op omkring en Multireol (9 rums) og en Amfi trappe. Dertil består den af en bundplade, to balustre, to afskærmninger, tre madrasser
Læs vejledningen godt igennem, før du begynder at samle vuggen. Please read the instruction carefully before you start.
 00 Samlevejledning på Vugge ssembly instruction for the cradle Læs vejledningen godt igennem, før du begynder at samle vuggen. Please read the instruction carefully before you start. www.oliverfurniture.dk
Brugsanvisning. Installation Manual
 Manual size: 148 x 210 mm 175g copper paper(铜版纸印刷) UNIVERSAL BIL TAGBAGAGEBÆRER Brugsanvisning UNIVERSAL CAR ROOF RACK Installation Manual Model no. 10889 Tak fordi du valgte dette produkt, som vi håber
highline med ramme with frame mit rahmen
 highline med ramme with frame mit rahmen Hvad er HighLine med ramme? HighLine med ramme er en produktserie bygget omkring det velkendte unidrain system. Udløbshuset og afløbsarmaturet er de samme produkter:
SkyVision Linear Installation manual, comfort _0216, Comfort, Item no Version 02/16
 SkyVision Linear Installation manual, comfort 5.6.07_06, Comfort, Item no. 0606 Version 0/6 Installation Manual VITRAL SkyVision Linear Comfort Trækarme skal altid opbevares tørt/ Wooden upstands must
DIVAR VIGTIGT! / IMPORTANT! MÅL / DIMENSIONS
 DIVAR VIGTIGT! / IMPORTANT! VIGTIGT læs vores anvisninger før du bruger produktet. Har du problemer med den elektriske installation, skal du kontakte en elektriker. Sørg for at altid slukke for strømmen
Læg lågen med fronten nedad på et blødt materiale for at beskytte lakken.
 Dansk Deutsch Francais - English Varenr. 51075 Udskiftning af pakning ved glas: Pakken indeholder: 1 stk. Pakning Vejledning: Aduro 4 Er pakningerne blevet hårde og utætte kan de skiftes på følgende måde:
SAMLEVEJLEDNINGER / COLLECTION GUIDES
 SAMLEVEJLEDNINGER / COLLECTION GUIDES INDHOLDSFORTEGNELSE GENERELT 1 MONTERINGSHULLER 3 ANGLE BORDBEN 5 PIN BORDBEN 9 LINK U - BEN 11 CROSS BUKKE 13 INDEX GENERAL 2 MOUNTING SPOTS 4 ANGLE TABLE LEGS 6
Samlevejledning til tremmeseng 70 x 140 Assembly instruction for cot 70 x 140
 Samlevejledning til tremmeseng 70 x 140 Assembly instruction for cot 70 x 140 Læs vejledningen godt igennem før du begynder. Read the assembly instruction carefully before you start. OLIVER FURNITURE /
DANSK INSTALLATIONSVEJLEDNING VLMT500 ADVARSEL!
 DANSK INSTALLATIONSVEJLEDNING VLMT500 Udpakningsinstruktioner Åben indpakningen forsigtigt og læg indholdet på et stykke pap eller en anden beskyttende overflade for at undgå beskadigelse. Kontroller at
Fuego. Biopejs / Bio firelight / Bio Feuerstelle. Instruktion / Instructions / Instruktionen
 Fuego Biopejs / Bio firelight / Bio Feuerstelle Instruktion / Instructions / Instruktionen Må kun fyldes hertil / Fill up to here only / Nur hier befüllen DK DK Læs hele instruktionen igennem inden brug
INSTALLATION INSTRUCTIONS STILLEN FRONT BRAKE COOLING DUCTS NISSAN 370Z P/N /308960!
 Materials supplied: 1. (10) Zip Ties 2. (4) Hose Clamps 3. (2) Brake Duct Hose 4. (2) Brake Shields 5. (2) Front Brake Ducts ( Stock Fascia Only ) 6. (2) Washers 1 OD ( Stock Fascia Only ) 7. (8) Shims
SkyVision Comfort Installation manual _0517, Comfort, Item no Version 05/17
 SkyVision Comfort Installation manual 5.6.02_0517, Comfort, Item no. 2022 Version 05/17 Installation Manual VITRAL SkyVision Comfort Trækarme skal altid opbevares tørt/ Wooden upstands must always be kept
Power Supply 24V 2.1A
 Power Supply 24V 2.1A Strømforsyning 24 V 2,1 A Power Supply 24V 2.1A Stromversorgung 24 V 2,1 A Teknisk brugervejledning Technical User Guide Technische Bedienungsanleitung 2015.04.21 604159 Technical
DANSK / ENGLISH DS PRO PROJEKTORBESLAG 180 CM MANUAL DS PRO PROJECTOR BRACKET 180 CM OWNERS MANUAL
 DANSK / ENGLISH DANSK SIDE 1 DS Pro PRO projektorbeslag PROJEKTORBESLAG 180 cm 180 CM Tillykke med dit nye DS Pro projektorbeslag 180 cm. For at opnå det bedste resultat bedes du læse denne manual og udelukkende
MAKING MODERN LIVING POSSIBLE. Danfoss Air PC Tool. Installation guide. Danfoss Heating Solutions
 MAKING MODERN LIVING POSSIBLE Danfoss Air Tool Installation guide Danfoss Heating Solutions 1. How to connect your to the Installer: Connection by USB cable (standard mini USB cable) USB cable End user:
Brug sømbrættet til at lave sjove figurer. Lav fx: Få de andre til at gætte, hvad du har lavet. Use the nail board to make funny shapes.
 Brug sømbrættet til at lave sjove figurer. Lav f: Et dannebrogsflag Et hus med tag, vinduer og dør En fugl En bil En blomst Få de andre til at gætte, hvad du har lavet. Use the nail board to make funn
FlexiManual Corner. Montagevejledning, Mounting Instructions, Montageanleitung, Tillæg til FlexiManual Manual. Supplement to FlexiManual User Manual
 FlexiManual Corner Montagevejledning, Mounting Instructions, Montageanleitung, Tillæg til FlexiManual Manual Supplement to FlexiManual User Manual Nachtrag zum FlexiManual Benutzerhandbuch PDF 5999 / 01.07.2019
- The knowledge to make a difference
 - The knowledge to make a difference TILLYKKE MED DIT NYE AKVARIUM Denne vejledning vil hjælpe dig let gennem opstilling og samling af dit nye MOVE akvarium. Vi anbefaler du læser vejledningen grundigt
DK - Vejledning ENG - Instruction manual x 532 mm 758 x 532 mm
 DK - Vejledning ENG - Instruction manual 1158 x 532 mm 758 x 532 mm DK - Læs monteringsanvisningen nøje igennem før montage/anvendelse. Kontrollere at alle dele er i pakken før montering. Kontakt forhandler
Montageanvisning Assembly instructions. MultiDicer KMD 12, 18
 Montageanvisning instructions MultiDicer KMD 12, 18 2 DK Kongskilde MultiDicer KMD 12 og KMD 18 samles som vist på efterfølgende tegninger. 1. Tegning 121117963 Kongskilde MultiDicer leveres fra fabrikken
Monteringsvejledning / Mounting instructions. Chameleon betræk / Chameleon cover system
 Monteringsvejledning / Mounting instructions Chameleon betræk / Chameleon cover system Monteringsvejledning / Mounting instructions Bred presenningsbunden ud på gulvet. 1. Place the bottom of the tarpaulin
Assembly Guide Monteringsvejledning. 60/30 - wood end panels
 Assembly Guide Monteringsvejledning 60/30 - wood end panels Wood end panels 1. When installing wood end panels, insert the top fittings into the upper crossbar slots and place the Z brackets over the foot
VEDLIGEHOLDELSE AF SENGE
 DK VEDLIGEHOLDELSE AF SENGE VEDLIGEHOLDELSE AF SENGE Sengen er typisk det møbel i hjemmet som bruges i flest timer gennem døgnet. Det betyder at sengen udsættes for et stort slid, og det er derfor vigtigt
Ventilation. Du skal selv være med til at holde din lejlighed sund You are responsible too: keep your apartment healthy
 Ventilation Du skal selv være med til at holde din lejlighed sund You are responsible too: keep your apartment healthy Ventilation Ventilation Din lejlighed er renoveret, for at du skal have et sundt indeklima.
ALLROUND 360 ONE 360 ONE SOFT SQUARY BLOCKY OWI TUBO EASY B75 EASY B100
 ALLROUND 360 ONE 360 ONE SOFT SQUARY BLOCKY OWI TUBO EASY B75 EASY B100 Since the dawn of time, man has depended on the existence of light. The sun forced darkness to retreat into the shadows and made
Monteringsvejledning (DK) Montering af centralbremse på Panther. Mounting instruction (GB) Mounting central braking system on the Panther
 Montering af centralbremse på Panther. Mounting instruction (GB) Mounting central braking system on the Panther") Monteringsvejledning (K) Montering af centralbremse på Panther Mounting instruction (G) Mounting central braking system on the Panther Montageanleitung () Montage der Zentralbremsessystem für den Panther
Monteringsvejledning (K) Montering af centralbremse på Panther Mounting instruction (G) Mounting central braking system on the Panther Montageanleitung () Montage der Zentralbremsessystem für den Panther
Manual Transmission Remove and Install (2,0 DOHC 8V Engine) ( ) Remove
 ( ) Remove") Manual Transmission Remove and Install (,0 DOHC 8V Engine) (6 4 0) Workshop Equipment Transmission jack Materials Brake fluid (Super Dot 4) ESD-M6C57-A Remove. Standard preparatory measures: Make a note
Manual Transmission Remove and Install (,0 DOHC 8V Engine) (6 4 0) Workshop Equipment Transmission jack Materials Brake fluid (Super Dot 4) ESD-M6C57-A Remove. Standard preparatory measures: Make a note
ROTERENDE TABURET 360 GRADER MED HYL Brugsanvisning. ROTATING SHOWER STOOL WITH TRAY Installation Manual. Size: 148 x 210 mm 105g copper paper
 Size: 148 x 210 mm 105g copper paper ROTERENDE TABURET 360 GRADER MED HYL Brugsanvisning ROTATING SHOWER STOOL WITH TRAY Installation Manual Model. 10853 1. Fjern emballagen. 2. Taburettens ben samles
E-PAD Bluetooth hængelås E-PAD Bluetooth padlock E-PAD Bluetooth Vorhängeschloss
 E-PAD Bluetooth hængelås E-PAD Bluetooth padlock E-PAD Bluetooth Vorhängeschloss Brugervejledning (side 2-6) Userguide (page 7-11) Bedienungsanleitung 1 - Hvordan forbinder du din E-PAD hængelås med din
Brugervejledning / User manual
 Brugervejledning / User manual No. 8700032 Airtracks til hjemmetræning og sport AirTracks for home and sport 2 Indholdsfortegnelse / Index Anbefalinger til brug af airtracks... 4 Sådan pumpes airtracken
Assembly Instructions. ROLZ-2 Portable AV/Conference Center
 1 Assembly Instructions ROLZ-2 Portable AV/Conference Center Rolz-2 Portable AV/Conference Center Part Drawing Description Qty Part Drawing Description Qty Hardware List A 1 ½ Flat Head Screw 2 EA P-1
DK - Quick Text Translation. HEYYER Net Promoter System Magento extension
 DK - Quick Text Translation HEYYER Net Promoter System Magento extension Version 1.0 15-11-2013 HEYYER / Email Templates Invitation Email Template Invitation Email English Dansk Title Invitation Email
TGP 15 H. Betjeningsvejledning. Texas Power Line Pumper 2003 / 2
 2003 / 2 Betjeningsvejledning Texas Power Line Pumper TGP 15 H Texas Andreas Petersen A/S Knullen 2 DK-5260 Odense S Tlf. 6395 5555 Fax 6395 5558 post@texas.dk - www.texas.dk ADVARSEL - Læs altid betjeningsvejledningen
frame bracket Dodge Ram x2 & 4x4 (Includes Mega Cab) (6-1/2 & 8 Boxes)
 (6-1/2 & 8 Boxes)") , Rev 4 03/19 frame bracket 8551006 Dodge Ram 3500 4x2 & 4x4 (Includes Mega Cab) (6-1/2 & 8 Boxes) ITEM PART # QTY DESCRIPTION 1 00248 4 WASHER,.625 SPRING LOCK 2 00291 4 NUT,.625NC HEX 3 00477 4 WASHER,.625
, Rev 4 03/19 frame bracket 8551006 Dodge Ram 3500 4x2 & 4x4 (Includes Mega Cab) (6-1/2 & 8 Boxes) ITEM PART # QTY DESCRIPTION 1 00248 4 WASHER,.625 SPRING LOCK 2 00291 4 NUT,.625NC HEX 3 00477 4 WASHER,.625
Mit den Steinen vorsichtig umgehen, da vor allem die Ecken und Kanten der Specksteine sehr spröde sind.
 15.09.2011 Montageanleitung zum Einbau der Speck und Speichersteine in Scan-line 820, 830 und 80. Heta empfiehlt, die Montage des Ofens von zwei Personen vorzunehmen. Mit den Steinen vorsichtig umgehen,
Boligsøgning / Search for accommodation!
 Boligsøgning / Search for accommodation! For at guide dig frem til den rigtige vejledning, skal du lige svare på et par spørgsmål: To make sure you are using the correct guide for applying you must answer
DAY HUNTER KIT ASSEMBLY INSTRUCTIONS
 DAY HUNTER KIT ASSEMBLY INSTRUCTIONS Attach the Shoulder Harness to the Frame 1. Pass the Upper Harness Attachment Straps (Diagram 1.) through the attachment points located inboard on the upper portion
Vores mange brugere på musskema.dk er rigtig gode til at komme med kvalificerede ønsker og behov.
 På dansk/in Danish: Aarhus d. 10. januar 2013/ the 10 th of January 2013 Kære alle Chefer i MUS-regi! Vores mange brugere på musskema.dk er rigtig gode til at komme med kvalificerede ønsker og behov. Og
Hjælpeværktøj for reparation af 300, 500 og 700 blæserne samt celleføderne CA 30 og 40
 Auxiliary tools Hjælpeværktøj for reparation af 300, 500 og 700 blæserne samt celleføderne CA 30 og 40 Auxiliary tools for repair of the 300, 500 and 700 blowers as well as the rotary valves CA 30 and
Hudevad P200. Technical datasheet
 Technical datasheet Key benefits Low, streamlined design Ideal in front of glazing to prevent cold draughts Available in two depths For high flexibility in usage Historical Kundenedfald Grøn energi Flat
Trin 1 Opstart af montage. Udsparingsmål kontrolleres. Mål på udsparinger udføres iht. nedenstående tabel.
 FutureVent Mounting instruction Ventilation row (WFV), Insolation box (WFB), Regenerator (WFR), Control unit (WFC), Drip edge (WFD), Outdoor screen (WFS), Mounting frame (WFF) & Indoor grill (WFG) DK Montagevejledning
Slot diffusers. Slot diffusers LD-17, LD-18
 LD-17, LD-18 Application LD-17 and LD-18 are designed for supply of cold or warm air in rooms with a height between. m and 4 m. They allow easy setting of air deflectors for different modes of operation
TELT. Oversigt over dele. Følg opstillingsanvisningerne for at opnå det bedste resultat.
 TELT Følg opstillingsanvisningerne for at opnå det bedste resultat. Opstillingstid: ca. 25 min. Krævet antal personer til opstilling: 2 Oversigt over dele Kabine Pløkker (18 stk.) Yderdug Bæretaske Ekstra
DET KONGELIGE BIBLIOTEK NATIONALBIBLIOTEK OG KØBENHAVNS UNIVERSITETS- BIBLIOTEK. Index
 DET KONGELIGE Index Download driver... 2 Find the Windows 7 version.... 2 Download the Windows Vista driver.... 4 Extract driver... 5 Windows Vista installation of a printer.... 7 Side 1 af 12 DET KONGELIGE
Frame System Part Numbers
 52 FRAMES Frame System Part Numbers Square Corner Part Numbers Round Corner Part Numbers White Black Almond Gray Brown Navy Taupe Black Almond Gray Brown Sizes Insert (not included) 2 x 4 1 59 / 64 x 3
 Instructions for use www.nilfisk-advance.com 1 2 3 PRECAUTIONARY MEASURES If the opening that sucks in the air, thesuction pipe orthe telescopic wand on pipe are blocked, you should switch off the vacuum
Portal Registration. Check Junk Mail for activation . 1 Click the hyperlink to take you back to the portal to confirm your registration
 Portal Registration Step 1 Provide the necessary information to create your user. Note: First Name, Last Name and Email have to match exactly to your profile in the Membership system. Step 2 Click on the
how to save excel as pdf
 1 how to save excel as pdf This guide will show you how to save your Excel workbook as PDF files. Before you do so, you may want to copy several sheets from several documents into one document. To do so,
The complete construction for copying a segment, AB, is shown above. Describe each stage of the process.
 A a compass, a straightedge, a ruler, patty paper B C A Stage 1 Stage 2 B C D Stage 3 The complete construction for copying a segment, AB, is shown above. Describe each stage of the process. Use a ruler
MS-H280-Pro Magnetic Stirrer
 MS-H280-Pro Magnetic Stirrer www..com Copyright: No part of this manual may be reproduced or transmitted without prior written permission of. VERSION201407 CONTENTS Chapter 1: Working Principle... 3 1
Hahn KT-EV / KT-EN For entrance and side entrance doors
 Hahn KT-EV / KT-EN For entrance and side entrance doors n For all common upstand dimensions from 5 to mm Hahn KT-EN Universal hinge with upstand fastening for entrance and side entrance doors Properties
Project Step 7. Behavioral modeling of a dual ported register set. 1/8/ L11 Project Step 5 Copyright Joanne DeGroat, ECE, OSU 1
 Project Step 7 Behavioral modeling of a dual ported register set. Copyright 2006 - Joanne DeGroat, ECE, OSU 1 The register set Register set specifications 16 dual ported registers each with 16- bit words
Diamond Core Drilling
 Diamond Core Drill ZIZ-250Pro Product Description Diamond core drill is a tool used for drilling holes on reinforced concrete, rocks and fire-proof materials. It features in high-efficiency, smooth and
Læs venligst Beboer information om projekt vandskade - sikring i 2015/2016
 Læs venligst Beboer information om projekt vandskade - sikring i 2015/2016 Vi er nødsaget til at få adgang til din lejlighed!! Hvis Kridahl (VVS firma) har bedt om adgang til din/jeres lejlighed og nøgler,
Hahn KT-EV / KT-EN. For front and side entry doors. n For all common upstand dimensions from 15 to 23 mm
 Hahn KT-EV / KT-EN For front and side entry doors n For all common upstand dimensions from 15 to 3 mm Hahn KT-EN Universal hinge with upstand fastening option for front and side entry doors Features n
Daglig huskeliste Daily checklist
 Daglig huskeliste Daily checklist Quick release er spændt Nakkestøtte korrekt højde Fodskåle korrekt højde Fodremme spændt Tjek jævnligt bolte og skruer for efterspænding Quick release locked Headrest
Info og krav til grupper med motorkøjetøjer
 Info og krav til grupper med motorkøjetøjer (English version, see page 4) GENERELT - FOR ALLE TYPER KØRETØJER ØJER GODT MILJØ FOR ALLE Vi ønsker at paraden er en god oplevelse for alle deltagere og tilskuere,
Daglig huskeliste Daily checklist
 Daglig huskeliste Daily checklist Quick release er spændt Nakkestøtte korrekt højde Selen er spændt og justeret korrekt Fodskåle korrekt højde Fodremme spændt Tjek jævnligt bolte og skruer for efterspænding
MMS Multi Media Storage
 MMS Multi Media Storage 02 MMS Multi Media Storage: MMS Introduction/ Indledning 03-03 MMS Storage and function / Opbevaring og funktion 04-04 MMS in white lacquer / MMS i hvid lak 05-09 MMS in black lacquer
Varenr.: 553925 90 højre 553926 90 venstre 554027 90º højre med coating 554028 90º venstre med coating
 DK GH Skiftespor Varenr.: 55395 90 højre 55396 90 venstre 55407 90º højre med coating 55408 90º venstre med coating 553991 60º højre 553995 60º venstre 551058 60º højre med coating 551059 60º venstre med
TM4 Central Station. User Manual / brugervejledning K2070-EU. Tel Fax
 TM4 Central Station User Manual / brugervejledning K2070-EU STT Condigi A/S Niels Bohrs Vej 42, Stilling 8660 Skanderborg Denmark Tel. +45 87 93 50 00 Fax. +45 87 93 50 10 info@sttcondigi.com www.sttcondigi.com
DK Tillykke med deres nye høj glans møbel. Det møbel som De netop har købt, er et møbel hvor overfladen er høj glans. Alt som placeres på dette møbel
 DK Tillykke med deres nye høj glans møbel. Det møbel som De netop har købt, er et møbel hvor overfladen er høj glans. Alt som placeres på dette møbel skal være beskyttet under bunden med filt eller lign.
Montering af læsseudstyr Mounting of Loading Equipment. SupraVac 2000
 Montering af læsseudstyr Mounting of Loading Equipment SupraVac 2000 DK Montering af læsseudstyr på SupraVac 2000 Det er vigtigt, at læsseudstyret monteres og justeres som angivet nedenfor. Forkert justering
The art of heating. Hudevad Plan XV. Installation guide Monteringsvejledning Montageanleitung. EN ini.3s /0
 The art of heating Hudevad Plan XV Installation guide Monteringsvejledning Montageanleitung 1 Languages Sprog Sprache EN... 4 DK... 6 DE... 8 Tools Værktøj Werkzeug Tools needed for installation Nødvendigt
storage with plenty of scope 79400/06 Reolsystem/Wall system/regalsystem
 create and combine 79400/06 Reolsystem/Wall system/regalsystem Med Bocca har formålet været at skabe en fleksibel opbevaringsserie. Bocca er møbler i et moderne design med metalgreb og mulighed for flotte
User Manual for LTC IGNOU
 User Manual for LTC IGNOU 1 LTC (Leave Travel Concession) Navigation: Portal Launch HCM Application Self Service LTC Self Service 1. LTC Advance/Intimation Navigation: Launch HCM Application Self Service
SYSTEM CADO Design by Poul Cadovius, 1960
 SYSTEM CADO Design by Poul Cadovius, 1960 Montagevejledning (DK) ASSEMBLY INSTRUCTION (ENG) Montagevejledning SYSTEM CADO (DK) SYSTEM CADO kan monteres på mange forskellige vægoverflader. Hvis reolen skal
Trolling Master Bornholm 2016 Nyhedsbrev nr. 5
 Trolling Master Bornholm 2016 Nyhedsbrev nr. 5 English version further down Kim Finne med 11 kg laks Laksen blev fanget i denne uge øst for Bornholm ud for Nexø. Et andet eksempel er her to laks taget
Håndbog til kælderen. Privat. Vælg den passende SolarVenti kælderløsning
 Privat Vælg den passende SolarVenti kælderløsning Vers. 12/06/2014 Indhold: Generel information om SolarVenti kælderaffugtning Affugtning af kælderen.3 SolarVenti kældermodellerne..3 SolarVenti kældersæt...3
16748-1. A x 1 B x 2. C1 x 1 C3 x 1. E1 x 2. E2 x 4. D1 x 1. D2 x 1 F x 1 H2 X 90 II X 4 I2 X 12. H1 X 8 50 x 50. G x 14. C2 x 1.
 16748-1 AKKU xxv A x 1 B x 2 C2 x 1 C1 x 1 C3 x 1 E1 x 2 D1 x 1 E2 x 4 D2 x 1 F x 1 Senest revideret: Letzte Änderung: 10-2014 G x 14 Ø4 x 80 X 8 50 x 50 H2 X 90 II X 4 I2 X 12 Ø4 x 40 Ø125 Ø8 x 80 Læs
ENGLISH/DANSK OWNERS MANUAL VLMC1800. Projector bracket 180 cm
 ENGLISH/DANSK OWNERS MANUAL VLMC1800 Projector bracket 180 cm ENGLISH PAGE 1 WARNING Please be sure to read this owner s manual and use your product only in accordance with the instructions. During installation
DANSK. INSTALLATIONSVEJLEDNING DS Pro Lærred med motor ADVARSEL!
 DANSK INSTALLATIONSVEJLEDNING DS Pro Lærred med motor Udpakningsinstruktioner Åben indpakningen forsigtigt og læg indholdet på et stykke pap eller en anden beskyttende overflade for at undgå beskadigelse.
SB ShooeBox. SB Introduction / Indledning 03-03 SB Inspiration combinations/inspirationsopstillinger 04-06 SB Functionality/Funktion 07-07
 ShooeBox 02 SB ShooeBox SB Introduction / Indledning 03-03 SB Inspiration combinations/inspirationsopstillinger 04-06 SB Functionality/Funktion 07-07 Introduction Shooebox is a Danish design, designed
FUTURA. H x 6. Minst två personer krävs för att sätta upp det här staketet. Det skal være minst to personer ved montering av dette gjerdet.
 FUTURA Der skal være min. 2 personer til opstilling af dette hegn. Minimum two people are needed to set up this fence. Es werden mindestens 2 Personen für das Aufstellen dieses Zauns benötigt. Compter
Trolling Master Bornholm 2014
 Trolling Master Bornholm 2014 (English version further down) Den ny havn i Tejn Havn Bornholms Regionskommune er gået i gang med at udvide Tejn Havn, og det er med til at gøre det muligt, at vi kan være
Bredgaard Bådeværft ApS
 Bredgaard Bådeværft ApS Velkommen til BREDGAARD BÅDEVÆRFT APS - et af Danmarks førende bådværfter indenfor glasfiberfartøjer. Vi tilbyder et bredt sortiment af glasfiberbåde - lige fra erhvervsfiskefartøjer
Timetable will be aviable after sep. 5. when the sing up ends. Provicius timetable on the next sites.
 English Information about the race. Practise Friday oct. 9 from 12.00 to 23.00 Saturday oct. 10. door open at 8.00 to breakfast/coffee Both days it will be possible to buy food and drinks in the racecenter.
Vejledning til Sundhedsprocenten og Sundhedstjek
 English version below Vejledning til Sundhedsprocenten og Sundhedstjek Udfyld Sundhedsprocenten Sæt mål og lav en handlingsplan Book tid til Sundhedstjek Log ind på www.falckhealthcare.dk/novo Har du problemer
FlexiElectric Corner. Montagevejledning, Mounting Instructions, Montageanleitung, Tillæg til FlexiElectric Manual
 FlexiElectric Corner Montagevejledning, Mounting Instructions, Montageanleitung, Tillæg til FlexiElectric Manual Supplement to FlexiElectric User Manual Nachtrag zum FlexiElectric Benutzerhandbuch PDF
Fejemaskine med integreret opsamler Sweeper with integrated collector box MS 920
 DK GB Betjeningsvejledning User manual Fejemaskine med integreret opsamler Sweeper with integrated collector box MS 920 Texas A/S - Knullen 22 - DK-5260 Odense S - Denmark Version 14.1 Tel. +45 6395 5555
Monteringsvejledning (DK) Montering af bord, armlæn til bord og legetøjsbøjle. Monteringsanvisning (SV) Montering av bord
 Montering af bord, armlæn til bord og legetøjsbøjle. Monteringsanvisning (SV) Montering av bord") Monteringsvejledning (K) Montering af bord, armlæn til bord og legetøjsbøjle Monteringsanvisning (SV) Montering av bord Monteringsveiledning (N) Montering av bord, armlener til bord og leketøysbøyle Mounting
Monteringsvejledning (K) Montering af bord, armlæn til bord og legetøjsbøjle Monteringsanvisning (SV) Montering av bord Monteringsveiledning (N) Montering av bord, armlener til bord og leketøysbøyle Mounting
DEUTSCH. Electric
 DEUTSCH D Electric 8-00-0 S SVENSKA 5 8 6 9 5 5.. SVENSKA S = 0 mm = 0 mm = 0 mm = 50 mm 0 mm 60 mm A C B.. 5.. 6. S SVENSKA 8. 9. INFORMATION OM STRØMFORBRUG Flere og flere maskiner, som f.eks. plæneklippere,
Aktivering af Survey funktionalitet
 Surveys i REDCap REDCap gør det muligt at eksponere ét eller flere instrumenter som et survey (spørgeskema) som derefter kan udfyldes direkte af patienten eller forsøgspersonen over internettet. Dette
DOL 15 SENSOR. DA Teknisk brugervejledning. EN Technical user s guide. DE Technisches Bedienungsanleitung.
 DOL 15 SENSOR DA Teknisk brugervejledning EN Technical user s guide DE Technisches Bedienungsanleitung www.dol-sensors.com DA TEKNISK BRUGERVEJLEDNING 1 Produktbeskrivelse DOL 15 er en universel fuldelektronisk
Trolling Master Bornholm 2016 Nyhedsbrev nr. 7
 Trolling Master Bornholm 2016 Nyhedsbrev nr. 7 English version further down Så var det omsider fiskevejr En af dem, der kom på vandet i en af hullerne, mellem den hårde vestenvind var Lejf K. Pedersen,
Wallstickers Wandsticker
 Wallstickers Wandsticker Færdige motiver eller design selv Dette er et lille udvalg af vore mest solgte Wallstickers. Men vi har mange flere motiver og forslag i vores online katalog. Alle Wallstickers
Asbestos and present working conditions in Construction. Lars Vedsmand, former TU adviser Asbestos Specialist Safety Coordinator COWI
 Asbestos and present working conditions in Construction Lars Vedsmand, former TU adviser Asbestos Specialist Safety Coordinator COWI Experiences from present real Denmark has for 40 years been in front
Shooting tethered med Canon EOS-D i Capture One Pro. Shooting tethered i Capture One Pro 6.4 & 7.0 på MAC OS-X 10.7.5 & 10.8
 Shooting tethered med Canon EOS-D i Capture One Pro Shooting tethered i Capture One Pro 6.4 & 7.0 på MAC OS-X 10.7.5 & 10.8 For Canon EOS-D ejere der fotograferer Shooting tethered med EOS-Utility eller
Privat-, statslig- eller regional institution m.v. Andet Added Bekaempelsesudfoerende: string No Label: Bekæmpelsesudførende
 Changes for Rottedatabasen Web Service The coming version of Rottedatabasen Web Service will have several changes some of them breaking for the exposed methods. These changes and the business logic behind
Dendrokronologisk Laboratorium
 Dendrokronologisk Laboratorium NNU rapport 14, 2001 ROAGER KIRKE, TØNDER AMT Nationalmuseet og Den Antikvariske Samling i Ribe. Undersøgt af Orla Hylleberg Eriksen. NNU j.nr. A5712 Foto: P. Kristiansen,